User Guide
Highlights & Quickstart
GenomeSpace bridges the gaps between GenomeSpace-enabled bioinformatics tools, making it possible for you to move data smoothly between these tools, leveraging the available analyses and visualizations in each resource. GenomeSpace allows you to store your data files in the cloud and provides necessary file format transformations whenever you select an analysis or visualization within one of the tools.
-
Tools are applications that allow users to either perform analyses on or visualize data. You can send files to these applications from GenomeSpace and save files from those applications to GenomeSpace.
-
Data sources are repositories of data files that are linked to GenomeSpace. Those with access to the data can use GenomeSpace as a conduit to further analyze the provided data. Data sources may additionally provide analysis tools within their site for analysis of their data but not of outside data. Data sources are also listed under the Tools menu and are referred to grouped as tools.
-
Recipes are step-by-step instructions of two types: (1) they outline how to perform tasks in GenomeSpace such as loading or moving data, and (2) show how to perform specific integrative bioinformatic data analyses using GenomeSpace tools.
Highlights of GenomeSpace functionality are outlined below with related links. Details follow in this User Guide.
-
A conduit for multi-tool bioinformatic analyses
-
A file management hub
-
30 GB personal storage included with account
-
Access files stored in Dropbox, Amazon S3, or Google Drive from any GenomeSpace-enabled tool.
-
An environment facilitating collaborative research
-
intuitive file sharing to individuals, groups, and the public
-
share private tools with groups
-
A data access resource
-
explore and access data provided by data sources listed under the Tools menu
-
access data via mounted Amazon S3 bucket, such as from the public 1000 Genomes Project and the Human Microbiome Project.
-
import data via URL from public servers such as the Gene Expression Omnibus (GEO)
-
test example analysis workflows using data under Public/SharedData/Demos
GenomeSpace also includes the ability to link your GenomeSpace login to user accounts in tools allowing easy single sign-on access. Learn how to link accounts in the Tool Guide. For more on the concepts and team behind GenomeSpace see What Is GenomeSpace? and check out our Presentations and Videos. Tool and data portal developers interested in GenomeSpace-enabling their projects should see Resources for Developers. For troubleshooting questions, see the FAQ. For additional questions and to provide feedback, please post to the forum or contact gs-help@broadinstitute.org.
For questions about specific tools we refer you to the help available at the tool websites, the Biostars forum, and the SeqAnswers forum.
Quickstart to the User Interface
Here we outline the main elements of the user interface to help you get started. More detailed instructions follow within this User Guide.
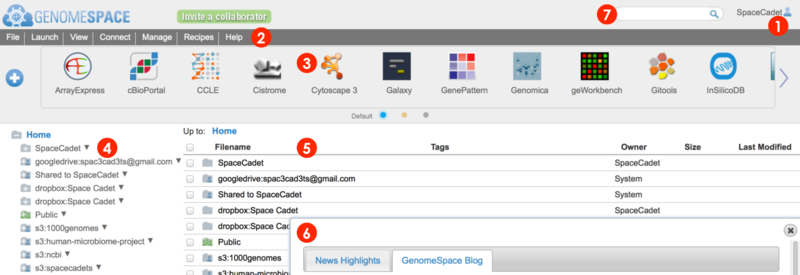
When you log in to your GenomeSpace account, you will be redirected from the home page to the user interface shown below (Screenshot 2015.02.06)
-
User account profile, history, and logout
-
Menu bar for management, analysis, and information. Many functions are also accessible by alternate methods, i.e. by right-click menu.
-
File and View menu to manage files and folders
-
Connect menu to link Dropbox, Amazon S3, and Google Drive accounts for access from your GenomeSpace account
-
Launch menu to open a specific tool, either by going to the tool's website or by opening the desktop application using Java
-
Manage menu to add and edit your groups and private tools
-
Recipes menu to view GenomeSpace recipes in a new browser tab
-
Help menu to view the User Guide and other helpful information
-
Tool bar for launching GenomeSpace tools and data sources.
-
Wide arrows
 at edges of toolbar scroll to next set of tools
-
Hover mouse over tool icon and click small downward triangle
 that appears to access menu of specific tool functions and information
-
Click directly on a tool icon to launch the tool
-
Click blue plus button
 to open the tool catalog to customize the toolbar
-
Click small selector buttons at bottom of toolbar
 to display your customized alternate toolbars
-
Left directories panel gives an overview of directories and lists your GenomeSpace user folder, Shared to folder containing items from other users, and the Public folder containing items shared to all users.
-
This window also displays any connected storage such as Dropbox & Google Drive and mounted Amazon S3 buckets.
-
Click on a folder to expand.
-
To indicate an item is shared, folder and file icons display people icons. Sharing to select users displays one
 , while public sharing displays three
  .
.
-
Access action options for folders from the File menu or from the pop-up menu called by right-clicking on a folder.
-
The main files area lists files and folders within a selected folder.
-
Clickable file path breadcrumb at top for easy navigation.
-
Refresh the browser window to update file listings when returning to GenomeSpace from tools.
-
Access action options for files and folders from the File menu or from the pop-up menu called by right-clicking on an item.
-
When you log in, dialog boxes and other elements occasionally appear.
-
Your feedback in the survey box helps improve and maintain funding for GenomeSpace
-
A What's New box highlighting news and updates to the system via blog are posted as we make changes
-
New tools in the tool catalog are marked by a red circled number next to the tool catalog button
-
A search field that matches file, directory, and tool names, descriptions, and tags.
-
Results for files and tools are listed separately with file hits displayed first. Click on Tools (#) at top of area to switch display results.
-
Searching is insensitive to case and matches strings within words
Quickstart an analysis
First, make files available to GenomeSpace with one of the following methods.
-
drag-drop data files from your desktop into your user folder in the browser
-
import files by URL from the menu File>Import from URL
-
send files from a GenomeSpace-enabled tool to your GenomeSpace account
-
mount Dropbox, Amazon S3, or Google Drive files using Connect from the menu bar
When you launch a tool on a file, file formats are converted automatically. Additionally convert the format of a selected file using File menu>Convert.
Launch a tool to analyze files using one of the following methods.
-
drag-drop the file(s) onto a tool in the toolbar
-
select the file(s) and go to menu Launch and select a specific tool
-
select file(s) then click on the tool in the toolbar
-
select file(s) then click on the files and select a tool from the pop-up menu
Overview of User Guide
This User Guide incorporates information up to the January 2015 blog posts and details GenomeSpace functionality. Sections are organized as reflected in the left navigation menu and the outline below. For instructions on accessing GenomeSpace functionality for a specific tool, see the Tool Guide. Please read the Highlights & Quickstart section for an introduction before reading the detailed User Guide.
The User Guide provides descriptions of GenomeSpace functionality in a two-pronged manner: (i) a visually-oriented approach in User Interface and subsections and (ii) a task-centric approach in the remainder of the guide. Thus, some instructions are repeated on these pages although they may be presented differently. As we make improvements to the site, accompanying screenshots in our guides inevitably become snapshots of past versions of GenomeSpace and may not correspond exactly to what you see in your current instance of GenomeSpace. However, these minor differences should not detract from the instructions and the overarching functionalities provided by GenomeSpace.
If you need additional clarification, please post to the forum or let us know at gs-help@broadinstitute.org. We are a small team and rely on your feedback for improvement.
|
|
instructions last updated |
screenshots last updated |
-
Highlights and Quickstart
|
|
|
-
Registering and Login
|
|
|
-
User interface in detail
-
Customizing the user interface, the tool catalog, and tool tags
|
-
January 2015
-
January 2015
|
-
January 2015
-
January 2015
|
-
Connect Dropbox and Google Drive Storage
|
-
January 2015
-
January 2015
|
|
-
Manage files and folders
-
Share data
-
Preview & Heatmap
-
Tag & Search
|
-
January 2015
-
January 2015
-
January 2015
-
January 2015
|
-
January 2015
-
February 2015
-
January 2015
-
January 2015
|
-
Manage groups and tools
|
|
|
-
Run an analysis
-
Convert file formats
-
Extract file rows and columns
-
Export external site files to GenomeSpace
-
Recipe demo datasets
-
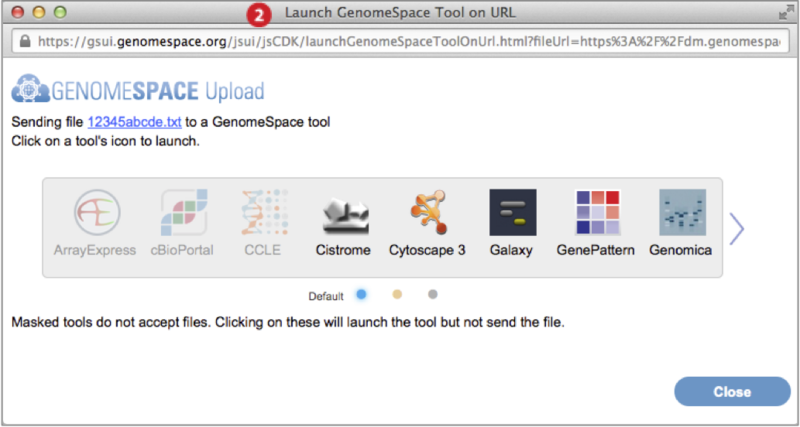
WDK launch on file or URL
|
-
February 2015
-
February 2015
-
February 2015
-
February 2015
-
February 2015
-
February 2015
|
-
February 2015
-
February 2015
-
February 2015
-
February 2015
-
February 2015
-
February 2015
|
Registering & Login
Registering is simple
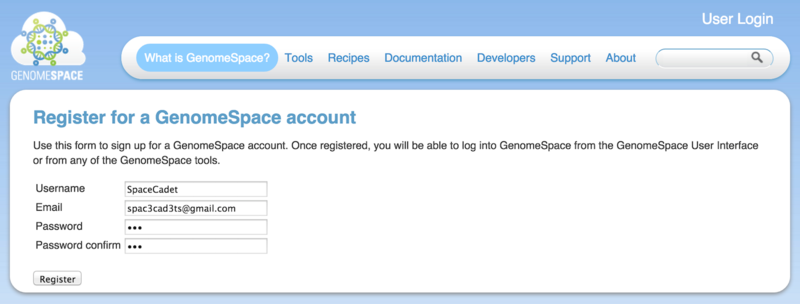
Click the Register button on www.GenomeSpace.org or go to the registration page directly (Screenshot 2015.1.15).
-
Choose a username and provide your email address.
-
Choose a password and confirm.
-
Click Register.
-
Follow instructions sent to your email to complete the registration. Email links are valid for 24 hours.
Log in to GenomeSpace and linked tools using one ID
Log in using your username and password on www.GenomeSpace.org or on gsui.GenomeSpace.org. Once logged in, first time users will see a welcome dialog with a tip to get started.
-
Use the Forgot your password? link to retrieve your password using either your username or email. GenomeSpace sends a temporary password to your email.
GenomeSpace login uses OpenID which allows use of your GenomeSpace username and password to log in to GenomeSpace-linked tools. For many tools this requires linking the accounts beforehand as outlined for specific tools in the Tool Guide. These tools will recognize your GenomeSpace username once you are already logged in to GenomeSpace. If you start from a specific tool website before logging in to GenomeSpace, you will need to enter your GenomeSpace credentials at the tool website to access GenomeSpace functionality for the tool.
-
It is possible to log in to a tool website without GenomeSpace credentials, using your tool-specific login information. In this case, GenomeSpace functionality for the tool is inactive. To avoid this, be sure to look for the OpenID Login field for a tool and select GenomeSpace authentication.
-
Not all tools use OpenID. Some tools require independent account verification.
User Interface
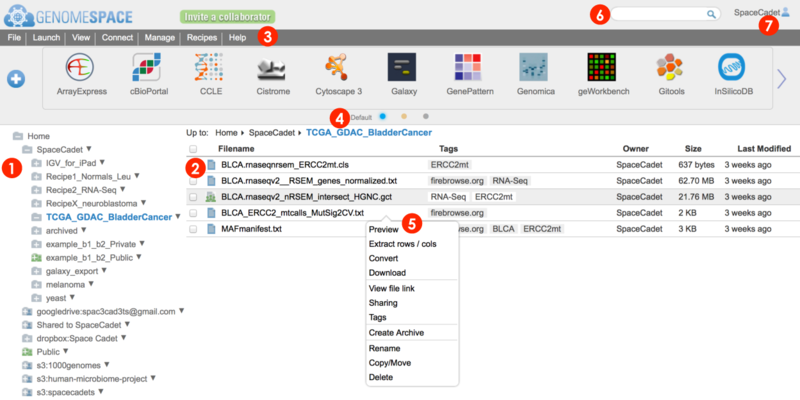
This section provides details on the user interface elements numbered in the screenshot below (2015.02.06). For a brief overview of the user interface, see Highlights & Quickstart.
The following links jump to the sections on this page and reference numbered elements in the screenshot.
-
Left directories panel gives overview of folders
-
Lists your GenomeSpace user folder at the top, and includes a Shared to folder containing items shared to you, and the Public folder containing items shared to all users.
-
Also displays any connected storage such as Dropbox and Google Drives and mounted Amazon S3 buckets, e.g. s3:1000genomes.
-
Main files panel lists files and folders within a selected folder
-
Sort items by clicking on headers, e.g. Last Modified.
-
Breadcrumb list at top, e.g. Home>SpaceCadet>TCGA_GDAC_BladderCancer, tells you which folder contents are displayed in blue and is clickable for backward navigation.
-
Menu bar organizes functions for managing files and groups, launching tools, connecting additional storage, accessing Recipes, and help items, e.g. viewing the status of the server system.
-
Toolbar displays tool and data sources as interactive icons that launch the tool.
-
Click wide arrows at edge of toolbar , here displayed on the right, to scroll to next set of tools.
-
Click on a tool icon to launch the tool. See FAQ2.2 for help launching desktop tools.
-
Hover mouse over an icon for tool description and click on the small arrow that appears to access the tool-specific menu.
-
Customize your toolbar from the tool catalog by clicking on the blue plus button
 at the left.
-
Display alternate toolbar views by clicking on the dots centered at the bottom of the toolbar.
-
Pop-up menu gives you access to a number of menu bar functions.
-
The search bar matches to the names, descriptions, tags, and tag-associated descriptors of tools, files, and folders.
-
The user profile name is displayed in the upper right corner. Click for profile information, history, and to log out.
Access directories panel (1) and file panel (2) options via File menu (3) and right-click pop-up menu (5)
Use the directories panel (1) to navigate your directories structure and click on a folder to display contents in the main files panel (2).
The main files panel provides a better access point to perform actions on both subfolders and files. A subset of these actions are available to perform on subfolders from the directories panel which only lists folders.
Within the main files panel, sort how items are listed by clicking on column headers, e.g. Last Modified, and also navigate backwards up the displayed directory structure by clicking on folder names in the breadcrumb list at top. E.g. clicking on SpaceCadet in the breadcrumb Up to: Home>SpaceCadet>TCGA_GDAC_BladderCancer will switch to display the subfolder SpaceCadet from contents of folder shown in blue.
For each file or folder, whether in the directories panel or in the main files panel, three alternate management actions are available:
-
Right-click and select option from pop-up menu (5)
-
for the directories panel, also click on downward right triangle
-
Select folder or file(s), see items highlighted, and go to the menu bar (3)> File for options.
-
for the main files panel, check the box left of the file/folder
-
Drag-drop
-
Drag-drop desktop file(s) to a folder either in the directories panel (1) or in the files panel (2).
-
Select folder or file(s) and drag-drop to different areas to move to a new directory (1) or to launch specific tools on the files (4).
Options may or may not be available depending on the read and write permissions granted at the initial mounting of the directories. For example, the Shared to folder containing items shared to you by other users and the Public folder containing items shared to all users may limit your access to contained files as read only or read and write permission. Increased sharing changes the folder icon to show one to three green people.
The difference between the File menu and the pop-up menu option is that File menu options remain static, with inaccessible options dimmed in gray, while the pop-up menu displays only available actions for the folder or file type. Additionally, actions for multiple files should be accessed from the File menu. Pop-up menu actions are usually only on the moused over item.
The options available from the various menus are summarized in the table below and are divided roughly by private versus shared or public directory types.
Certain menu options, such as Import from URL, are only available from one menu, in this example the File menu.
|
Private storage: User folder & subfolders, Dropbox folder, and Read/Write S3 Bucket |
|
Upload |
-
This menu item gives a reminder message to upload files by dragging and dropping them onto the destination folder in the directories or files and subdirectories panels.
-
For step-by-step instructions see the Upload Data to GenomeSpace recipe.
|
|
Import from URL
(File menu only)
|
-
Enter or drag-drop the file URL in the provided textbox.
-
Select the destination folder from the provided directory structure.
-
Edit the name of the imported file.
|
|
Create subdirectory |
-
Creates a subfolder within the selected directory. Enter a name for the subfolder.
|
|
View file/directory link |
-
Displays the highlighted URL address of the file/folder that you can copy by keyboard shortcut or right-click menu.
|
|
Sharing |
-
View and edit the share setting for the file/folder with individual users, groups, or the public.
-
To create groups, see instructions for Manage>Groups below.
-
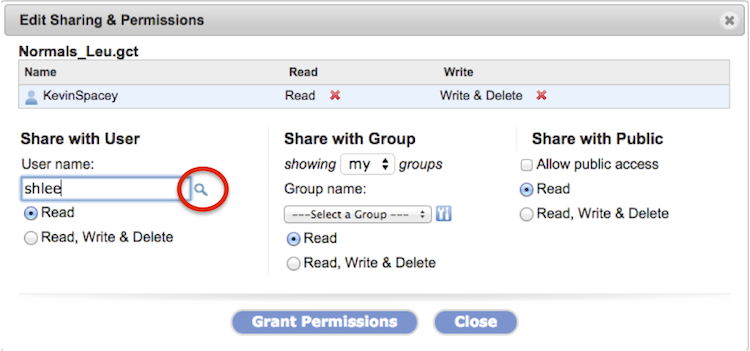
To confirm a username exists, click on the magnifying glass (Screenshot, circled in red).
-
Revoke permissions by clicking on the red X next to the shared user/group name.
-
Checking Allow public access for a file/folder places an alias of the file/folder in the Public directory within a folder with your username. Within your user directory, the file/folder icon displays green people (
  ) to indicate public sharing. ) to indicate public sharing.
-
Read more in the Share Data section.
|
|
Tags |
-
Add or remove tags to file(s)/folders.
-
Folder tags apply only to the folder and not to contents.
-
The search bar matches search terms within the file name and tags, tool name, tool description, tool tags and tag descriptions.
-
To tag tools, see Customizing the interface.
|
|
Create/Expand Archive |
-
Compress or expand file/folder in ZIP, TAR.GZ, or TAR format with option to edit name. At the directory level, ZIP and TAR.GZ compression are recommended.
-
Archiving creates a secondary compressed file and leaves the original file/folder intact.
-
Similarly, expanding an archive creates a secondary expanded folder and leaves the archived files intact.
|
|
Rename |
-
The original file/folder name is displayed for editing.
|
|
Copy/Move |
-
Select the destination folder for the copied or moved file/folder.
-
Edit the file/folder name. An error occurs if a file/folder of the same name already exists in the destination folder so be sure to edit the name if copying to the same folder.
-
Progress is shown at the bottom of the browser and a dialog box informs you of completion.
|
|
Delete |
-
Delete file(s) or a folder with contents from the main files & subdirectories area.
-
To delete from the directories panel, the folder must be empty.
-
Refresh your browser window to reflect the change.
|
|
Disconnect (Dropbox & S3) |
-
Disconnects linked account. Browser refreshes automatically to reflect change.
|
|
Public storage: GoogleDrive folder, Shared to folder, Public folder, and Public Amazon S3 buckets |
|
View file/directory link |
-
Displays the highlighted URL address of the file/folder that you can copy by keyboard shortcut or right-click menu.
|
|
Sharing |
-
View the share setting for the file/folder. These folders do not allow editing of share settings.
|
|
Create/Expand Archive |
-
Archive a file or folder and its contents or expand an archive to the User directory. Move the archived file or expanded folder to the desired linked account afterwards.
-
Supported compression formats are ZIP, TAR.GZ, and TAR and you can edit the name of the resulting file/folder.
-
Archiving creates a secondary compressed file and leaves the original file/folder intact.
-
Similarly, expanding an archive creates a secondary expanded folder and leaves the archived files intact.
|
|
Copy/Move |
-
Select the destination folder for the copied or moved file/folder.
-
Edit the file/folder name. An error occurs if a file/folder of the same name already exists in the destination folder so be sure to edit the name if copying to the same folder.
-
Progress is shown at the bottom of the browser and a dialog box informs you of completion.
|
|
Disconnect (S3 and GoogleDrive) |
-
Disconnects linked account. Browser refreshes automatically to reflect change.
|
Additional options for files (2) from the File menu (3) and right-click pop-up menu (5)
In addition to the options listed in the previous section, the File menu (3) and right-click pop-up menu (5) allow for specific functions on data files in the main files panel (2) and are listed in the table below. These options work on specific data file formats.
|
Preview |
-
View the selected text-based file up to the first 5 kilobytes in a new window.
-
Depending on file type, you may see an additional tab labeled Heatmap. Click to switch to Heatmap view created by jHeatmap. If the file is large, the heatmap may take a while to load.
-
Scroll within the heatmap to zoom view.
-
Click on a datapoint in the heatmap for column, row, and value.
-
Read more in the Preview & Heatmap section.
|
|
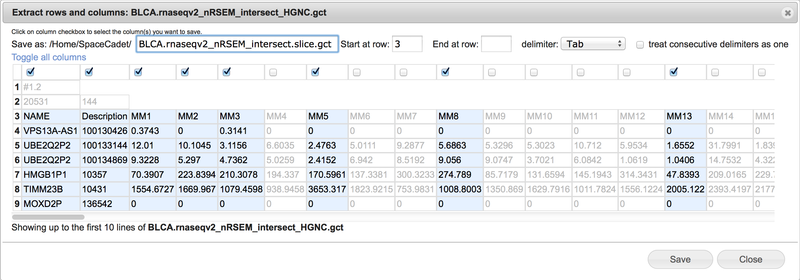
Extract rows & columns |
-
Create a new file containing selected columns and selected consecutive rows.
-
View the selected text-based file up to the first ten rows in spreadsheet format.
-
Use the Save as field to change the file name. GenomeSpace automatically appends the term .slice between the original file name and extension.
-
Select consecutive rows by entering start row and end row numbers. Leave end row field blank to include all remaining rows.
-
Select tab, comma, space, or semicolon delimiter with option to treat consecutive delimiters as one.
-
Select columns by checking boxes at top of columns. Scroll bar at bottom to display additional columns.
-
Click on Toggle all columns to invert selections.
-
See the Extract file rows & columns section for additional details.
|
|
Convert |
-
Convert files into data formats used by popular bioinformatic tools. Within your account, go to Help>Fomat Converters to see the most current list of supported conversions. For more instruction see Convert file formats.
-
Select a single file and Convert.
-
Select the conversion format from the drop-down menu.
-
Download to your desktop or save to your GenomeSpace account by selecting Convert on Server.
-
The original file remains intact and the converted file saves as a new file.
-
Some tools will automatically convert compatible formats for you when launched on files.
|
|
Download |
-
Download files to your local machine.
-
For multiple files, check the files and use File menu>Download.
-
Alternatively for a single file, you can right-click on the item and select Download.
|
|
Open Parent Folder (search results only) |
-
Opens the folder the search result item is found in.
|
Other Menu bar functions (3)
The options provided by the menu bar (3) are listed in the table below.
|
File |
See the two previous sections above for details.
|
|
Launch |
-
Launch a selected tool or data source. If you have selected a file, you can launch a tool on that file.
-
The drop-down menu lists all available tools and data sources alphabetically described in Tools.
-
Alternatively, drag-drop selected files on the tool displayed in the Toolbar.
-
For step-by-step instructions see the Send Data from GenomeSpace to a Tool recipe.
|
|
View |
-
Refresh current directory refreshes the directory currently in your view.
-
The alternative browser refresh resets the directory view
-
Recent uploads displays files most recently queued for upload to your GenomeSpace User account.
-
This differs from the User>History list
-
Customize toolbar displays the same toolbar manager as clicking the blue + button on the left of the toolbar. Using the displayed toolbar catalog, add or remove tools, tag tools, and search tools. You can rearrange the display order of tools either in the catalog or directly on the toolbar. For more details, see Customizing the interface.
|
|
Connect |
Connection to these three commercial cloud storage systems are supported for access from GenomeSpace and enabled tools. Select the storage to connect from the menu and the permissions granted, read only or read and write, and follow directions from the service provider. Once connected, drives appear as folders in the left directories panel (1). You can connect multiple drives at a time.
-
For Amazon public S3 data buckets, enter the bucket name in lowercase, e.g. 1000genomes or human-microbiome-project.
-
Connecting a private Amazon S3 bucket is a multistep process to verify you have access to the Amazon Web Services (AWS) account.
-
Read only or read & write permissions are granted by the bucket owner. To enable writing to a bucket from a browser, from your AWS console, select the S3 bucket Properties>Permissions>Add CORS Configuration. Copy-paste the following custom script over the sample CORS configuration and save.
<?xml version="1.0" encoding="UTF-8"?>
<CORSConfiguration xmlns="http://s3.amazonaws.com/doc/2006-03-01/">
    <CORSRule>
        <AllowedOrigin>*</AllowedOrigin>
        <AllowedMethod>PUT</AllowedMethod>
        <AllowedMethod>POST</AllowedMethod>
        <AllowedHeader>*</AllowedHeader>
    </CORSRule>
    <CORSRule>
        <AllowedOrigin>*</AllowedOrigin>
        <AllowedMethod>GET</AllowedMethod>
    </CORSRule>
</CORSConfiguration>
-
Follow the connection instructions provided by GenomeSpace using the provided links to specific AWS console pages to perform steps.
-
Note that leading or trailing spaces in textboxes, leftover from copy-pasting, will give errors in connecting the bucket. Go back to each field and remove the spaces and submit again.
One advantage of accessing data in these drives from your GenomeSpace account is that GenomeSpace links preserve 3-letter file format extensions required by many bioinformatic tools to recognize file types, e.g. the IGV tool, which may not be the case when the files are accessed directly from the connected storage system.
|
|
Manage |
-
Select Groups to create groups of GenomeSpace users.
-
Select a group under Group Names to view, edit members, or delete the group.
-
Members with administrator priviliges are shown with a red icon and other members in blue.
-
Private Tools opens a window that allows you to add private tools to your toolbar or to share with your groups.
-
Press Add new and fill in the form.
-
To display more instruction, click the ? icon on the right.
|
|
Recipes |
-
View GenomeSpace Recipes of which there are three groups in a new browser tab:
-
Loading data into GenomeSpace
-
Moving data between tools via GenomeSpace
-
Analyzing data with GenomeSpace tools
-
Recipes are step-by-step instructions of two types: (1) they outline how to perform tasks in GenomeSpace such as loading or moving data, and (2) show how to perform specific integrative bioinformatic data analyses using GenomeSpace tools.
|
|
Help |
Menu items link to the following:
-
User Guide (GenomeSpace Help)
-
Tools listing (Tool Help) where you can find support information by clicking on a specific tool
-
a popup box listing supported Format Conversions
-
System Status page to check for changes in the system that impact using GenomeSpace
-
GenomeSpace Support page for our help email, links to forums, and to sign up for email lists.
-
What's new popup box featuring news highlights and excerpts and links to the blog
-
email the GenomeSpace team (Contact us) opens your desktops default email app
-
About GenomeSpace gives information about the origin, funders, and participating labs of GenomeSpace.
|
Launch tools from the Toolbar (4) or left-click pop-up menu (5)
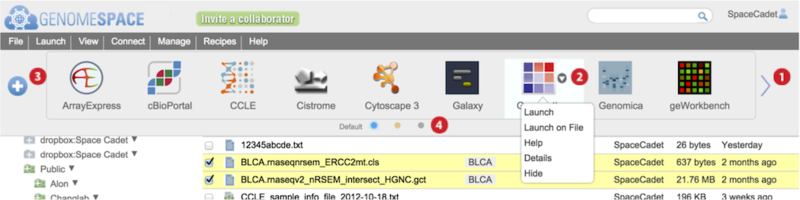
Each GenomeSpace tool and data source is represented on the Toolbar with an icon and in the Launch menu as part of a list. Additionally, normal or left-clicking on a file displays a pop-up menu of tools that when selected will launch on the file. The Tools page describes each of the tools and data sources.
-
Scroll to view next set of tools by clicking the wide arrows at either edge of the toolbar.
-
These buttons also work on touchscreens such as from a tablet or smartphone.
-
Hover mouse over a tool and click on the small downward triangle that appears to access specific functions from a menu listed in the table below. Additional menu options are available for private tools you administer. See Managing Private Tools for details on these.
-
|
Launch |
-
Launches the tool.
-
Alternatively, click directly on a tool icon to launch the tool or data source.
|
|
Launch on file |
-
Launch the tool on preselected files.
-
The dialog box allows removal and addition of selections before launching the tool via drag-drop.
|
|
Help |
-
Opens the Tools page. Select the specific tool you need help on to view tool-specific support information.
|
|
Details |
-
Describes the tool and displays editable tags. Tool description is the same that appears when you hover mouse over tool icon.
-
View, add, and edit tool tags shared by users as detailed in Customizing the interface. The search bar matches to terms within tool names, descriptions, tags, and tag descriptors.
|
|
Hide |
|
-
Click the blue plus icon or go to View menu > Customize toolbar to display the tool catalog. For details on the tool catalog, see Customizing the interface.
-
Click on small selector buttons at the bottom of the toolbar to display alternative views of the toolbar. These alternate views are user-defined by customizing the toolbar.
-
When you start, the Default toolbar shows all available tools.
-
New tools added to GenomeSpace after your account is activated can be viewed and added to the toolbar via the tool catalog.
Find files, folders, or tools using the Search bar (6)
-
Type into the search field to match terms to file/folder names, tool names, tool descriptions, all tags, and tag-associated descriptors.
-
Searching is case-insensitive and matches strings within words.
-
Items separated by comma or space search for matches containing any of the search terms.
-
For space separated terms, hits are listed in order of matches to search terms. In other words, hits with matches to the most search terms are listed first then hits with matches to fewer search terms are listed next.
-
The order of the comma-separated search hits reflect directory structure.
-
Results for Files and Tools are listed separately with files hits displayed first.
-
Click on the Tools (#) link to switch display results.
-
Click the return arrow to go back to the directory displayed before searching.
-
For Files results, hover mouse over a result to see the location of the hit in your directories.
-
For Files results, right-click on a result for pop-up menu options, which include Open Parent Folder.
-
For Tools results, hover mouse over a tag to display the tag-associated descriptor
-
In the screenshot example below, the search term geo (boxed) is found in the tag-associated descriptor (circled).
-
For Tools, click on the downward triangle next to the tool icon for the tool-specific pop-up menu.
Log out with your User Profile (7)

Clicking your username or the  icon gives you the following menu of options.
|
Profile |
-
Change the associated email address
-
Change account password
-
Make your user name unsearchable by others or searchable (default)
-
Check the amount of storage you are using against the quota
|
|
History |
-
Search and view your account activity log by date range
-
Toggle and sort column headers of time, action, and files
|
|
Logout |
-
Logs you out of your GenomeSpace account.
-
To open multiple different accounts at the same time from the same machine, use a private instance of the browser or different browsers, i.e. Firefox and Chrome.
|
Customize the interface, the tool catalog & tool tags
You can customize within GenomeSpace at two conceptual levels that are reflected in the toolbar.
-
The visual interface you encounter when you sign in to your account.
-
For example, display only the limited subset of tools you use on a daily basis in your toolbar.
-
In functionality.
-
In analyses by private tools that propogate to shared users. For example, add a private tool that runs your preferred analysis algorithm and is shared only with members of your laboratory. See Manage Groups & Tools for details.
-
In the user interface by annotations of tools that propogate to shared users. For example, add a tag and tag descriptor to a public tool, such as IGV, which will be seen and can be searched against by all GenomeSpace users.
Customization settings will persist such that whenever you log in to GenomeSpace, the toolbar will display according to your last set preferences.
Access user interface customization options (i) directly from the browser interface and (ii) more extensively from the tool catalog. Each approach has unique customization options as well as some duplicated options (asterisked in table) and are described in detail in the following sections. This page describes only customization related to the user interface. For information on adding and editing private tools, see Manage Groups & Tools.
|
(i) browser interface |
-
Reorder tools, hide* tools, and resize the toolbar.
-
To view and edit tags and tag descriptors for any tool, click the downward triangle next to the tool and select Details** from the menu.
-
To edit a private tool you administer, click the downward triangle next to the tool and select Edit*** from the menu. Alternatively, from the menu bar, select Manage>Private tools to add, delete, or modify/edit*** a private tool you administer. See Manage Groups & Tools for details.
|
|
(ii) tool catalog |
-
Add and customize alternate toolbar displays.
-
Remove/hide* or add tools to a toolbar.
-
From a tool's panel, select More details** to view and edit tags and tag descriptors.
|
Customize the toolbar from the user interface

-
Reorder tools by drag-dropping them along the toolbar (Screenshot).
-
To remove a tool, hover mouse over a tool and click on small downward triangle that appears to the right of the tool, and select Hide from the menu.
-
Adjust the height of the toolbar, with tool icons sizing accordingly, by dragging by mouse the bottom edge of the toolbar upwards or downwards.
-
As you hover the mouse over the bottom of the toolbar, between the gray and white edge, the pointer will display as a downward arrow.
-
Click and drag the downward arrow to adjust the height of the toolbar.
-
At the narrowest height, tool names disappear and only the icons display.
Customize the toolbar from the tool catalog

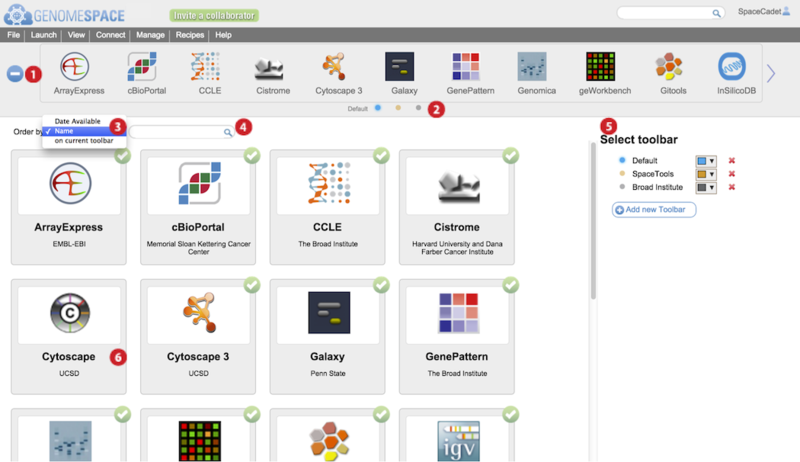
Open the tool catalog by clicking the button on the left of the toolbar (circled in red in Screenshot). The tool catalog will display akin to the screenshot below.
-
Press the blue + or – button to open or close the tool catalog.
-
Alternatively, from the menu bar, select View>Customize toolbar to open the tool catalog.
-
Click on small selector button corresponding to toolbar you wish to edit.
-
The displayed toolbar's name appears to the left of the selector buttons.
-
Adding additional toolbars adds selector buttons here.
-
Order the tool catalog tool panels by selecting an option from the dropdown menu.
-
By date starts with the newest tool first. This is the default display order.
-
By name is alphabetically descending.
-
On current toolbar puts all the tools absent from the toolbar first, then alphabetically by name.
-
Display filtered tool catalog tool panels by typing match terms in the search field.
-
Search is against tool name, tool tags, tool description, and tool tag-associated descriptors.
-
Add a new toolbar by clicking Add new toolbar.
-
Edit a toolbar name by hovering mouse over the name and typing.
-
Selecting a toolbar here also switches the tool catalog display to reflect its contents.
-
Change the color representing the toolbar by clicking on the downward arrow and selecting a color.
-
Delete a toolbar by clicking the red X next to the toolbar name.
-
In the main tool catalog, for the selected toolbar, tool panels with green circled checkmarks are displayed in your toolbar while those without are not.
-
In the example, Cytoscape 3 is checked but the original Cytoscape is not. This is reflected in the toolbar.
-
Hover mouse over tool panel for a brief description, options for more details, to add the tool, or to remove the tool from the specific toolbar.
-
The more details link gives a description of the tool, date added, URL address, and lists the tags. Additionally, special requirements and help URL links may be listed. For the most current information on a tool, use the links on the Tools page.
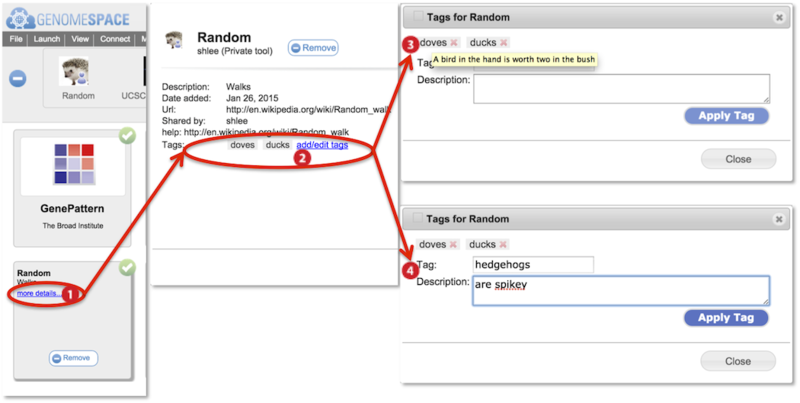
Add and edit searchable tool tags and tag descriptors
Searches from the main searchbar or tool catalog searchbar match to tool names, tool descriptions, tags, and tag descriptors. Searches are case-insensitive.
You can add your own tool tags and tag descriptors for any tool. These are viewable by anyone with access to the tool. You can delete or edit tags and tag descriptors only for tags you had added. You cannot remove tags placed by another user.
-
Within the tool catalog, hover mouse over a tool panel and select more details.
-
Alternatively, from the toolbar, click the downward triangle next to the tool and select Details from the menu.
-
Information about the tool is displayed including tool description and tags (circled). Click add/edit tags.
-
Hover mouse over a tag to display the tag-associated tag descriptor in a yellow box.
-
Add a new tag and associated descriptor by typing into the tag and description fields. Press Apply Tag.
-
To edit an existing tag, click on the tag to display its information within the fields. Edit the fields and click Apply Tag to save.
Connect Storage
You can add external storage from public Amazon S3 buckets, your own Amazon S3 buckets, your Dropbox, and your Google Drive to your GenomeSpace user account. You can connect multiple storage drives to a single user account.
-
From the menu bar, select Connect and the drive you want to connect.
-
In order to disconnect a drive, right-click the drive from the left directories panel and select Disconnect from the pop-up menu.
Contents of connected drives become available to GenomeSpace tools. Refer to provider websites for details on the functionality of each drive. This page details how to connect a Dropbox drive and a Google Drive. For Amazon S3 Buckets, see Connect S3 Bucket.
Connect Dropbox
-
Select Connect>Dropbox.
-
Select Read only or Read and Write, and click Submit.
-
When you click Submit in this dialog, a new window will open to the Dropbox site.
-
You must disable popup blockers on your browser for the next step.
-
If you are not already logged in to Dropbox, the Dropbox window will ask you to login.
-
Dropbox will then ask you to confirm that you want to allow GenomeSpace to access your Dropbox account. Click Allow.
-
A new folder named dropbox:[user] appears in the left directories panel.
Connect Google Drive
-
Select Connect>Google Drive in the menu bar and click Submit.
-
Select the privileges GenomeSpace can have in Google Drive: Read only or Read and Write if you want GenomeSpace to be able to send files into Google Drive.
-
You must disable popup blockers on your browser for the next step.
-
Tell Google that GenomeSpace is allowed to access your files. A new window opens to the Google Drive site.
-
If you are not already logged in to Google, a window will ask you to login.
-
Confirm GenomeSpace is allowed access to your Google account and click Accept.
-
GenomeSpace creates a new folder within your Google Drive, in the left directories panel, labeled GenomeSpacePublic.
GenomeSpace will operate exclusively on files and folders within GenomeSpacePublic. Place any data files you want to access from GenomeSpace tools under this folder.
The GenomeSpacePublic folder is created with Public on the web Google Drive permissions. This permission level allows anyone to access the contents of the folder via search results or the web address. If you have sensitive data that you would like to use from GenomeSpace data tools, we recommend you place it under your GenomeSpace home directory, in a GenomeSpace-mounted Dropbox account, or in an Amazon S3 bucket.
Connect S3 Bucket
You can connect public and private Amazon S3 Buckets, and instructions for mounting both categories of buckets are outlined on this page.
You can connect multiple S3 Buckets simultaneously to your GenomeSpace account.
-
Public buckets require only the name of the bucket to mount it.
-
Connecting private buckets, or those with limited non-public accessibility, involves several steps and requires an Amazon AWS account with an S3 Bucket and bucket permissions edited to share with GenomeSpace. Bucket permissions are either read-only or read-and-write. Once a bucket has been mounted in GenomeSpace, you can share it with other GenomeSpace users using the standard GenomeSpace sharing dialogs.
Mount a Public Amazon S3 Bucket
A publicly accessible Amazon S3 Bucket has its permissions set to allow public access to anyone without authentication. Public buckets may be mounted only with read permissions in GenomeSpace and means you cannot write files back to them. This is to prevent users from accidentally saving files to Amazon S3 Buckets that they do not control.
-
Select Connect>Amazon S3 Bucket. This will open the Mount Cloud Storage dialog box (Screenshot 2013).
-
Select the Public S3 Bucket tab.
-
Enter the name of the publicly accessible bucket in the field.
-
In the screenshot example, we used the 1000genomes bucket.
-
Bucket names are always all lowercase.
-
Click Submit. In less than a minute, the directory view refreshes with the new bucket mounted under your Home directory, e.g. s3:1000genomes. You can now read files from this bucket as you would any other files in GenomeSpace and share it read-only to other GenomeSpace users.

See aws.amazon.com for the comprehensive list of public S3 datasets. Of note are two projects, the 1000 Genomes Project and the Human Microbiome Project. To find a specific S3 Bucket input name, click on the specific dataset and look for a URL address such as <https://s3-us-west-2.amazonaws.com/human-microbiome-project>. For this example, input human-microbiome-project as the S3 Bucket name to mount the data. Some datasets do not provide their bucket name on the website as they require human subjects protection approval, copying the data to your own drive prior to access, or access from specific geographic regions, i.e. from northeastern USA. Contact the provider for more information.
Mount a Private Read/Write Amazon S3 Bucket
Connecting a private Amazon S3 bucket is a multistep process to verify you have access to the Amazon Web Services (AWS) account. GenomeSpace opens a wizard to guide you through the connection procedure. Buckets with default AWS settings will be read-only. Special instructions to edit your bucket permissions to read-and-write are at the end of this section.
-
Sign in to your Amazon AWS management console.
-
Within your GenomeSpace account, Select Connect>Amazon S3 Bucket. This will open the Connect to Amazon S3 Buckets dialog box.
-
Select the Read/Write S3 Bucket tab.
-
Click the Begin button and follow the guided instructions in the wizard that opens (Screenshot 2013).
-
Wizard section headings are in gray. Click on the section heading to expand the section.
-
Click on a previous section heading to go back and edit inputs.
-
For your convenience, we have provided clickable URL links to the relevant AWS Console pages and these are underlined.

Supplemental clarification to the wizard instructions
-
When the wizard opens, it should look like the Screenshot above. GenomeSpace automatically generates an AWS username under a Pending status. You will copy the AWS username to paste when you create the AWS sub-user account. If the creation date and time do not correspond to the current date and time, then it is from a previous session. Delete the account by clicking the red x and click Create another pending account to generate a fresh AWS username.
-
If you encounter errors, go back to sections by clicking on section headers and remove any leading or trailing spaces in the input textboxes and submit again.
-
When creating the custom policy, copy-paste the GenomeSpace provided policy document that is in JSON, a computer language with a lot of whitespace, brackets {, and quotes ". JSON is sensitive to misplaced extra spaces.
-
You will see an AWS credentials verified successfully notification when the connection is successful.
-
Read-only is the default AWS setting for S3 Buckets connected to GenomeSpace even if you select Read and Write permissions from the GenomeSpace wizard. The bucket owner can grant read-and-write permissions under S3 bucket Properties>Permissions>Add CORS Configuration. Copy-paste the following custom script over the sample CORS configuration and save.
<?xml version="1.0" encoding="UTF-8"?>
<CORSConfiguration xmlns="http://s3.amazonaws.com/doc/2006-03-01/">
    <CORSRule>
        <AllowedOrigin>*</AllowedOrigin>
        <AllowedMethod>PUT</AllowedMethod>
        <AllowedMethod>POST</AllowedMethod>
        <AllowedHeader>*</AllowedHeader>
    </CORSRule>
    <CORSRule>
        <AllowedOrigin>*</AllowedOrigin>
        <AllowedMethod>GET</AllowedMethod>
    </CORSRule>
</CORSConfiguration>
Amazon AWS is constantly updating their services. If you find our instructions no longer work, please let us know as soon as possible at gs-help@broadinstitute.org.
Manage files & folders
The left directories panel and main files panels show the contents of your account folders. From here, you can manipulate your data files in a number of ways detailed extensively in the User Interface section or broadly and selectively on this page. More specialized file management features, Share data, Preview & Heatmap, and Tag & Search, follow in separate pages.
Manage folders
|
You can manage your folders by clicking the triangle next to a directory name, by right-clicking on the folder, or by selecting a folder and using the File menu:
-
Upload files from your local machine or import by URL address into a folder
-
Create subdirectories
-
View the URL link to the folder
-
Share the folder with colleagues or the public
-
Tag, rename, copy, or move a folder
-
Create an archive of a folder
-
Delete a folder and all its contents (from main files panel)
-
Connect or disconnect storage devices which appear as directories
|
Manage files
|
You can also manage individual files by right-clicking the file name or by using the File menu for selected multiple files:
-
Preview text-based files and heatmaps for select file formats
-
Extract rows and columns from a tab- or comma-delimited file and save to a new file
-
Convert the file to another file format
-
Download the file to your local machine
-
View the URL link to the file
-
Share the file with colleagues or the public
-
Tag, rename, copy, or move the file
-
Delete the file
|
Store files on your GenomeSpace account
To store a file in your account, import by (i) drag-drop or (ii) URL address. For drag-drop import of individual files ~1GB or larger, we recommend using Firefox over Chrome as explained in FAQ1.3. Additionally, consider accessing files via a linked external storage drive containing the files as outlined in Connect Storage and Connect S3 Bucket.
|
(i) drag-drop file import |
Drag-and-drop the file from your desktop to the target GenomeSpace directory.
-
Make sure to use a compatible browser as defined in FAQ1.3.
-
An older feature, the Java Uploader, is no longer supported.
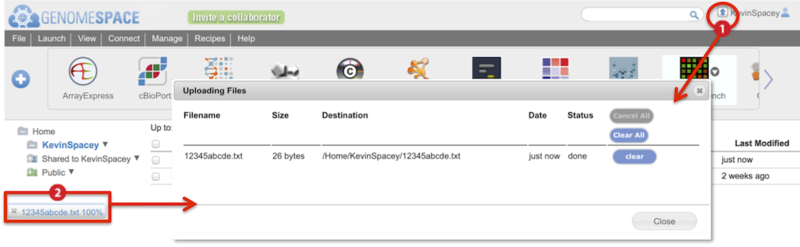
Two indicators show the upload progress of a drag-and-drop file (Screenshot):
-
Animated arrow by your user name

-
Percentage progress bar at the bottom of the browser window
Clicking on either of these brings up a dialog box with more details on the progress of the file upload (inset).
-
This dialog box can also be viewed from the View menu>Recent uploads.
-
Clicking on the link either under the Filename or Destination columns opens the directory containing the file.
|
|
(ii) URL address file import |
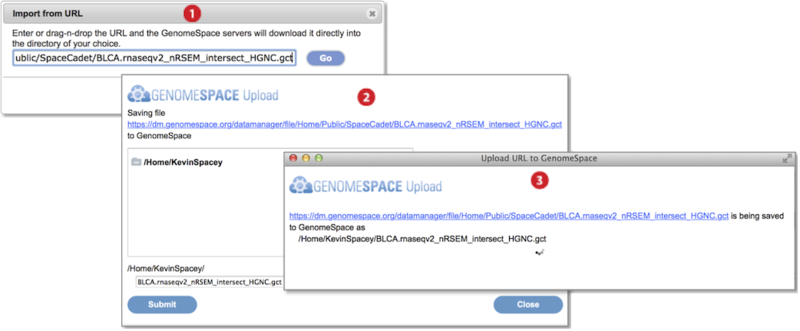
-
Go to File menu and select Import from URL. Provide the URL address in the textbox by typing, pasting, or drag-dropping the URL. Press Go. (Screenshot above 2015.1.27)
-
In the dialog box that appears, select the destination folder for the import and optionally edit the file name. Press Submit.
-
A third dialog box shows import is ongoing and closes once complete.
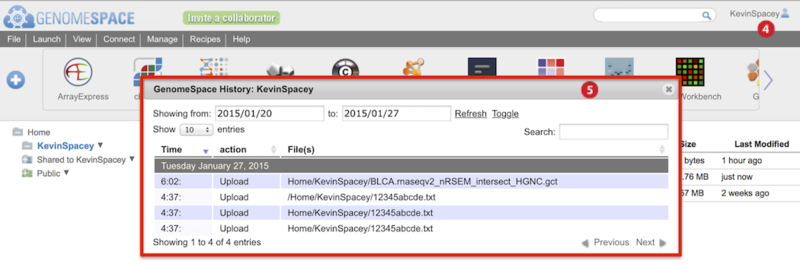
-
To view history of uploads, click on your user name and select History from the menu (Screenshot below 2015.1.27).
-
The History dialog box appears (boxed red) and marks uploads as Upload in the second column.
|
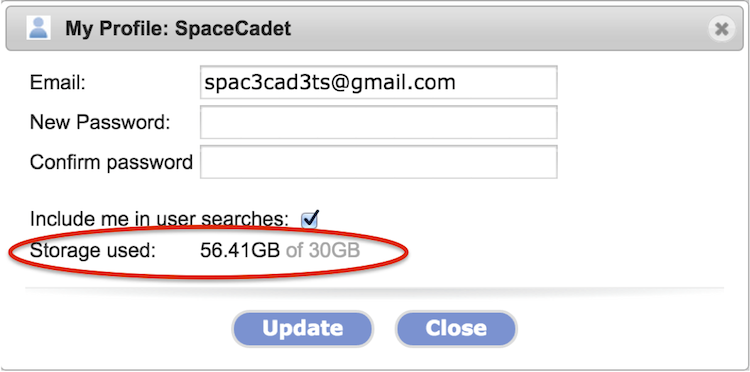
Each GenomeSpace account has 30GB of storage
The 30GB storage quota took effect in the summer of 2014. You can check how much storage you are using by clicking on your user account name in the upper-right and selecting Profile from the menu. The storage used is circled in the screenshot below.
-
When you are over the quota, you are reminded to reduce storage each time you log in.
-
Any attached storage, e.g. Dropbox, S3 bucket, or Google Drive, does not count towards the quota. For more details, see Connect Storage and Connect S3 Bucket.
-
If your project requires additional storage, specify your needs to gs-help@broadinstitute.org.
GenomeSpace allows you to store your data securely in the Amazon Elastic Compute Cloud (Amazon EC2), which is a web service that provides resizable compute capacity in the cloud.
Archive files to reduce storage
When planning your analyses, note if your bioinformatic tools accept input of compressed formats so you can plan your storage needs efficiently. A number of tools take specific compressed formats as input into their offered bioinformatic algorithms. You can thus store files in a compressed or archived format without loss of utility and increase your available storage.
You can perform additional compression for archiving purposes directly in GenomeSpace. GenomeSpace supports in-browser archiving and expansion of ZIP, TAR.GZ (TGZ), and TAR formats.
-
Please let us know of additional compression formats that would aid in your research.
-
Because BAM (binary of SAM) format files are already compressed to binary format, additional compression may be negligible depending on the extent of duplicated reads and whether they are marked.
When archiving files and folders or expanding archived files in GenomeSpace, original files and folders remain intact and you can remove these separately. For larger footprint folders, we recommend archiving contents in smaller groupings. Follow instructions below starting with steps outlined in the table.
|
|
a single item |
multiple files |
|
Archive files and folders |
-
right-click the item and select Create Archive from the pop-up menu
-
an archived file with the same name, with option to edit, is created
|
-
check the files and select File menu>Create Archive
-
creates a single archived file, named archive with option to edit name, containing the multiple files
|
|
Expand archived file |
-
right-click the item and select Expand Archive from the pop-up menu, or check the file and select File menu>Expand Archive
-
A folder with the same name is created and contains the expanded contents
|
|
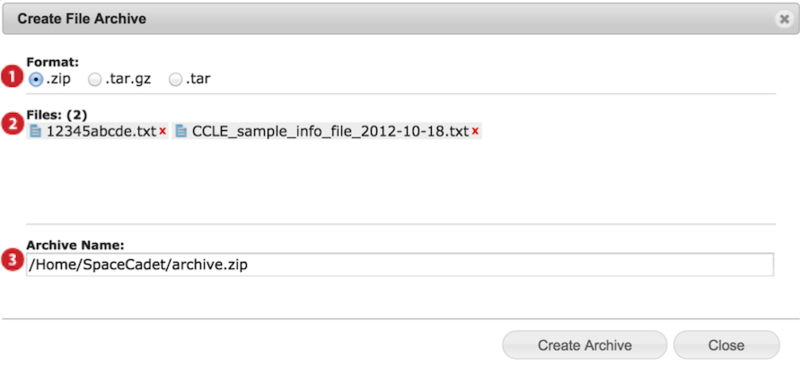
When you archive, a dialog box appears (screenshot below).
-
Select preferred archive format ZIP, TAR.GZ or TAR.
-
Confirm files to be archived and remove undesired files by clicking on the red x.
-
Edit archive file name and location and press Create Archive.
-
Available locations are your GenomeSpace user folder and subfolders, linked Dropbox, and linked Read/Write S3 buckets.
-
The progress of archiving, and similarly for expansion, is shown with a green percentage bar
 at the bottom of the browser window.
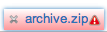
-
Once complete, the notification turns gray
 . Clicking on the notification opens the folder containing the new archive file.
-
The notification turns red
 if an error occurs.
Download files to your local machine
Two features of GenomeSpace obviate the need for direct file downloads from the GenomeSpace interface.
One is the ability to link cloud storage devices, i.e. Dropbox, Amazon S3 Buckets, and Google Drive, to your GenomeSpace account. These devices already provide backup of your files in their architecture and in the case of Dropbox and Google Drive allow syncing to your local machine. Meaning you can access the contents of these drives from your desktop file manager even when offline.
Second is the move by bioinformatic tools, especially those GenomeSpace-enabled, to provide online access to their analyses and the ability of the analysis tool to access data in your GenomeSpace account or via URL address. For tools that are not GenomeSpace-enabled, you can change the share setting of files and folders within your account to Public to allow URL web access to the data without authentication. GenomeSpace is particularly useful when the bioinformatic tool requires URL addresses to preserve file extensions. A URL link for the same file from your Dropbox or Google Drive account will not preserve such file extensions. For example, when providing the Integrative Genomics Viewer (IGV) tool a URL address of a file, it can process the GenomeSpace generated URL link to a file within a linked Dropbox account. Lastly, GenomeSpace allows you to share data in your account with the public and with colleagues either within the GenomeSpace environment or by shared URL link as detailed in Share data.
If your required file manipulations necessitate downloading and then reuploading the transformed data into GenomeSpace, we would like to hear about it. Posting to our forum may inform you of tools that can accomplish what you need online or lead us to offer these file manipulation features within the GenomeSpace environment.
To download files from GenomeSpace:
-
For multiple files, check the files and select File menu>Download.
-
Alternatively for a single file, right-click on the item and select Download from the pop-up menu.
-
To download all files in a folder, open the folder to display contents in the main files panel. Check the box next to the column headers to select all the files and then select File menu>Download.
-
Download of an entire directory and its directory structure is not supported.
The download protocol for your specific browser activates and notifies you of the download. To check your download history, follow these steps:
-
Click on your user name in the upper-right corner and select History from the menu.
-
Be sure the date range reflects the date of the download or edit the date range and press Refresh.
-
Downloads are marked as Read in the second column under action.
Although no longer supported, we previously offered a folder downloader, called the recursive downloader, in September of 2014, in the blogpost Recursively downloading files from GenomeSpace.
Move and copy files within your directory structure
Copy and move functions are provided together and have the following constraints.
-
Duplicate item names are not allowed in a single folder. Edit item names within the Copy/Move dialog box.
-
Copy from any type of directory to directories for which you have read/write permission.
-
Move to and from directories for which you have read/write permission.
-
Attempted moves from write-only directories to read/write folders will automatically default to a copy function.
|
move files or folders |
-
Drag-drop the file/folder into another directory in either the main files panel or the left directories panel.
-
Right-click the file/folder name and select Copy/Move from the pop-up menu. Select the destination then click Move.
-
Check the file(s)/folder and select File menu>Copy/Move. Select the destination then click Move.
|
|
copy files |
-
Press and hold down the shortcut* key on your keyboard while dragging-and-dropping the file into the directory in which you want a copy. Select the destination then click Copy.
-
*PC users use CTRL, SHIFT, or ALT
-
*Mac users use OPTION or SHIFT
-
Right-click the file name and select Copy/Move from the pop-up menu.
-
Check the file(s)/folder and select File menu>Copy/Move. Select the destination then click Copy.
|
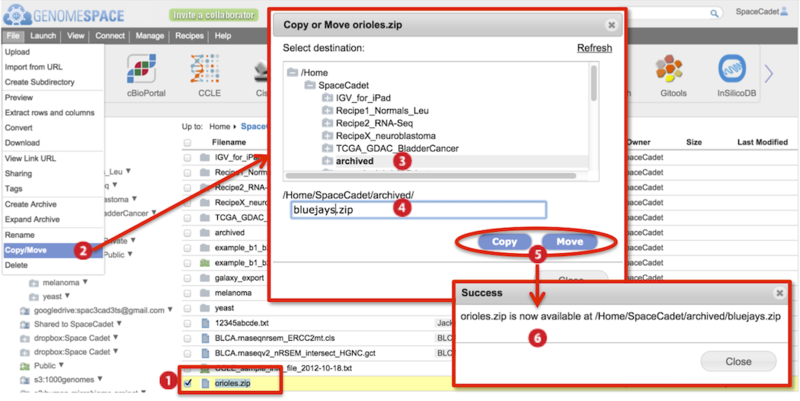
The screenshot below gives an example of a copy/move.
-
Check to select file(s).
-
Go to File menu>Copy/Move.
-
In the dialog box that appears, select the destination folder in the directory structure.
-
Also edit the file name. Duplicate file names are not allowed in the same folder.
-
Click either Copy or Move.
-
Progress of copying and moving is shown by a percentage progress bar
 at the bottom of the browser.
-
Hovering mouse over the progress bar displays the destination file path in a yellow box.
-
A new dialog box informs you the process is complete.
Share data
Share data within your GenomeSpace account in two ways.
-
With other GenomeSpace users by sharing or URL address as detailed in the sections on this page.
-
With all others by providing URL links to the data. Generate URL links within your GenomeSpace account or within a connected storage account, e.g. Dropbox or Google Drive.
When sharing with other GenomeSpace users, you can search for their user name with a partial name or by email address by clicking on the provided  magnifying icon within dialog boxes. If a user has opted-out of being in username searches, then you must know their exact username to share with them. If you wish to opt out of username searches, click on your username in the upper-right and clear the checkbox next to Include me in user searches.
When sharing URL links, considerations differ whether the link is for tool access or for download purposes.
For tool access. If you are providing a URL link for bioinformatic tool access, i.e. visualization, then be sure to check that the tool accepts the generated URL address.
-
A URL address generated within GenomeSpace for a file within a connected storage account will differ from the URL address to the same file generated from the storage account. GenomeSpace preserves 3-letter file extensions required by many bioinformatic tools to recognize and process data while commercial storage accounts may not.
For download. File download links are viable with public data. A public share setting allows anyone with the URL address to access the data. If this is a concern consider the following.
-
Longer link addresses, with random strings of text, provide better security.
-
You can reset to a restrictive share setting after your colleagues have downloaded the data.
-
It's easy to invite your colleagues to join GenomeSpace. Click the Invite a collaborator button next to the GenomeSpace logo (Screenshot).

Get to the share options for your file or folder
You can view the share settings for files and folders within any directory.
|
folder sharing |
-
Click the triangle next to the directory name or right-click and select Sharing in the left directories panel.
-
Select the folder from the main files panel and go to File menu>Sharing.
-
Right-click folder from the main files panel and select Sharing from the pop-up menu.
|
|
file sharing |
-
Select the file checkbox and go to File menu>Sharing.
-
Right-click file and select Sharing from the pop-up menu.
|
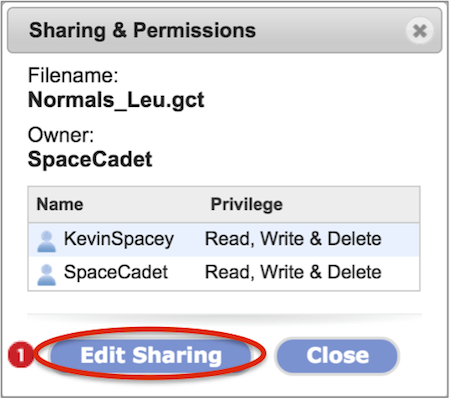
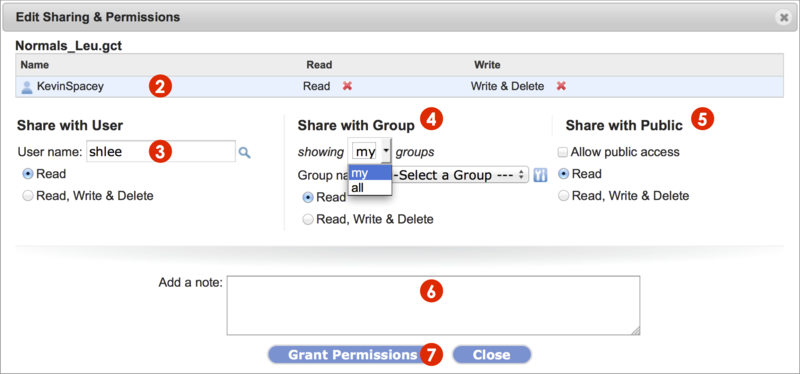
The Sharing & Permissions dialog box (Screenshot) will list the file or folder name, the owner, users with which the item is shared with including the owner, the level of privilege for each user, and a button to edit the share setting (#1).
Change sharing & permissions
You can change share settings for a file or folder within directories for which you have read/write permission. Currently these include your user folder and subfolders, connected Dropbox, and Read/Write S3 Buckets. The two levels of permission are read-only (Read) which allows copying, and read-write-delete (Write & Delete in the dialog but otherwise known as Read & Write).
If you grant permissions to a folder, all the files and subfolders in that folder inherit those permissions. In this way you can make your entire User directory writable by a colleague. You cannot remove inherited permissions. Remove permissions from the original top-level folder to which they were applied.
-
Bring up the Sharing & Permissions dialog box as outlined in the previous section. Click the Edit Sharing button.
-
The Edit Sharing & Permissions dialog box displays (Screenshot 2015.02.06).
-
Remove permissions for a shared user (KevinSpacey in example) by clicking on the red x next to the permission, Read or Write & Delete.
-
Removing a read permission automatically removes extant write & delete permission.
-
Share with another GenomeSpace user by typing in the username and set permission settings.
-
To look up a user name by partial name or complete email address, click the magnifying glass .
-
Share with a group of GenomeSpace users.
-
From the dropdown menu, select which groups to show. Those defined by you (my groups) or by other GenomeSpace users (all groups).
-
Select a group from the second dropdown menu and set permission settings.
-
Click the gear icon
 to manage your groups as detailed in Manage Groups & Tools.
-
Share with all GenomeSpace users (Share with Public) by checking the square box next to Allow public access. Set permissions.
-
Email a message, typed in the field, to the user or group members to which you shared the item.
-
For items made public, no message is sent.
-
To save changes, click the Grant Permissions button and see changes reflected in the dialog box.
Find shared items in the Shared To and Public folders
Depending on the share setting, shared items appear in two locations.
Items you share with others remain in their original directory stucture in your account. In addition, if you've made something public, it will appear in a folder with your user name in the Public folder in the left directories panel.
An item shared to you selectively by another user will appear in a Shared to [your user name] folder in the left directories panel. Items made public by other users appear in the Public folder in subfolders organized by user name.
-
Click on the Filename column header to sort these folders alphabetically.
-
Within the Public folder is a SharedData subfolder containing items shared by the GenomeSpace team, including demo data used in Recipes and presentations from workshops. See Recipe demo datasets for more information.
Create a link that opens a particular directory
Right-clicking a file and selecting View file link from the pop-up menu displays the URL address of the file. The structure of the folder path is preserved in the URL address so you can append a given address by editing the text with the file path of the new folder. Users with share permission to the folder can use the link to access the shared data.
When sharing data with other GenomeSpace users, or perhaps for your own convenience, create a URL that will open the shared folder within a permitted user account. For example, in the following URL address, the section that follows [?pathOrUrl=] shows the directory path and opens the SharedData folder within the Public directory:
Preview & Heatmap
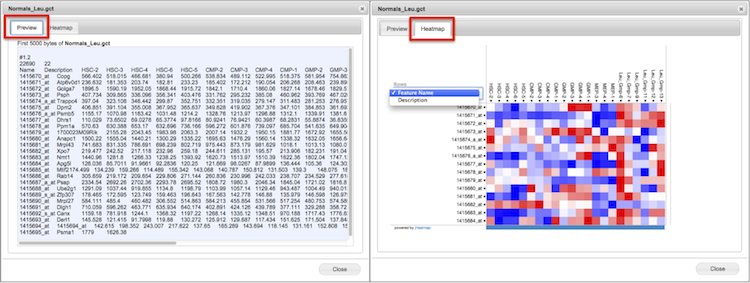
For a given file, access the Preview function from the File menu or right-click pop-up menu. You can preview any plain text based or binary file and, depending on file data type, a heatmap of the entire dataset in the secondary Heatmap tab (Screenshot). GenomeSpace automatically converts binary text to plain text in the Preview pane.
Previews are up to the first 5 kilobytes.
-
Use the horizontal scroll bar to view columns across the file.
-
Alternatively, preview in a spread-sheet format, up to the first ten rows of a delimited file, with Extract Rows & Columns.
-
SAM files will show the header section and some lines of reads.
-
Display of BAM files, although binary formats of SAM, are not currently supported.
Heatmaps are created by jHeatmap and are possible for gct matrix format files or a format that can be converted to GCT, such as GXP and Genomica tab formatted files.
-
The colors are row normalized.
-
The blue-to-white-to-red heatmap scale matches lower to higher values, respectively.
-
GCT file formats provide two columns to describe probes or targets, and the Heatmap preview allows selection of either column to display on the y-axis from a drop-down menu.
-
Mouse-scroll within the heatmap to zoom view.
-
Click on a datapoint in the heatmap for column, row, and value.
Depending on the dataset size, the heatmap may require some moments to load. Try mouse clicking or scrolling within the heatmap area to display a portion of the heatmap. Files ~5MB should display immediately. Related, depending on your browser memory settings, extremely large files may fail to display. If you see a blank outline, please let us know at gs-help@broadinstitute.org so we can determine the source of error.
Tag & Search
To help manage, add tags to files, folders, and tools. For example, you can add any number of tags to your files to describe them so that it's easy to find all of the files belonging to a particular project. This page covers tagging of files and folders and searching in general. Tool tagging and tool catalog searching is described in Customizing the interface.
Tags are displayed in the main files panel under the Tags column. Tags are visible to GenomeSpace users to which the tagged items have been shared.
Add or remove tags to files and folders
-
Right-click on a file or folder and select Tags from the pop-up menu.
-
Alternatively, and for multiple items, check to select the items and go to File menu>Tags.
-
An Edit File Tags dialog box opens. The selected files are displayed alongside common current tags. Type the text for the tag in the field and press Add Tag.
-
Add multiple tags at once by comma-separating them.
-
The tags are applied and this is reflected in the updated dialog box.
-
To remove a tag, click the red x next the the tag name.
-
Close the dialog box to see your main files panel view refresh to display the tags under the Tags column.
Search for files, folders, and tools
Type into the search field (Screenshot, 1) to match terms to file/folder names, tool names, tool descriptions, all tags, and tool tag-associated descriptors.
-
Searching is case-insensitive and matches strings within words.
-
Constrain search terms by adding a percent sign at the start or end of a search string.
-
E.g. %.bai searches for files with .bai extensions or srr% searches only for files starting with the string SRR.
-
A % wildcard cannot be used in the middle of a search string.
-
Items separated by comma or space search for matches containing any of the search terms.
-
For space separated terms, hits are listed in order of matches to search terms. In other words, hits with matches to the most search terms are listed first then hits with matches to fewer search terms are listed next in descending order.
-
The order of the comma-separated search hits reflects directory structure.
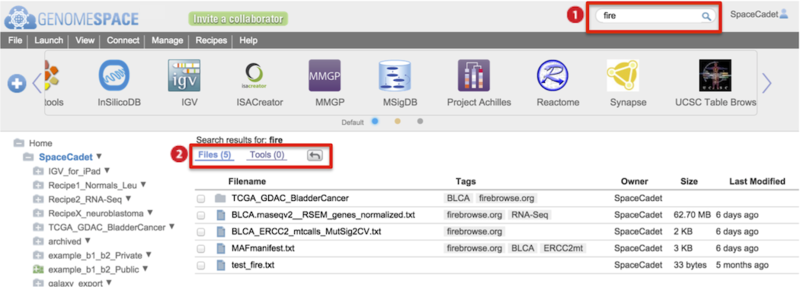
Results for Files and Tools are listed separately with files hits displayed first (Screenshot, 2).
-
Click on the Tools (#) link to switch display results.
-
Click the return arrow to go back to the directory displayed before searching.
-
For Files, hover mouse over a result to see the location of the hit in your directories.
-
For Files, right-click on a result for pop-up menu options, which include Open Parent Folder.
-
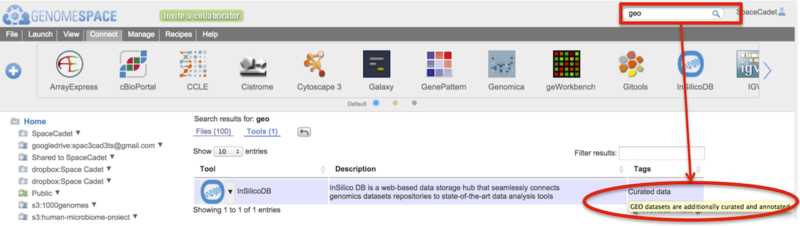
For Tools, hover mouse over a tag to display the tag-associated descriptor as shown in Customizing the interface.
-
For Tools, click on the downward triangle next to the tool icon for the tool-specific pop-up menu.
Manage groups & tools
The menu bar's Manage menu allows you to manage either Groups or Private Tools. This includes creating, editing and deleting groups and private tools.
Groups are GenomeSpace user lists much like a group email list that become available from drop-down menus when sharing files, folders, and private tools. You have the option of viewing my groups and all groups. My groups are groups in which you are a member and all groups are groups defined by other GenomeSpace users of which you are not a member. When you create a group, you automatically become a member and the administrator of the group.
Private tools are your own private instances of GenomeSpace-enabled tools that are sharable with groups. This may be a local instance of GenePattern, Galaxy, or any other GenomeSpace-enabled tool. Private tools show up in the tool catalog and from there you can add them to a toolbar for one-click launches. To GenomeSpace-enable your tool, developers see Adding a Tool to GenomeSpace in the Developer's guide.
Manage Groups
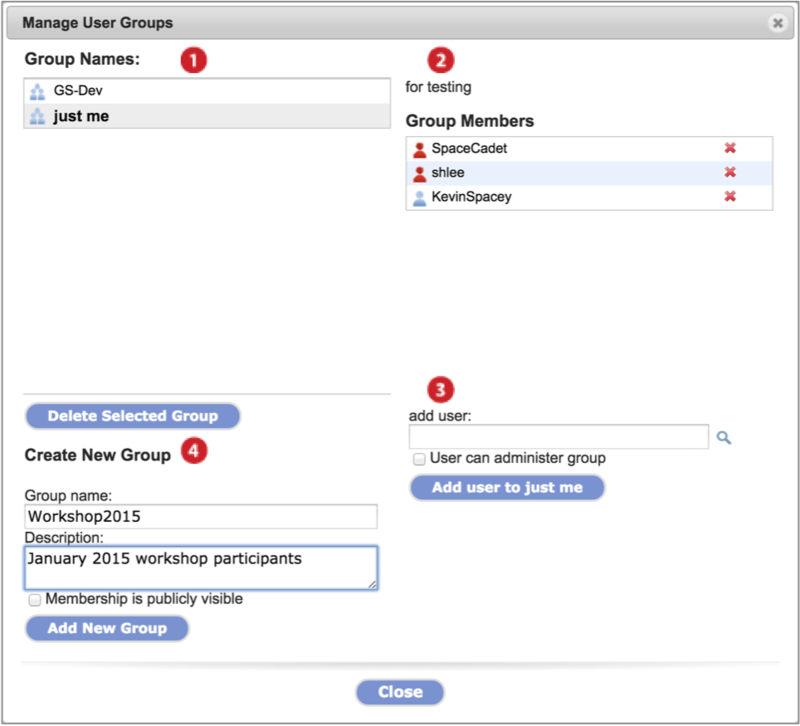
Click on the Manage menu and select Groups. The Manage User Groups dialog displays (Screenshot 2015.1.30). For a given group, all members can view members but only those with administrative privileges can edit or delete the group. When viewing a group for which you are not an admin, disabled button options turn gray.
-
Groups in which you are a member display under Group Names. Click on a group to select.
-
Click Delete Selected Group button to delete the group (admins only).
-
The selected group's description and members display.
-
Members with administrative priviledges have red icons next to their name while those that do not are labeled with a blue icon.
-
Remove a member by clicking on the red x next to their name (admins only).
-
Add a member to the selected group by entering the username in the text field and clicking Add user to [group name] button (admins only).
-
If a member has a searchable name, as described in Share Data, then you can search for them with a partial username or an email address by clicking on the magnifying glass icon . Otherwise, you must know the exact username.
-
Make a user a group administrator by checking User can administer group.
-
Create a new group by inputing a Group name and group Description in the text fields. Click the Add New Group button.
-
To allow non-member GenomeSpace users to view members of a group, check the box. This is a future feature.
You can add any GenomeSpace-enabled tool to your GenomeSpace toolbar as a private instance. For example, you can add your private GenePattern or Galaxy server as a private tool.
-
You and groups you share it with can see and use this instance.
-
Private tools show up in the tool catalog for addition to a toolbar. From the tool catalog, add the tool to your toolbar as outlined in Customizing the interface.
To manage private tools, select Manage>Private Tools. The Manage My Tools dialog box displays and lists private tools you administer. Only tools you have added can be edited or deleted by you.
-
To delete a listed tool, click the red x next to the tool name.
-
To modify a listed tool, click the Modify link in line with the tool name. An Edit dialog appears.
-
To add a new private tool, click the Add new button. An Add a new private tool dialog appears.
The Edit and Add a new private tool dialog boxes have the same input fields. Edit or fill out the parameters summarized in the table below and press Save. To display instructions within the dialog box, click the blue quesiton mark ? button.
|
Field
(* required)
|
Description |
|
Name* |
|
|
Description |
|
|
Tool Provider* |
-
Institution, group, or user providing the tool
|
|
Base URL* |
-
The page in the web-based application that will be launched or the URL of a JNLP launch file for desktop applications. For example, a GenePattern server might have the base URL <http://gpdev.broadinstitute.org/gp/pages/genomespace/receiveFile.jsf>.
|
|
Help URL |
-
Optional tool documentation web address
|
|
File Parameter |
-
Optional parameter to pass GenomeSpace file URLs to the tool when launched. Without this GenomeSpace cannot pass a file to your tool.
-
We recommend as a minimum that you add the ability to transfer data between your tool and GenomeSpace.
-
The File Parameter name is added to the Base URL for the call. File parameters are defined by the application you are adding. If you do not know the file parameter, contact the help desk for the tool you are adding.
-
Check the Allow multiple files box to allow multiple files to be passed to the tool at once. Specify a Multiple file Delimiter to separate the multiple file URLs.
-
Select as many as apply from the list file formats your tool natively accepts. Files in these selected formats are sent directly to the tool and GenomeSpace will not ask to convert them.
-
If another compatible format is selected, meaning the conversion between formats is supported, GenomeSpace will automatically convert when a file is sent to the tool. See Help menu>Format Converters for supported conversions.
-
If your tool's accepted format is not listed, contact gs-help@broadinstitute.org to request the addition.
|
|
Icon |
-
Optional custom icon to display in the tool catalog and toolbar for the tool. By default, a GenomeSpace icon is provided.
-
Use GIF, JPG, or PNG files.
-
Icon is scaled to 44x44 or less pixels within GenomeSpace.
-
Sharing the tool adds people icons to the tool icon.
|
|
Share with groups |
-
Optionally share your private tool with your groups. Your groups are groups in which you are a member.
-
Shared group users will be able to see and launch the tool, but cannot edit or delete it.
-
Click the wrench icon to create or edit user groups as described in the preceding section.
|
Additional considerations
-
All tools need to be web-launchable. Desktop applications like Excel cannot be handled at this time. If your tool is a Java-based application, it must be implemented as a Java Web start jnlp file.
-
If GenomeSpace-enabled, the tool should point to the GenomeSpace production environment as detailed in the technical documentation.
-
Some GenomeSpace tools have instructions in their help for managing private instances in GenomeSpace. For example, Galaxy on their Customizing Galaxy's GenomeSpace Integration help page.
-
You may not share tools with the gs-public group via this mechanism. If you'd like to make your tool available to all members of the GS community, contact the development team at gs-help@broadinstitute.org.
-
If you are using a private tool and would like to see it use more GenomeSpace features, please let us know and we will try to work with the developers to have it added.
Run an Analysis
This page gives an overview on how to make data files available to GenomeSpace and send these files to a tool for analysis. When you launch a tool on a file, if needed and supported, file formats are converted automatically. To see supported conversions and to manually convert files, see Convert file formats.
The following pages provide step-by-step instructions on the titled topics:
The following daughter pages cover additional analysis related topics:
If you have trouble launching desktop tools, see FAQ2.2.
Load data files
Make files available to GenomeSpace with one of the following methods. The second column provides links to detailed instruction.
|
Drag-drop data files from your desktop into your user folder in the browser |
|
|
Import files by URL from the menu File>Import from URL |
|
|
Send files from a GenomeSpace-enabled tool to your GenomeSpace account |
|
|
Mount Dropbox, Amazon S3, or Google Drive files using Connect from the menu bar |
|
Send data to a specific tool from GenomeSpace
Launch a tool to analyze files using one of the following methods.
-
drag-drop the file(s) onto a tool in the toolbar
-
select the file(s) and go to menu Launch and select a specific tool
-
select file(s) then click on the tool in the toolbar
-
select file(s) then click on the files and select a tool from the pop-up menu
The Launch dialog box opens (Screenshot 2015.2.4).
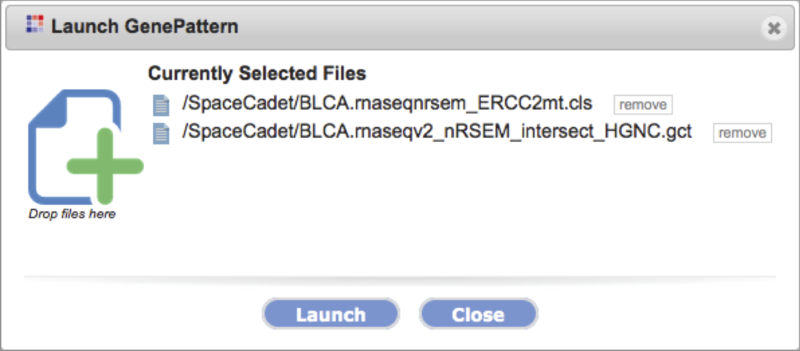
-
Currently selected files are listed with the option to remove each by clicking the remove button.
-
You can also add files by drag-dropping them from your main files panel to the target area indicated by the green plus +.
-
Click Launch to send the selected files to the tool.
-
Follow additional steps presented by the tool.
See User Interface for a description of the toolbar and the Tool Guide for tool specific instructions.
Convert file formats
GenomeSpace contains built-in file converters for frictionlessly moving your files from one tool to another and these are described in the three sections below. By no means do the given lists encompass all the accepted file formats used by the tools.
Please let us know of additional file conversions that would be helpful to your work, or if you have a converter you would like to contribute to GenomeSpace, at gs-help@broadinstitute.org.
Rename the file extension. A number of formats are based on the plain text format and you can convert these to a TXT file simply by renaming the file extension.
To rename a file, either:
-
Right-click on the file and select Rename from the pop-up menu.
-
Check to select the file and select File menu>Rename.
Edit the original file name and extension in the display and click Rename to save.
The converse requires additional consideration. You can transvert a plain text file to a tool-specific format by renaming the extension if the file is of a supported data type and has the required attributes of the format.
-
Supported data types and required attributes are described in detail for file formats at their respective websites. These required attributes may include specific usage for select cells such as specific headings, unique sample and probe identifiers, etc.
-
One example attribute is the delimiter. For example, GenePattern's GCT format data are tab-delimited and GenePattern's CLS format labels are space-delimited.
-
A file must conform to the required attributes for a true conversion. A file with the extension but without the required attributes results in a tool error.
-
Transversion may be useful to take advantage of certain GenomeSpace features, such as Heatmap previews, which are only available to GCT, GXP and Genomica TAB files.
-
Note rich text format TXT is noncomparable to plain text TXT. Mac users needing help on creating plain text files, see this external site.
Convert a file format
In sending files to different tools, you may automatically invoke a file conversion. Each tool handles these conversions differently, and may offer you options within the tool's user interface, or may convert the file behind the scenes. The option to manually convert the file will not be available if there is no converter for that format. The next section on this page lists available converters.
Manually convert file formats within GenomeSpace by:
-
Right-clicking the file and selecting Convert.
-
Checking a single file and selecting File menu>Convert.
This opens the Convert File Format dialog box.
-
Multiple converters for a file type are presented in a drop-down menu. Select the destination format from this menu.
-
To convert and download the file, click Download.
-
To convert and save in the same folder, click Convert on Server.
Available Converters
For the most current list of file converters, on the menu bar select Help>Format Converters. Hovering over formats in the new dialog displays brief descriptions of the format. Similarly, links in the table below take you to the next section where each format is described.
The nowhitespace converter for TXT files is for developer testing only. To convert TXT files, see Convert by renaming the file extension.
|
From format |
To format |
|
ADJ |
XGMML |
|
ATTR (Cytoscape) |
ATTR (Cytoscape GeneMania) |
|
CDT |
GCT (GenePattern) |
|
TAB (Genomica) |
|
GCT |
ATTR (Cytoscape) |
|
GXP |
|
TAB (Genomica) |
|
geneset.TAB
The input is a dataset with expression values for genes or probes, but the output lists just the probes.
|
|
EXP (geWorkbench Affymetrix EXPeriment file) |
|
GMT |
TAB (Genomica) |
|
GXP |
GCT |
|
LST |
geneset.TAB (Genomica)
A single column indicating a geneset is added and includes all genes from the LST file.
|
|
ODF |
ATTR (Cytoscape) |
|
REG2TARGET |
geneset.TAB
The input is a file that maps regulators to target genes, but the output lists just the probes.
|
|
GMT |
|
RES |
GXP |
|
TAB (Genomica) |
|
geneset.TAB
The input is a dataset with expression values for genes or probes, but the output lists just the probes.
|
|
TAB (Genomica) |
GCT |
Descriptions of file formats for which converters are available
|
Format extension |
Primary tool |
Description |
|
ADJ |
GenePattern ARACNE module |
Adjacency file, tab-delimited. Used by the ARACNE module in GenePattern. The ARACNE module is an algorithm that reverse engineers a gene regulatory network from microarray gene expression data. Further information on this file format can be found here (PDF). |
|
ATTR (Cytoscape) |
Cytoscape |
Cytoscape format that describes node and edge attributes. Further information on this file format can be found here. |
|
ATTR (Cytoscape GeneMania) |
Cytoscape GeneMania plugin |
Cytoscape attribute format for GeneMania networks. See this page for more information about the GeneMania plugin for Cytoscape. |
|
CDT |
GenePattern's HierarchicalClustering module |
CDT (clustered data table) files are created by GenePattern's HierarchicalClustering module. The CDT file reorders the original input data based on the clustering. An additional column or row is added and depends on if clustering was performed on genes or arrays. The additional column or row contains a unique identifier for each row or column that is linked to the description of the tree structure in the GTR or ATR file that is also output by the module. For details on the format, see here. |
|
EXP |
geWorkbench |
The geWorkbench native tab-delimited format for saving microarray data, providing a way to include both the data matrix for a group of arrays and various set labels grouping these arrays in the same file. Further information on this file format can be found here. |
|
GCT |
GenePattern |
A tab-delimited file format that describes an expression dataset. Further information on the file format can be found here. |
|
GMT |
GenePattern GSEA module |
Tab-delimited file format that describes gene sets. Each row represents a gene set. Further information on this file format can be found here. |
|
GXP |
Genomica |
Genomica proprietary expression file format. This file format can be used to store the results of complex analyses, and a single GXP file can store multiple annotation files and analyses. It presents the same data as TAB format but is not tab-delimited. More information is detailed here. |
|
LST |
Genomica |
Genomica outputs lists of genes as an LST format file. It contains the list of genes and descriptions given in the first two columns of GXP or TAB files but not expression data. Gene symbols are in square brackets, followed by the identifier and description as shown in the lower-right quadrant of the figure here. |
|
ODF |
GenePattern |
The Output Description Format (ODF) is similar to the RES or GCT file formats for gene expression datasets. The main difference is in the header; the body of data still contains the expression level values for each gene in each sample. Further information on the file format can be found here. |
|
REG2TARGET |
|
A two-column format that contains the mapping between regulators (column 1) and target genes (column 2). |
|
RES |
GenePattern |
A tab-delimited file format that describes an expression dataset. Unlike the GCT file format, the RES file format contains labels for each gene's absent (A) versus present (P) calls, as generated by Affymetrix's GeneChip software and does not allow missing expression values. Further information on the file format can be found here.
|
|
TAB |
Genomica |
Tab-delimited text file that contains gene expression data. It presents the same data as the GXP format. The first row is a header row, where the names of the arrays or experiments are specified from the third column onwards. Column one lists gene symbols and column two gives the name and description of the probe separated by space-hyphen-space " - ". Remaining columns give expression data for each gene across experiments.
The geneset.TAB format contains just the list of probes from a TAB file. This format is different from the LST format in that it omits the column of descriptions and adds columns that define gene sets, marked by 1 if a gene is included and 0 if it is not.
|
|
XGMML |
Cytoscape |
eXtensible Graph Markup and Modeling Language file. These files contain network data and node/edge/network attributes. Further information on the file format can be found here. |
Extract file rows & columns
Create a new file containing selected columns and consecutive rows on the GenomeSpace server from a delimited data file. This obviates the need for you to download a file and perform the operation in a spreadsheet program and upload the new file.
To access this feature you can either:
-
Right-click on a file and select Extract rows/cols from the pop-up menu
-
Check to select a single file then select File menu>Extract rows and columns.
This opens the Extract rows and columns dialog (Screenshot 2015.1.21). Make selections within the dialog and click Save for a new file.
-
Select tab, comma, space, or semicolon delimiter from the drop-down menu.
-
Display updates automatically.
-
Check treat consecutive delimiters as one to skip empty fields between delimiters and to place filled fields adjacently. This can shift data cells in undesired ways. For example, for a GCT file with empty Description fields, checking this box will shift data fields into the Description column (Screenshot below 2015.2.3).
-
View the selected text-based file up to the first ten rows in spreadsheet format.
-
When less rows are shown, up to the first 50 kb of the selected file is displayed.
-
Select consecutive rows by entering start row and end row numbers. Leave end row field blank to include all remaining rows.
-
Use the bolded row numbers on the left as reference.
-
Select columns by checking boxes at the top of columns. Scroll horizontal bar at bottom to display additional columns.
-
When selected, column text changes from gray to black and is highlighted.
-
Unselected column text remains gray with white backgrounds.
-
Click on Toggle all columns to invert selections.
-
This is useful when selecting the majority of columns as it allows you to uncheck the fewer undesired columns.
-
Use the Save as field to change the file name. GenomeSpace automatically appends the term .slice between the original file name and extension.
-
If you are removing header lines, consider editing the file extension to match the new format.
-
Press Save to create the new file in the same folder as the original file.
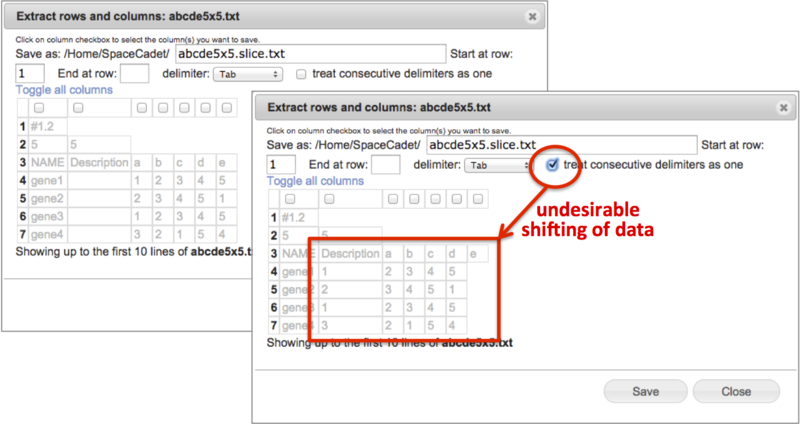
Export external site files to GenomeSpace
Certain GenomeSpace-enabled data portals, listed under Tools, allow direct export of their data to GenomeSpace to facilitate analysis of the data with other bioinformatic tools. These portals use a GenomeSpace lightweight data integration library (link for developers), which means you need to sign in to your separate account with the portal in order to access its data in any manner, including export.
Currently, data portals that offer direct export of their data to GenomeSpace include:
In general, a data portal will have a menu to browse data. For example, for the two first data portals above, access data from the menu bar Browse>Data. When data are listed at the file level, look for the small GenomeSpace icon  next to each file name or at the bottom of the curation table. Clicking on the icon launches the GenomeSpace import dialog window.
-
If prompted, login or register for GenomeSpace.
-
Select the directory to save the file to and optionally rename the file.
-
Click Submit.
-
Analyze the data from GenomeSpace.
Recipe demo datasets
The scale of genomic data is growing and to minimize the duplication of resources spent to obtain and store data of interest to the wider scientific community, providing data server access is becoming more common. In addition to the specialized data portals provided under GenomeSpace Tools, GenomeSpace enables use of other public data resources. If a public data resource provides URL addresses for data files, then you can easily access the files from your GenomeSpace account. On this page we list the example datasets used in the Analysis Recipes as well as provide links to alternative datasets that showcase GenomeSpace functionality.
GenomeSpace Public Folder Datasets
The Public folder in your left directories panel contains user specific public data and a folder titled SharedData. Example datasets used in GenomeSpace Recipes are stored in the Demos subfolder of the SharedData folder. Here we briefly describe each shared dataset. Find more information about each dataset on the corresponding Recipe page, provided as links in the table below.
-
Link to open the Demos folder: /Home/Public/SharedData/Demos
-
Some Recipes use data from other sources and do not have a corresponding shared dataset.
-
Some datasets were used in past workshops and do not have a corresponding recipe or a corresponding presentation. These will be removed from the SharedData folder in the upcoming months as we organize these datasets.
Table matching /Home/Public/SharedData/Demos subfolders to Analysis Recipes as of February 3, 2015
Amazon S3 Public Datasets
See aws.amazon.com for the comprehensive list of public S3 datasets. Of note because of their scale are two projects, the 1000 Genomes Project and the Human Microbiome Project. The User Guide details how to Connect an S3 Bucket to your GenomeSpace account.
Other Public Datasets
Please let us know of other public datasets GenomeSpace should link to. We refer you to curations on the following websites listing other public datasets.
WDK launch on file or URL
WDK stands for Web Development Kit. This feature was introduced in the Blogpost from December 18, 2014, which is of more interest to developers.
Users need only know that private tools or tools that are not present in the GenomeSpace tool catalog may use this feature to allow you to save their data to your GenomeSpace account and even allow you to select a GenomeSpace Tool to launch on the data. GenomeSpace will prompt you to sign in to your account before saving files.
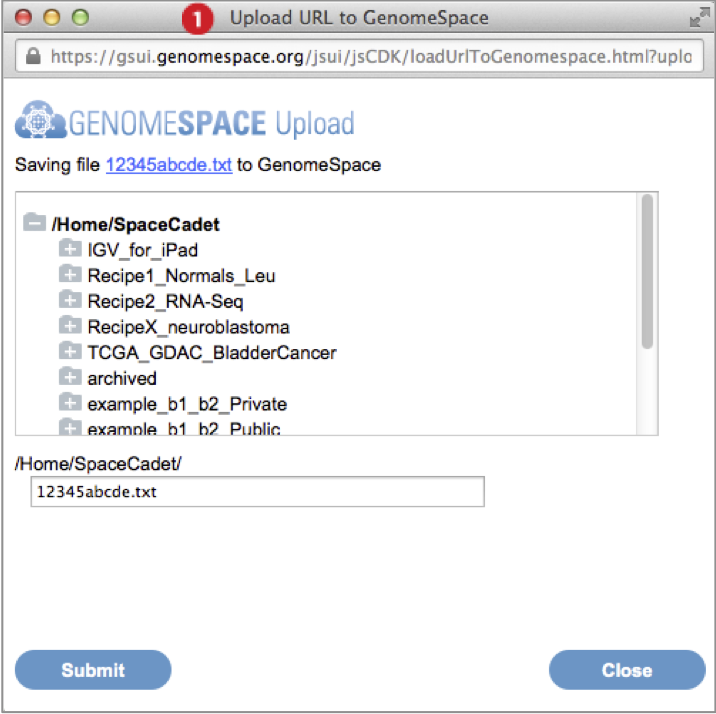
-
When you upload a file, the Upload URL to GenomeSpace dialog box appears (Screenshot above, 2015.2.4).
-
Select the a directory location that the file will be saved within.
-
Optionally edit the name of the file.
-
Click Submit.
-
Once the file is uploaded, if the feature includes launching a tool, then the Launch GenomeSpace Tool on URL dialog appears (Screenshot below, 2015.2.4).
-
Use the scroll button at the edge of the toolbar to see the next set of available tools.
-
Click on a tool to launch it on the data.