| 

Back


Setting Up Your Own Instance (version beta 1.0)

Introduction

This document describes how to set up your own instance of GenomeSpace services. 

GenomeSpace is designed to run on Amazon Web Services. The basic steps involve launching our provided Amazon Machine Image and then customizing the settings to correspond to your own Amazon credentials, machine DNS name, email accounts, etc.

This document assumes the person installing the GenomeSpace instance has some familiarity with Amazon AWS and a basic understanding of HTTP and HTTPS security, and is also comfortable working on a Unix command line.

Prerequisites

1. An Amazon Web Services account

GenomeSpace currently runs on the Amazon Web Services cloud exclusively and makes extensive use of its APIs. If you do not have an account with Amazon, go to http://aws.amazon.com/.

2. A DNS entry for your server

A DNS entry allows it to be accessed with a URL, such as https://genomespace.myinstitution.edu/jsui.

3. A security certificate that matches the DNS entry

All communications with the GenomeSpace servers occur via HTTPS, and thus require a security certificate, preferably from a well-known certificate authority. The public GenomeSpace instance uses a security certificate issued by Network Solutions for domain *.genomespace.org (a “wildcard” certificate), but you can use whatever certificate source you prefer and the certificate can be specific to a server. We have included a dummy certificate so that you can start up the service.  However, there will be problems accessing the services without an “official” security certificate, such as not being able to upload files, security warnings from web browsers, etc. Using a self-issued certificate is likely to cause the same problems.

4. An email account that can be used to send email notification to users during registration

In addition to the email account address and password, the services need the SMTP host DNS address. We have been using GMail accounts for this purpose, and our info looks like this:
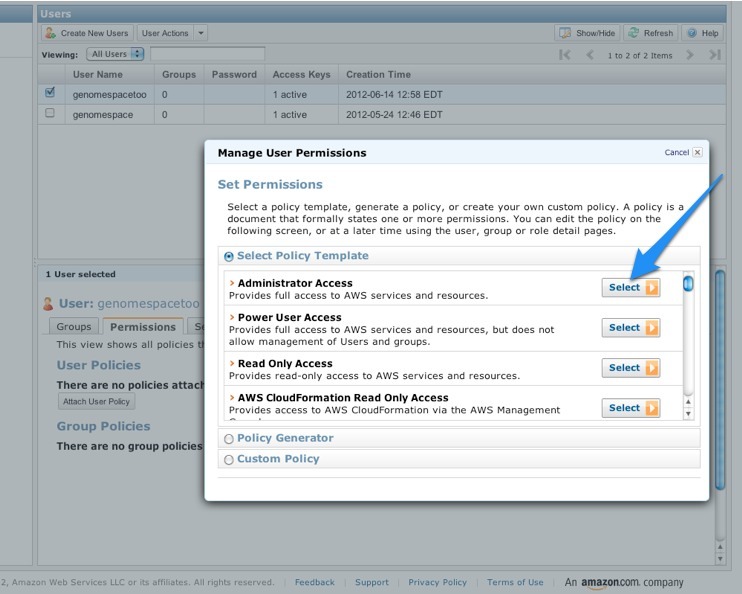
  • user email: genomespaceNotifier@gmail.com
  • host: smtp.gmail.com
  • port: 465
  • password: aPrivatePassword

Setup

1. Create a super-user for your account using the Amazon IAM service, and save its credentials.

GenomeSpace will not run properly using the credentials for the Amazon account owner or “root account”  (i.e., the Amazon user associated directly with the Amazon account). Using the main Amazon account, you can create a new user that has sufficient privileges to access the Amazon buckets, SimpleDB domains, etc. To create the user:

  1. Go to the IAM portion of the AWS Console: https://console.aws.amazon.com/iam/home#s=Users
  2. Click the Create New Users button.
  3. Enter the name of your user.
  4. Click the Download Credentials button in the confirmation dialog.

Important: When you create the user from the AWS Console, there will be a link to download the credentials. This is the only time that you will be able to do so for this user. Download the credentials and save them; they are required for the rest of the installation procedure.

  1. Assign permissions to the user; the simplest thing is to assign administrator access for the user:
    1. Select the user.
    2. Click the Permissions tab.
    3. Click Attach User Policy.
    4. Select Administrator Access, then accept the generated policy.

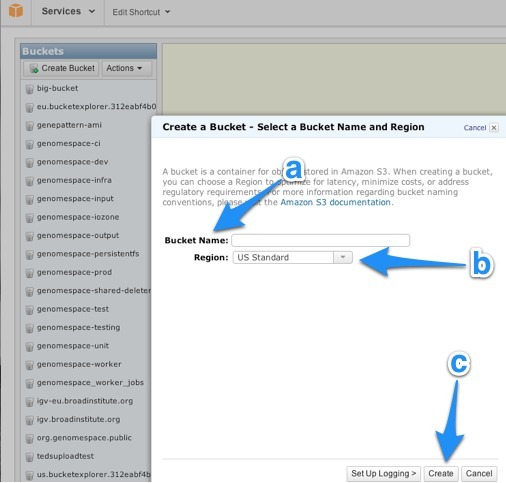
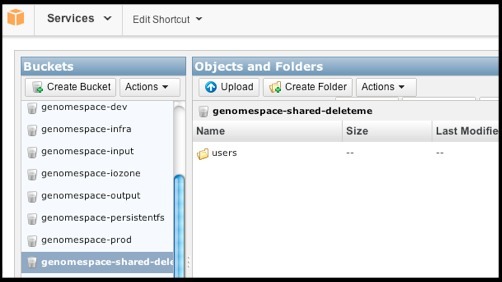
2. Create an S3 bucket and initialize it.

  1. The easiest way to do this is to log in into the AWS console at:  https://console.aws.amazon.com/s3/home
  2. Click the Create Bucket button.
  3. Complete the Create a Bucket form:
    1. Enter the name of the file bucket you want to use.
    2. Select the best region for your server.
    3. Click the Create button.

  1. Click the Create Folder button and enter the name users.  Your AWS Console screen will look like this:

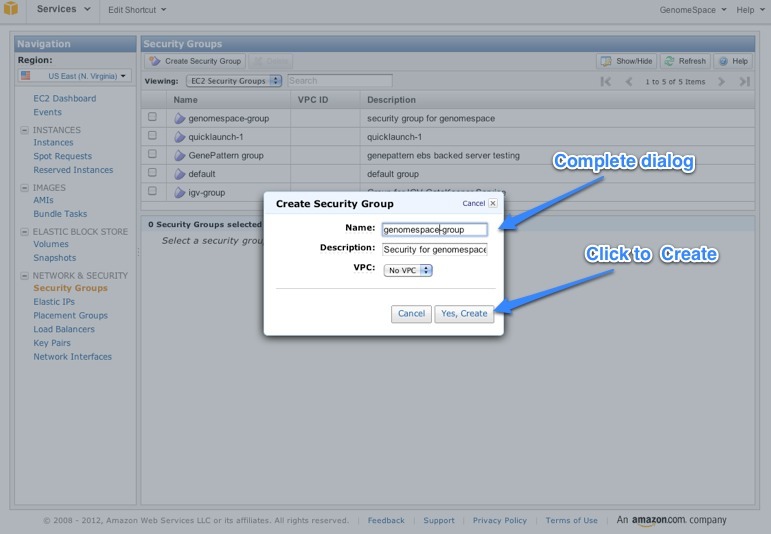
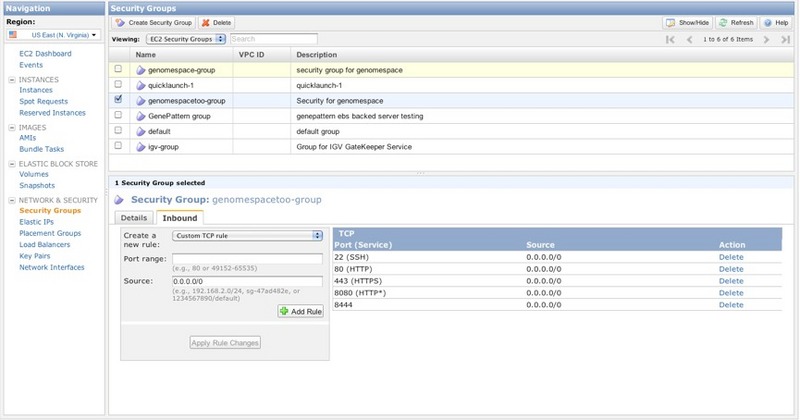
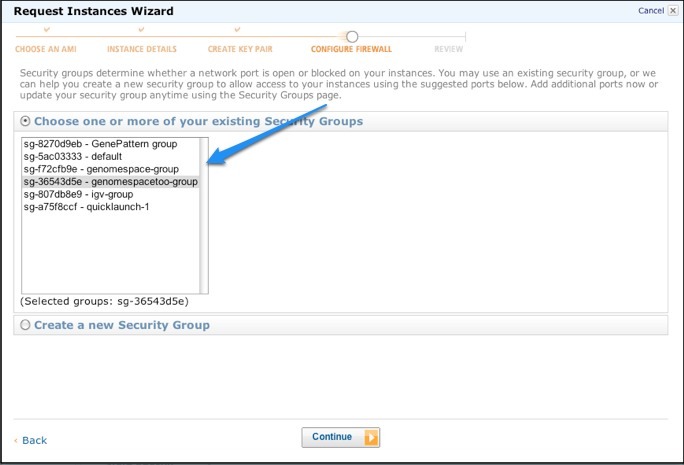
3. Create a security group for GenomeSpace

The security group allows you to specify the network ports needed to access the GenomeSpace web services remotely.

  1. Go to the EC2 console Security Groups page:  https://console.aws.amazon.com/ec2/home?#s=SecurityGroups
  2. Click the Create Security Group button. Complete the Create Security Group dialog.

  1. Click Yes, Create.
  2. Select your newly-created security group and click the Inbound tab in the bottom panel.
  3. In Create a new rule drop-down:
    1. Select SSH, enter a definition, and click Add Rule.
    2. Select HTTP, enter a definition, and click Add Rule.
    3. Select HTTPS, enter a definition, and click Add Rule.
    4. Select Custom TCP rule from the pull-down menu, enter 8080, and click Add Rule.
    5. Select Custom TCP rule from the pull-down menu, enter 8444, and click Add Rule.

When you're done, the Inbound tab for your new Security Group should look like this:
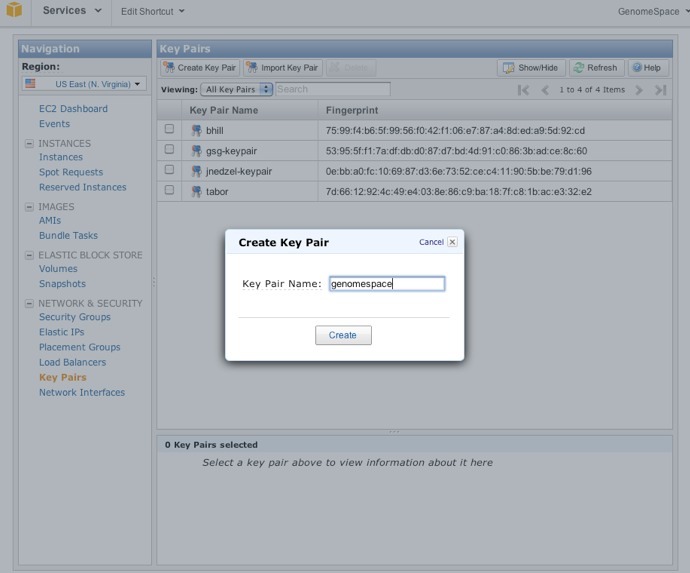
 

4. Create a key pair for GenomeSpace.

You need to generate a key pair with a corresponding SSH key file that will allow you to access your instance remotely.

  1. Go to the Key Pairs window on the AWS Console: https://console.aws.amazon.com/ec2/home?#s=KeyPairs
  2. Click the Create Key Pair button.
  3. Complete the Create Key Pair dialog and click Create.

  1. As soon as you click the Create button, a file will be downloaded with the extension .pem. Save this file. This file allows you to log in remotely to your instance.

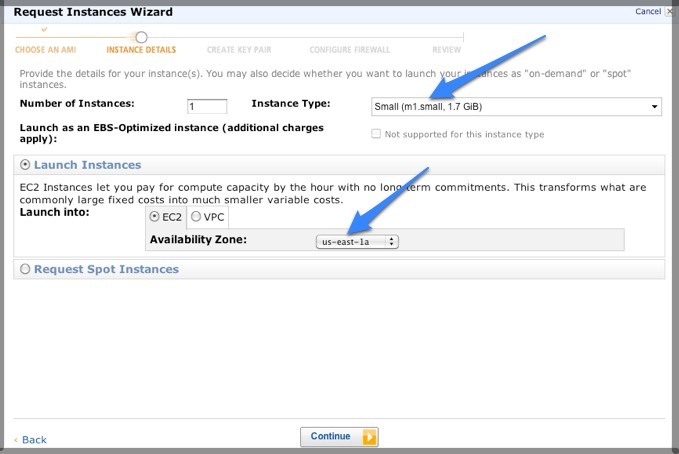
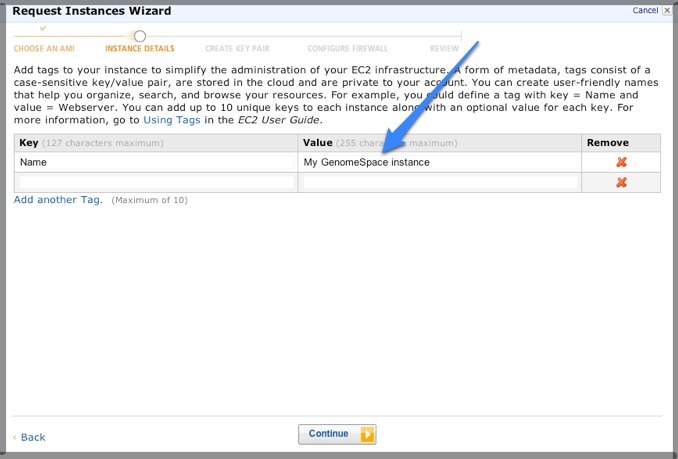
5. Launch the GenomeSpace AMI

  1. Go to the AMIs window in the AWS Control Panel: https://console.aws.amazon.com/ec2/home?&region=us-east-1#s=Images
  2. Look up the GenomeSpace AMI by entering GS Public 1 in the search box and selecting Public Images from the first pull-down, as shown below.

  1. Select the checkbox beside the AMI and click the Launch button.  This opens a wizard that will help you launch the AMI.
  2. Select Small (m1.small) in the Instance Type pull-down and an Availability Zone that makes sense for your users.  Click Continue.

  1. Accept the defaults on the next wizard screen by clicking the Continue button. 
  2. Enter a name that will let you recognize your new instance in the console and click Continue.

  1. On the next page, select the key pair you created earlier.

  1. On the next page, select the Security Group you created earlier in the process.

  1. On the last screen, review your settings and click the Launch button at the bottom.
  2. Return to the Instances page. The new instance is likely to take a few minutes to start.

6. Associate an Elastic IP address with your new instance.

Network addresses for EC2 instances are volatile and generally do not survive an instance restart. You can assign a stable IP address by using AWS Elastic IPs.

  1. Go the Elastic IPs page in the AWS Console: https://console.aws.amazon.com/ec2/home?#s=Addresses
  2. Click the Allocate New Address button and click Yes, Allocate.
  3. Select the new Address and click Associate Address.
  4. Select your GenomeSpace instance from the list and click Yes, Associate.

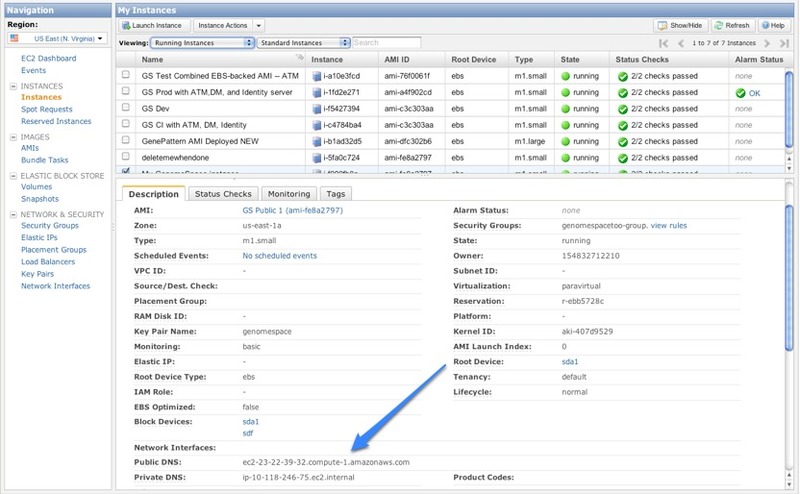
7. Associate a network domain name with the IP address for your instance.

Your network administrator should be able to update or create a DNS record where they can point a server name such  as genomespace.company.com with the elastic IP address you just created.

8. Remotely log into the new instance.

The rest of the setup process must be performed via command line to the running instance. Access the instance via an SSH client.

Be sure to have access to:

  • the .pem file you downloaded when you created the Key Pairs
  • the DNS name for the machine; you can use the one set up by your network administrator or the one created automatically by AWS
    • NOTE: To get the AWS DNS Name, click Instances in the Navigation panel, find your new instance, and click its row. The Description tab in the bottom panel will show its Public DNS:

From your local machine, execute the following command:

ssh -i YOURKEYPAIRFILE.pem ec2-user@YOURINSTANCEPUBLICDNSENTRY

where YOURKEYPAIRFILE.pem is the key file downloaded when you created the security group and YOURINSTANCEPUBLICDNSENTRY is the Public DNS address for the instance.

Note: You might get an SSH error like the one below. If you do, it means you need to reduce the permissions on the .pem file. You can get past by this error on Mac or Linux with the chmod command:

chmod 400 genomespace.pem
@@@@@@@@@@@@@@@@@@@@@@@@@@@@@@@@@@@@@@@@@@@@@@@@@@@@@@@@@@@
@         WARNING: UNPROTECTED PRIVATE KEY FILE!          @
@@@@@@@@@@@@@@@@@@@@@@@@@@@@@@@@@@@@@@@@@@@@@@@@@@@@@@@@@@@
Permissions 0644 for 'genomespace.pem' are too open.
It is recommended that your private key files are NOT accessible by others.
This private key will be ignored.
bad permissions: ignore key: /Users/test1/genomespace.pem
Permission denied (publickey).

9. Customize configuration files.

  1. Copy the configuration template files to a new directory.

cd /tmp
mkdir gs-config
cd gs-config
cp -r ~/gs-config-files/* .

  1. Generate a secret key for your website and copy it to appropriate locations. This file will be used for encryption and decryption of security tokens.  Assuming you are still in /tmp/gs-config, execute:

gengssecretkey.sh

This creates a file called genomespace-secret.key.

  1. Copy the secret key file:

cp ./genomespace-secret.key ./atm-properties/
cp ./genomespace-secret.key ./identityserver-properties/
cp ./genomespace-secret.key ./dm-properties/

  1. Edit the configuration file template copies to enter the correct server name, default bucket name, and namespaces.
  2. Replace server.mydomain.edu with your own server's DNS name by executing the following command (all one line):

find . -name  server.properties | xargs sed -i  's/theserver/server.mydomain.edu/'

  1. Set the bucket name. Replace my-gs-bucket-name with your own bucket name:

find . -name  server.properties| xargs sed -i  's/thebucketname/my-gs-bucket-name/'

  1. Set the namespace used for the SimpleDB databases. Keep the namespace string to 3 or 4 characters. Replace gs1 with whatever you want to use:

find . -type f -name server.properties | xargs sed -i  's/gsnamespace/gs1/'

  1. Using your favorite text editor (such as emacs), open genomespace-aws.properties and enter the Access Key ID and Secret Access Key for the Amazon user you created earlier. Also, include the email address for the email account that will be used to send registration notifications.

emacs genomespace-aws.properties

  1. Copy genomespace-aws.key into the sub directories.

cp ./genomespace-aws.properties ./identityserver-properties
cp ./genomespace-aws.properties ./atm-properties
cp ./genomespace-aws.properties ./dm-properties

  1. Create the jar files and copy them to the Virgo repository.

cd ../atm-properties/
zip -r atm-properties.jar *
cp atm-properties.jar /usr/share/virgo/repository/usr
cd ../dm-properties/

  1. Edit the server.properties file and modify the properties labeled

org.genomespace.datamanager.groupManagementServer.username

and

org.genomespace.datamanager.groupManagementServer.password

Make a note of the assigned values to use later for registering a user.

  1. Continue creating the rest of the properties jars.

zip -r dm-properties.jar *
cp dm-properties.jar /usr/share/virgo/repository/usr

cd ../jsui-properties/
zip -r jsui-properties.jar *
cp jsui-properties.jar /usr/share/virgo/repository/usr

cd ../identityserver-properties/

  1. Edit the server.properties for identity server to set the emailer properties for your environment.

zip -r identityserver-properties.jar *
cp identityserver-properties.jar /usr/share/virgo/repository/usr

10. Initialize GenomeSpace databases.

There are some Amazon SimpleDB databases that should be initialized with data for GenomeSpace to start normally, and so we provide seed data for you to load.

  1. Create a directory and retrieve the database data files into that directory.

mkdir /tmp/dbfiles
cd /tmp/dbfiles
wget https://dm.genomespace.org/datamanager/file/Home/Public/mocana2/GenomeSpaceSetupData/0.9/prod_dataformat.db -O prod_dataformat.db
wget https://dm.genomespace.org/datamanager/file/Home/Public/mocana2/GenomeSpaceSetupData/0.9/prod_webtool.db -O prod_webtool.db

  1. Set up your environment with your Amazon credentials.

export AWS_ACCESS_KEY_ID=yourAwsSecretId
export AWS_SECRET_ACCESS_KEY=yourAwsSecretAccess

  1. Execute the script to load the data.

loadgsdata.sh theNameSpace

where theNameSpace is the same as what you set earlier in for the configuration files.

11. Configure HTTPS.

GenomeSpace runs in the Virgo Application Server, which in turn is built on top of the Apache Tomcat server.  Depending on the origin of the SSH certificate and what format it is in, you may have to configure the Virgo https support with different parameters and/or convert your certificate to a format that is amenable to the server.  For more information:

Each vendor provides instructions on how to use the certificates they sell with Tomcat. Here are the Network Solutions instructions on how to use their certificates: http://www.networksolutions.com/support/installation-of-an-ev-ssl-certificate-for-tomcat-apache/

More information is available from Apache: http://tomcat.apache.org/tomcat-6.0-doc/ssl-howto.html

The file to edit on the GenomeSpace application server is /usr/share/virgo/config/tomcat-server.xml

The relevant portion of the file:

<Connector port="8444" protocol="HTTP/1.1"
                           scheme="https"
                           secure="true"
                           SSLEnabled="true"
                          

keystoreFile="config/wildcard.genomespace.org.p12"
                           keystoreType="PKCS12"
                           keyalias="tomcat"
                           maxThreads="150"
                           clientAuth="false"
                           connectionTimeout="20000"
                           redirectPort="8444"
                           sslProtocol="TLS" />

In the main GenomeSpace setup, we have placed the certificate file (wildcard.genomespace.org.p12) in the /usr/share/virgo/config directory.

12. Update the admin password for Virgo Console.

The password for the admin user is set in the file: /usr/share/virgo/config/org.eclipse.virgo.kernel.users.properties

The property user.admin is the admin password for the Virgo admin server application. For the best security, we recommend changing it.

13. Register the user used by the Data Manager to communicate to the Group Management server.

  1. Start up the Virgo application server.

cd /usr/share/virgo/bin
nohup ./startup.sh &

  1. Execute the following command to see boot-up progress:

tail -f /usr/share/virgo/serviceability/logs/virgo-server/log.log &

  1. Wait for the startup process to complete.
  2. From a web browser, go to the following URL (replacing YOURSERVERNAME with your server name):

https://YOURSERVERNAME:8444/identityServer/registration.html

A form like this one should appear:

  1. Enter the USERNAME and PASSWORD you set earlier for:

org.genomespace.datamanager.groupManagementServer.username

and

org.genomespace.datamanager.groupManagementServer.password

  1. For EMAIL, enter the an email address to which the person doing the installation has access.
  2. Click Sign Up.
  3. That email account should receive an email message with a link. Click the link to complete the registration, and you should see this page:

14. Start GenomeSpace.

  1. Shut down and restart the Virgo server.

cd /usr/share/virgo/bin
./shutdown.sh

  1. To make sure it is completely down, look for the Virgo server java process.

ps -ef | grep java

If only the grep command returns, the server is completely down.

If the Virgo java process is still active, wait a few more minutes, look for the process again.

If it still running, kill the process.

  1. Now start it up again.

nohup ./startup.sh &

  1. Open a web browser and go to the main GenomeSpace UI.

https://YOURSERVERNAME:8444