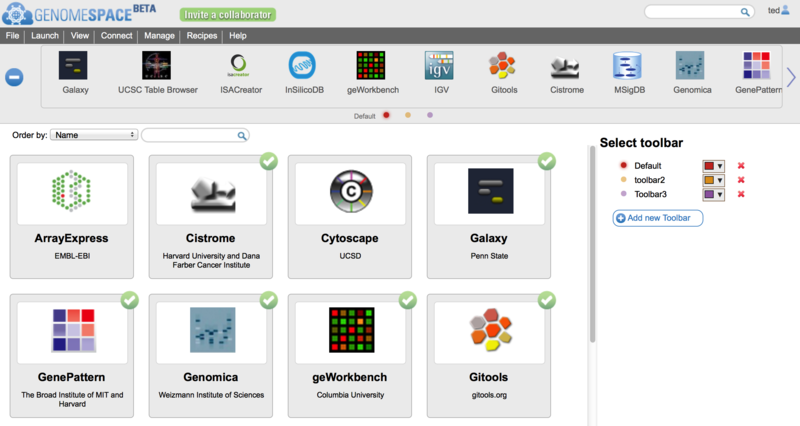
The GenomeSpace Toolbar and new Tool CatalogAs the number of tools available in GenomeSpace grows it has become clear that having a single toolbar on the GenomeSpace User Interface (GSUI) is no longer sufficient. So, to make it easier to deal with the ever-increasing collection of GenomeSpace tools, we have added a few new features to the GSUI; including multiple toolbars, and a new tool catalog to help you arrange and manage your tools and toolbars. The ToolbarThe new toolbar looks like this:
Some of the changes to note include:
To reorder the tools in a toolbar, simply drag and drop them within the toolbar. Also, as with the old toolbar, you can make the icons smaller by grabbing the bottom edge of the toolbar and dragging upwards as described in the previous Toolbar Enhancements blog post. The new scrollbar buttons also work on touchscreens for those of you accessing GenomeSpace from a tablet or smartphone. The Tool Catalog
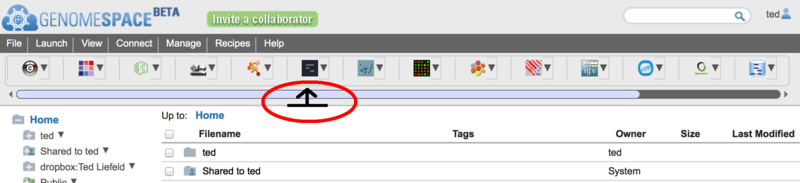
To open the tool catalog, click on the
In the catalog itself (on the left in the image above) you will see all the tools available to you in GenomeSpace. This includes those made available by the GenomeSpace team, as well as any private tools that other users have shared with you. If a tool is on your currently selected toolbar, it will display a checkmark at the top right corner. On the right under Select Toolbar in the image above, is the list of toolbars you have created. Everyone will start with one called 'Default', but you can rename it, by clicking on the toolbar name, and create others. You can also change the color assigned to a toolbar's button using the color picker beside the name. Finally you can delete a toolbar by clicking the red 'x' next to it; though you must always have at least one toolbar. You can change the current toolbar by clicking on the row with its name or by clicking its matching button (i.e. the colored dots). You can sort the tools using the 'Order by' control above the catalog. Tools can be sorted by:
You can also search for tools using the search box provided. This will search through tool names, descriptions, and tags, and display only those that match in the catalog. To see the description of a tool you may be interested in, or to add/remove it from the current toolbar, simply mouse over the tool card in the catalog.
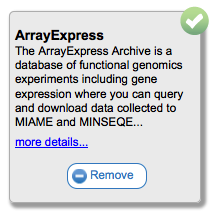
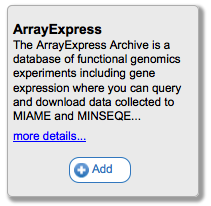
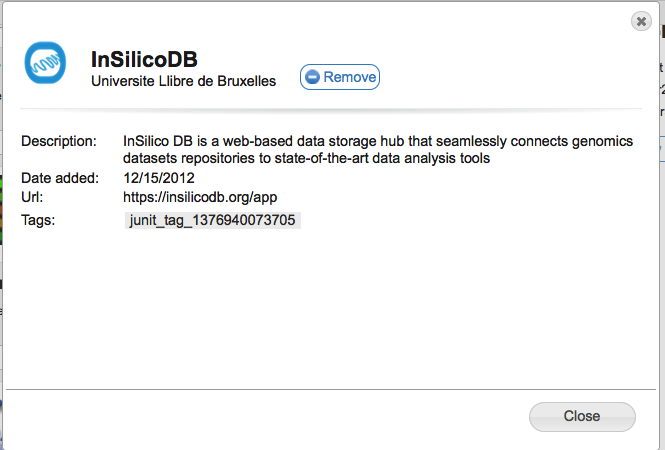
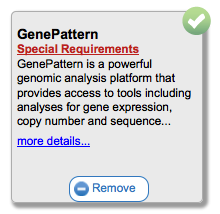
Clicking on the Add or Remove buttons will (suprisingly) add or remove this tool from your currently selected toolbar. You can see more information about the tool by clicking on the 'more details...' link. For example, for InSilicoDB you would see the following:
This shows you the tool's name, author, date added to GenomeSpace, the URL to access the tool directly, and also any tags that have been added to the tool in GenomeSpace. In the example above you see a tag called 'junit_tag_1376940073705' that was added by our automated build and test system. In the released version of GenomeSpace the tags typically reflect capabilities the tool has.
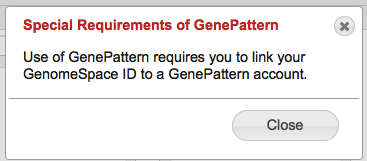
In some cases, a tool may have a special note attached to it. In these cases you will see an additional link called 'Special Requirements' that looks like this Clicking on this link will bring up details you may need to know before using this tool.
GenomeSpace OpenID Authentication for Ruby on Rails with DeviseFor those of you that are Ruby on Rails developers, you're most likely already familiar with Devise. It's a fantastically simple and flexible way to add password- and token-based authentication to your Rails application. What you may not know is that there is a companion gem called 'devise_openid_authenticatable' that extends Devise's authentication strategies to include OpenID. This post will show you how you can implement this to authenticate your application against the GenomeSpace OpenID server. SetupFor this example, we're using Rails 3.2.12 and Ruby 1.9.2. You can use newer versions of Ruby, but I don't recommend using Rails 4 for this - there are issues with OpenID and the CSRF authenticity token in Rails that causes authentication to fail unless you completely disable it, which is less than ideal if this application is going to be public. Once you've created your application, you'll need to add these 3 gems to your Gemfile: gem 'devise' gem 'devise_openid_authenticatable' gem 'warden' After that, create a User model in the standard fashion (see the Devise documentation for more information). If this is a new application you've created, you also need to set up a simple controller with an index method to give Devise somewhere to redirect to once we've authenticated. Here's a quick example: From the command line: rails g controller home index Add this line to app/controllers/home_controller.rb before_filter :authenticate_user! Finally, edit your config/routes.rb: devise_for :users get "home/index" root to: "home#index" It would also be a good idea at this point to read our OpenID Requirements documentation as well so that you're familiar with the concepts before moving forward. The User ModelOnce you've created your user model, you're going to want to edit it so that it only tries to authenticate against OpenID. To do this:
1. Migration to add necessary fields:
class AddOpenIDFieldsToUsers < ActiveRecord::Migration
  def up
    add_column :users, :identity_url, :string
    add_column :users, :username, :string
    add_column :users, :token, :string
    remove_column :users, :encrypted_password
  end
  def down
    remove_column :users, :identity_url
    remove_column :users, :username
    remove_column :users, :token
    add_column :users, :encrypted_password, :string
  end
end
2, 3. Edits to app/models/user.rb class User < ActiveRecord::Base # Include default devise modules. Others available are: # :token_authenticatable, :database_authenticatable, :confirmable, :lockable, :timeoutable, :omniauthable, # :registerable, :recoverable, :rememberable, :trackable, :validatable devise :openid_authenticatable, :trackable # Setup accessible (or protected) attributes for your model attr_accessible :identity_url, :email, :username, :token GenomeSpace OpenID Parameters & FormsThe next thing that you'll need to do is set up the proper GenomeSpace OpenID parameters inside you User model. This is done via a custom extension (option #3 from our OpenID Requirements documentation). To set this up, you need to do 2 things:
1. app/views/devise/sessions/new.html.erb: <%= form_for(resource, :as => resource_name, :url => session_path(resource_name)) do |f| %> <%= f.hidden_field :identity_url, value: "https://identity.genomespace.org/identityServer/xrd.jsp" %> <%= f.submit "Sign in using GenomeSpace" %> <% end %> In our login form (above), you can see that we've removed the standard username/password fields and instead added a hidden field that points directly at GenomeSpace's OpenID URL. This way, when the user clicks the "Login with GenomeSpace" button, they are redirected to our GenomeSpace login page, which will then return back to your Rails application once the login is successfully completed. 2. Implement required OpenID User methods (inside app/models/user.rb):
def self.openid_required_fields
  ["gender", "nickname", "email"]
end

def self.build_from_identity_url(identity_url)
  User.new(:identity_url => identity_url)
end

def openid_fields=(fields)
  fields.each do |key, value|
    # Some AX providers can return multiple values per key
    if value.is_a? Array
      value = value.first
    end

    case key.to_s
    when "nickname"
      self.username = value
    when "email"
      self.email = value
    when "gender"
      self.token = value
    else
      logger.error "Unknown OpenID field: #{key}"
    end
  end
end
These 3 methods will provide the necessary functionality so the devise_openid_authenticatable can map the fields from GenomeSpace's OpenID server to the instance of the User model you're working with. Here's a brief overview of what each method is doing: i. self.openid_required_fields This is an array of required fields for any successful authentication response. We're providing the SReg names for fields here even though we're using the custom extension as this is what is returned from GenomeSpace (more on this later). Specifically, we're saying that GenomeSpace must provide the gender and nickname fields in it's response. We'll map these fields to our User model later. ii. self.build_from_identity_url(identity_url) This method automatically creates your User record once we've successfully logged in and records it in the database. The :identity_url is your GenomeSpace OpenID unique identifier, and takes the following format: https://identity.genomespace.org/identityServer/xrd/[YOUR GENOMESPACE USERNAME]. We need this method so that we can record our other OpenID fields somewhere later on. iii. openid_fields=(fields) This is where the real heavy lifting happens. In this instance method (as opposed to the above class methods), once we have a valid User instance, we can then take the response from OpenID and parse out the various fields that we said we needed. It takes a hash from devise_openid_authenticatable (fields) and maps each field to what we want. Specifically, it takes the SReg names for the values we requested and maps them inside the case statement to the User columns we created earlier. Handling the Custom Extension ResponseYou might think you're done at this point, but there is one last thing we need to do. Even though we're using the custom extension, devise_openid_authenticatable can only send the request as either SimpleRegistration (SReg) or AttributeExchange (AX). This was why we specified the SReg names for the parameters in our required fields rather than the custom GenomeSpace fields. We need this because otherwise the fields aren't "signed" when they're returned, and devise_openid_authenticatable won't parse any unsigned fields. So we need to tell devise_openid_authenticatable how to handle this custom case. It requires a one-line fix to the source code for the gem. To do this:
Once you've vendored all of your gems (it is possible to only vendor the devise_openid_authenticatable gem, but I don't recommend it - it's much simpler to vendor them all), find the strategy.rb file inside the lib/devise_openid_authenticatable folder of the gem. Navigate down to the fields method (it should be around line 100) and look for the following line: if ns_alias.to_s == "sreg" And change the line to read like so: if ns_alias.to_s == "sreg" || ns_alias.to_s == "ext1" The reason we're doing this again is because of the response that comes back from GenomeSpace. If you refer back to the GenomeSpace OpenID Requirements documentation, you'll notice that using the custom extension sets the namespace to "ext1" instead of "sreg". Since the fields method parses the values returned by from OpenID by namespace, if we don't tell it how to handle this special namespace your username, email and token values won't get recorded. That's it - you've now got a simple Rails application that can authenticate against GenomeSpace's OpenID server. Toolbar enhancementsIt has long been possible to customize your GenomeSpace toolbar by adding, reordering or hiding tools. This has now gotten a little easier with the changes that we've just released. 1. Reordering the tools in your toolbarYou have always been able to reorder tools in your toolbar from the View>>Customize Toolbar menu but you can now also accomplish this just by dragging and dropping the tools within the toolbar itself. Simply click and hold on a tool's icon and drag it to the left or right to change its place in the toolbar order.
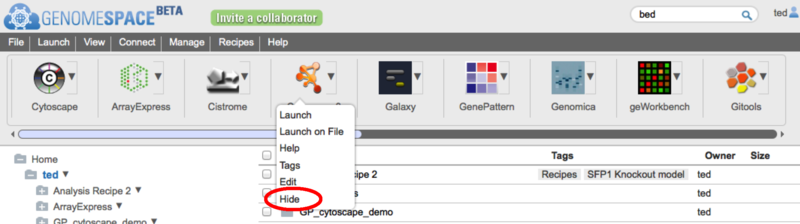
2. Hiding tools you don't useAs with the reordering, you could previously do this from the View>>CustomizeToolbar menu, but you can now also hide a tool by clicking on the tool's dropdown menu and then selecting the 'Hide' option. If it is a private tool that you have permission to edit, you will also see an 'Edit' menu item here to allow you to change the tools properties.
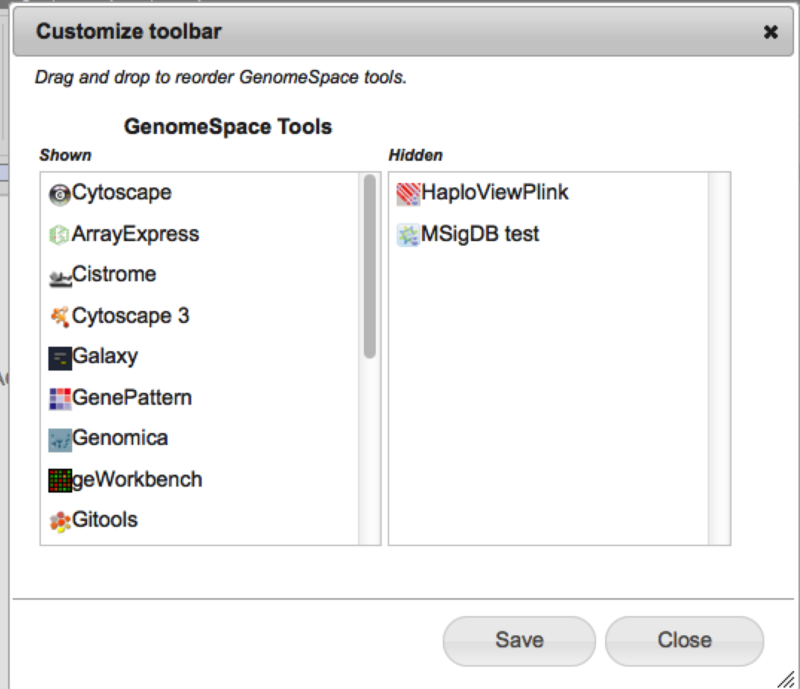
3. Finding new (or hidden) toolsIf you have hidden a tool or want to find out what else is available and not showing on your toolbar, use the View>>CustomizeToolbar menu item. This will bring up the toolbar dialog which will show you the currently hidden tools in the panel on the right. You can also use this dialog to reorder or hide tools by dragging and dropping them within or between the shown/hidden tool lists.
4. Resizing your toolbarFinally, you can now also resize the toolbar to give your files more space in the browser window. To do this simply click on the handle along the bottom edge of the toolbar slider and drag it upwards. Once the icons get smaller than about 50% it will also hide the tool names to leave even more space for your files.
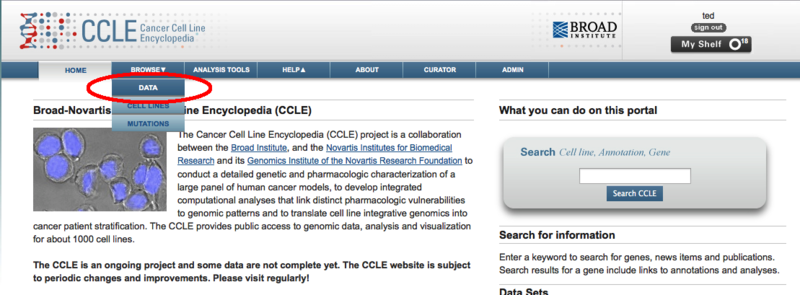
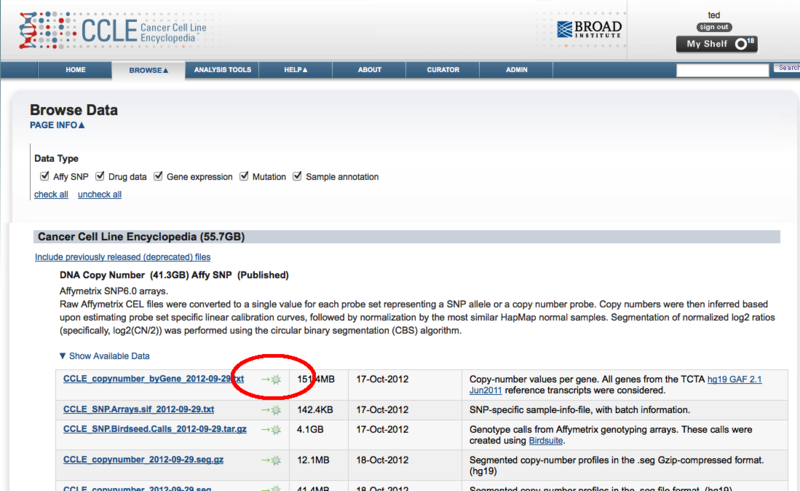
The Cancer Cell Line Encyclopedia Portal now exports to GenomeSpaceThe Cancer Cell Line Encyclopedia portal (CCLE) can now export data directly to GenomeSpace to facilitate its analysis in any of the GenomeSpace tools. The Cancer Cell Line Encyclopedia provides public access to genomic data, analysis and visualization for about 1000 cell lines. Since the CCLE is using the GenomeSpace lightweight data integration library, you will still need a separate account on the CCLE in order to access the data it contains. Sending data from the CCLE to GenomeSpace starts by going to the Browse > Data menu from any page.
Once on the data page, a GenomeSpace icon has been added beside each file name.
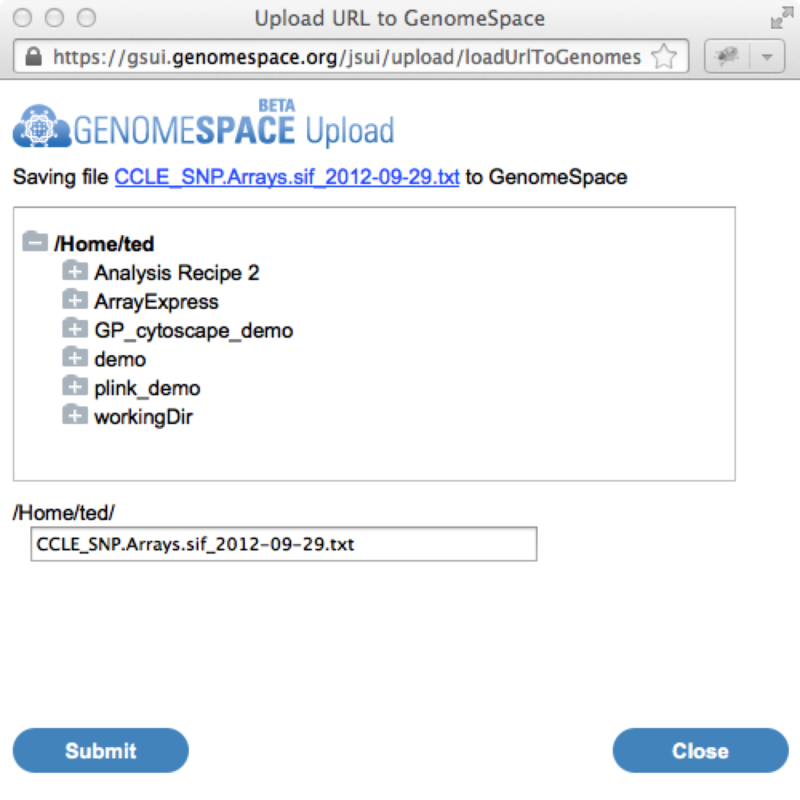
Clicking on this icon will launch the GenomeSpace import dialog window. From there you can login to GenomeSpace if necessary (or register for GenomeSpace), select the directory you want to save the file to, and optionally rename the file.
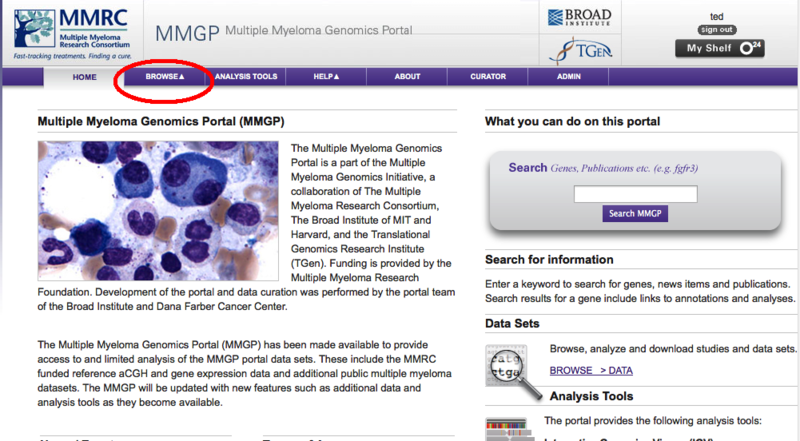
Once you hit the submit button, the file will be automatically copied from the Cancer Cell Line Encyclopedia portal into your GenomeSpace directory. From here you can then analyze the data using the usual GenomeSpace mechanisms. Multiple Myeloma Genomics Portal now exports to GenomeSpaceThe Multiple Myeloma Genomics Portal (MMGP) can now export data directly to GenomeSpace to facilitate its analysis in any of the GenomeSpace tools. The Multiple Myeloma Genomics Portal (MMGP) provides access to significant multiple myeloma datasets. These include the Multiple Myeloma Reseach Foundation-funded reference aCGH, mutation and gene expression data as well as 8 other additional public multiple myeloma datasets. Since the MMGP is using the GenomeSpace lightweight data integration library, you will still need a separate account on the MMGP in order to access the data it contains. Sending data from the MMGP to GenomeSpace starts by going to the Browse > Data menu from any page.
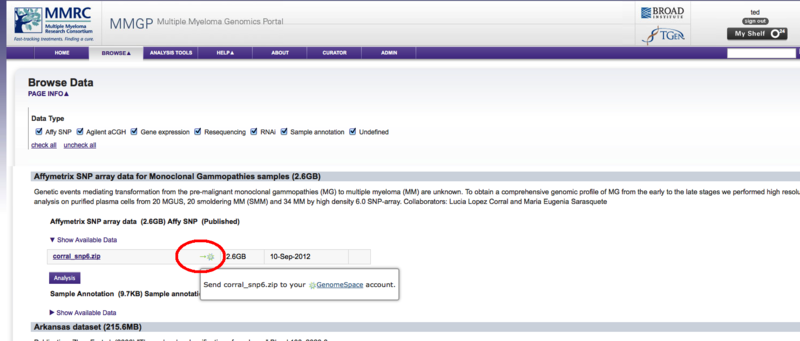
Once on the data page, a GenomeSpace icon has been added beside each file name.
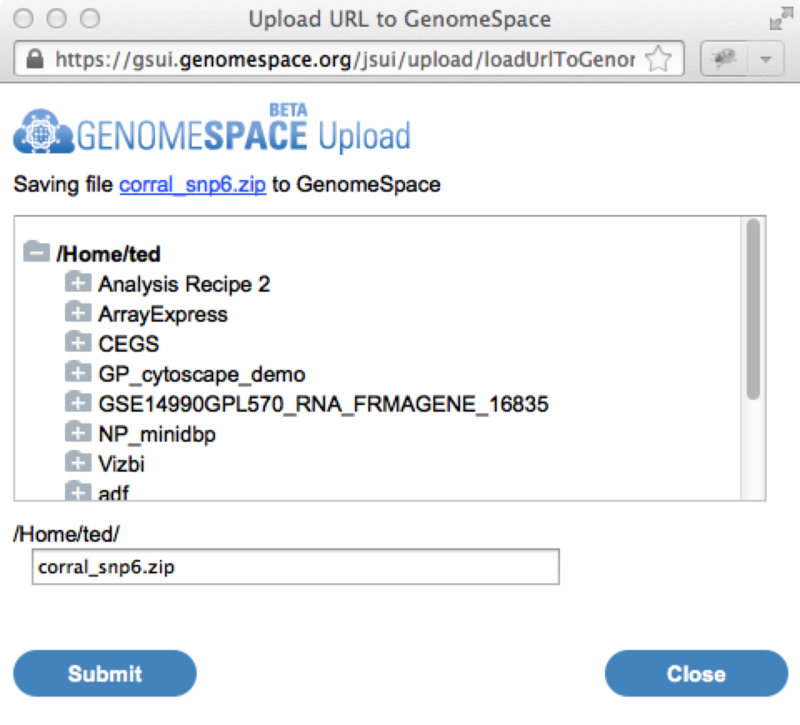
Clicking on this icon will launch the GenomeSpace import dialog window. From there you can login to GenomeSpace if necessary (or register for GenomeSpace), select the directory you want to save the file to, and optionally rename the file.
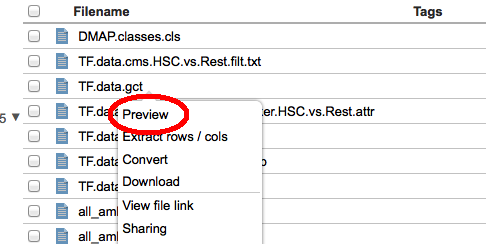
Once you hit the submit button, the file will be automatically copied from the Multiple Myeloma Genomics portal into your GenomeSpace directory. From here you can then analyze the data using the usual GenomeSpace mechanisms. New Feature: Heatmap previewsFor those of you frequently working with data in the gct matrix format, or a format that can be converted to gct (currently gxp and Genomica tab formatted files) it is now possible to visualize your files as heatmaps directly within the GenomeSpace user interface. To start, select the file preview for a file.
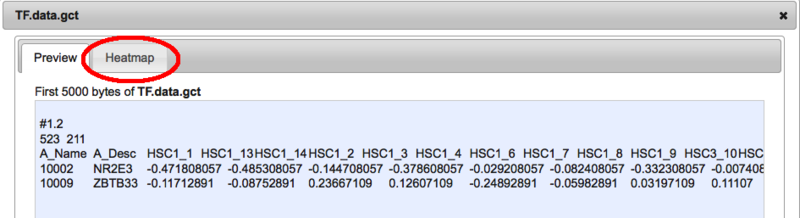
This will open the standard preview dialog. If it is possible to visualize this file as a heatmap. you will se a 'Heatmap' tab beside the 'Preview' tab.
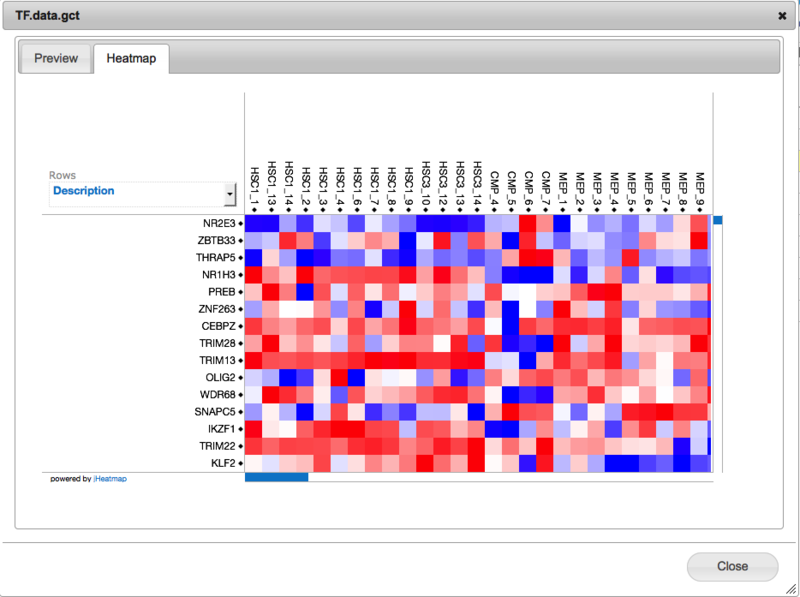
Clicking on this tab will display your data as a heatmap.
Some notes:
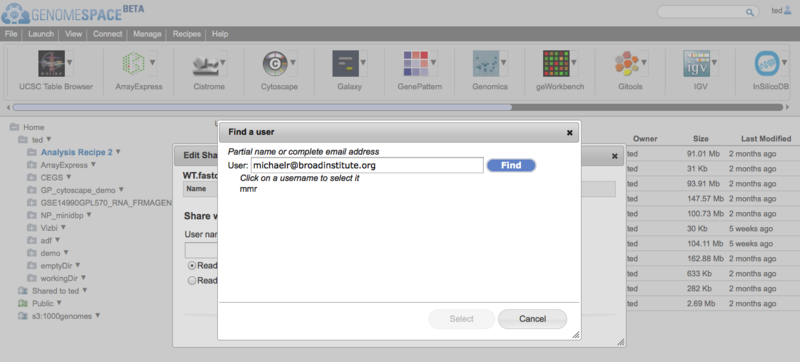
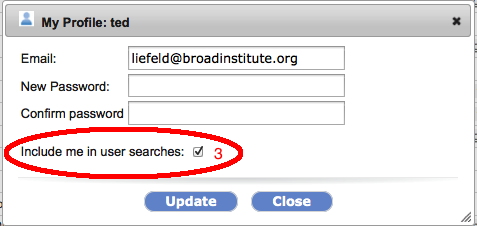
Sharing just got easierWhen GenomeSpace was first released, to share a file (or a private tool) you needed to know your collaborator's username which often involved emailing them to ask them what it was. GenomeSpace now supports looking up other GenomeSpace users by their email address or by partial username matching. So if you have your collaborator's email address, you can now look up their username when you are
When you click on the username text field in the dialog boxes for any of the above, you will now see the 'find user' dialog appear. Simply enter either an email address or a partial username and the GenomeSpace User Interface will find your collaborator's username for you and fill it in in the form.
For those of you who would prefer not to let other GenomeSpace users find you via your email address (or partial username matching) you can opt-out of being in the search results from your GenomeSpace profile dialog. Other users will then have to know your exact username in order to share tools or files with you.
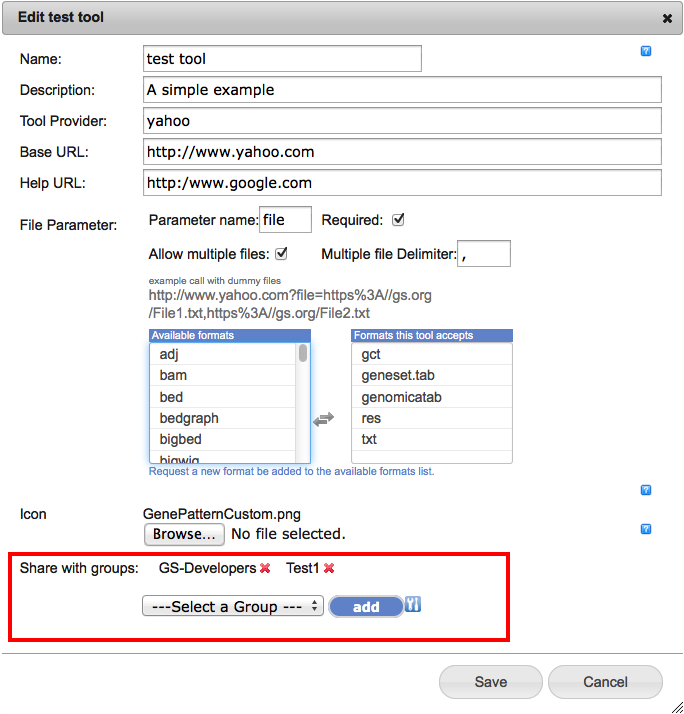
Private Tools - now shareable with multiple groupsThe GenomeSpace team has updated the servers and GSUI to allow you to now share your 'private' tools to multiple user groups at the same time. Click here to see the original post about adding private tools to your GenomeSpace toolbar. The only change is at the bottom of the dialog where the list of groups the tool is hared to is located. The new interface looks like this with the changed region highlighted by a red box;
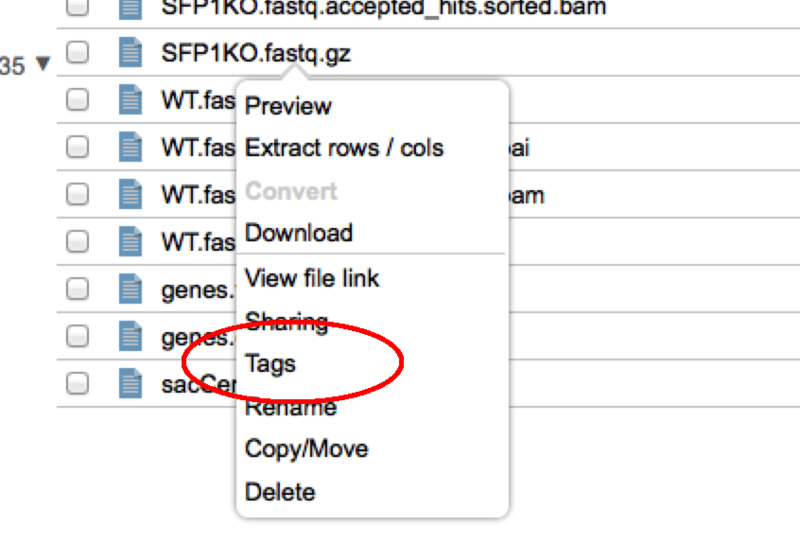
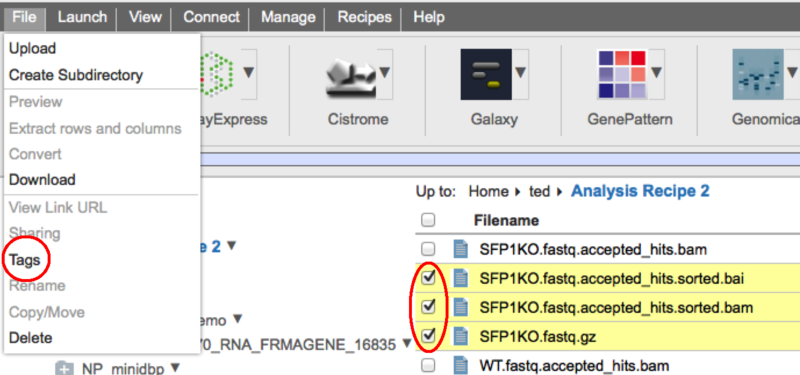
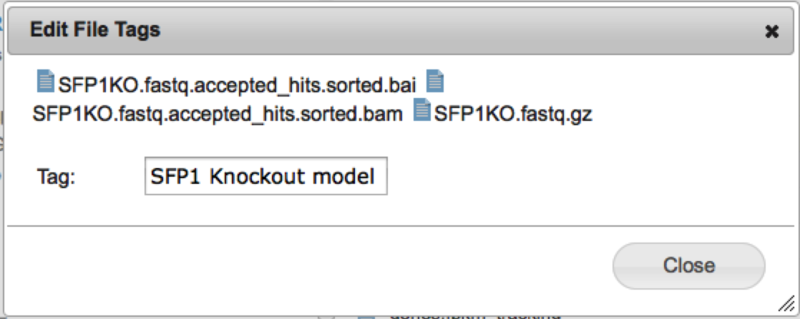
In this example, the tool is shared with the two groups 'GS-Developers' and 'Test1'. To add a group, select its name from the '---Select a Group---' dropdown and click the 'add' button. To remove a group from the list simply click the red 'x' beside its name. For either adding or removing you must also then 'Save' your changes with the 'Save' button. Hopefully this will make it easier than ever to share your tools with your coworkers. File Tagging and SearchWe are pleased to announce that we have added the ability to 'tag' your files to GenomeSpace. With this feature you can add any number of tags to your GenomeSpace files to provide another way to organize them or to make it easy to find all of the files belonging to a particular project. Adding Tags to a FileTo add a tag to a file, simply right click on a file and select 'tags' from the context menu. To add tags to many files at once, check the files in the file browser and then select Tags from the File menu. This will open up the file tagging dialog.
Start typing the text for your tag in the field provided.
When you hit the 'Enter' key, the tags will be created and added to the file(s). To add multiple tags at one time, simply put a comma "," at the end of each tag.
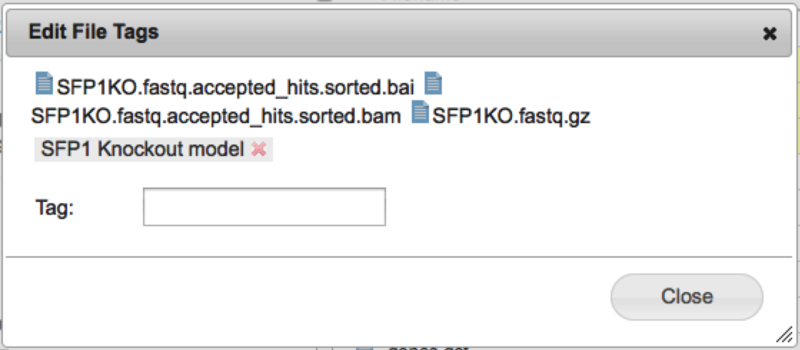
Once you close the dialog, the tags will be displayed in your file view like this.
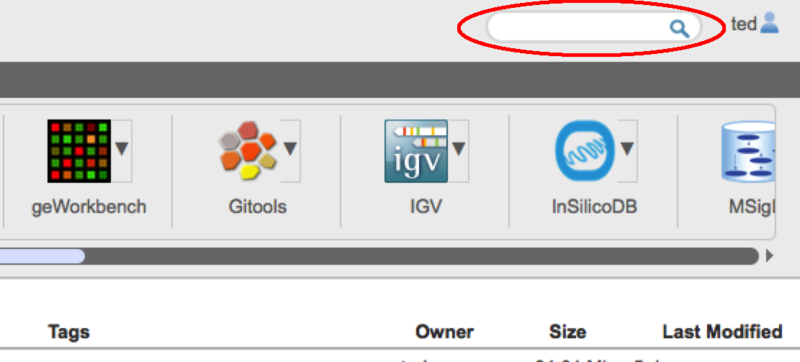
Removing tagsTo remove a tag, open the file tagging dialog as before on one or more files, and click the red 'x' next to the tag name. The tag will then be deleted from the selected files. File SearchAlong with the file tags, we have also added a file search capability to GenomeSpace. To use it simply type the search term you want in the search box at the top right corner of the GenomeSpace User Interface Window.
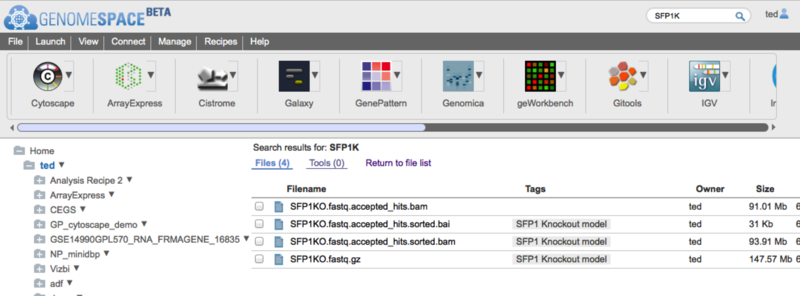
Search automatically searchs for files based on the tags and the file name. Search results are seperated between files and tools and are displayed in place of the usual directory view. To return to the directory view click on the 'Return to file list' link.
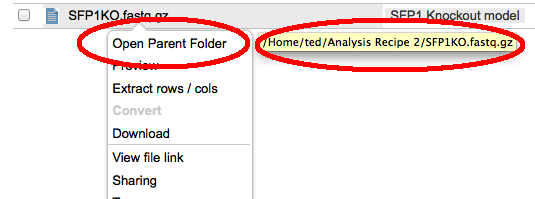
Search is always case insensitive and automatically adds wildcards to the front and end of the term you typed. So if you search for for 'FOO' you would get any files with FOO, foo, FoO etc anywhere in the filename or in a tag. You can constrain the search to filenames and tags starting or ending with a particular string by adding a percent sign '%' at the start or end of the search string. e.g. use '%.bai' to seach for files with the '.bai' extension or 'SFPK%' to search only for files starting with the String 'SFKP'. Unfortunately, you cannot at the moment use the '%' wildcard in the middle of the search string. Files in search results will display their path if you hover the mouse over them. You can also go directly to the containing folders from the file context menus.
Please let us know if you have any suggestions for how to make this more useful for you and your team.
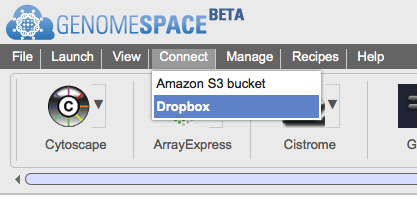
Connecting GenomeSpace to DropboxGenomeSpace is pleased to announce that you can now connect to your Dropbox files via your GenomeSpace account, giving you an additonal option for accessing and analyzing the files you have stored in the cloud. Connecting your GenomeSpace account to your Dropbox account takes just two steps:
This is what these steps look like: First, select Connect>Dropbox in the menu bar.
Next, select the privileges GenomeSpace can have in Dropbox. This can be Read only, but choose Read and Write if you want GenomeSpace to be able to send files into your Dropbox folders.
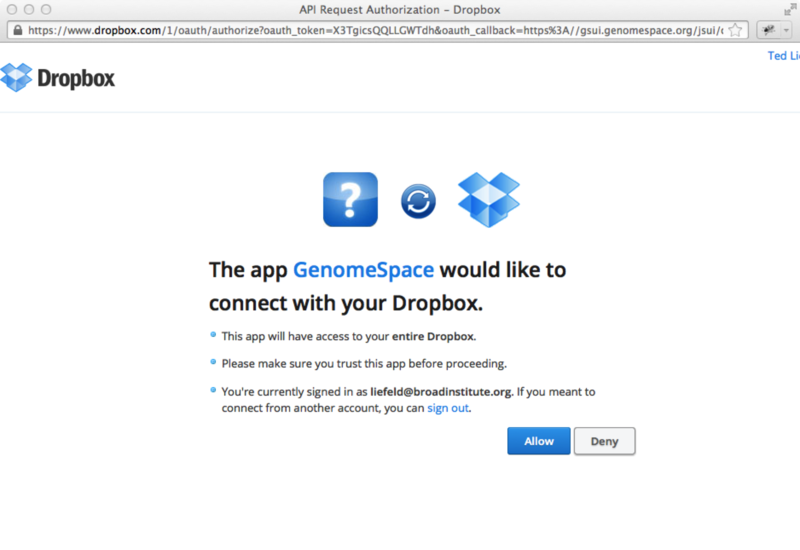
When you click Submit in this dialog, a new window will open to the Dropbox site for the next step. Note that if you have a popup blocker enabled on your browser, you have to allow this popup window to be opened. If you are not already logged in to Dropbox, the Dropbox window will ask you to login.
Dropbox will then ask you to confirm that you want to allow GenomeSpace to access your Dropbox account. Click Allow.
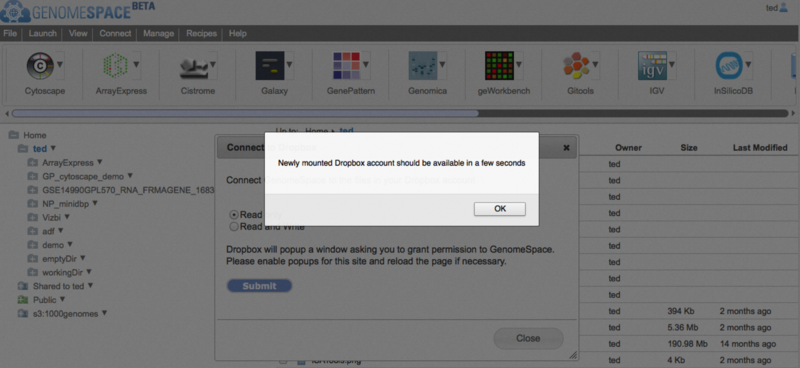
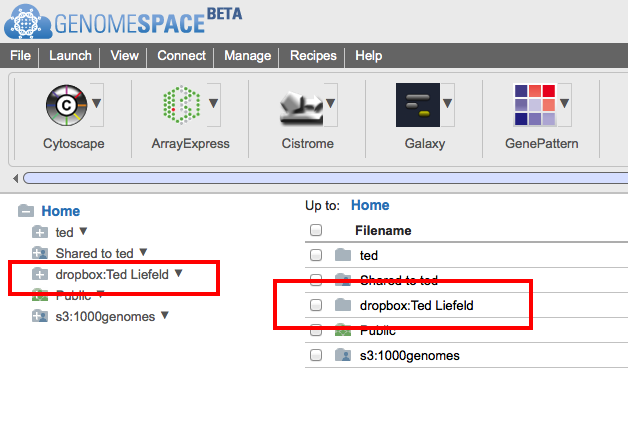
When you allow GenomeSpace to access your Dropbox account, GenomeSpace will connect to Dropbox and create a new folder in your GenomeSpace home directory.
After this, you can copy files between GenomeSpace and Dropbox and send files directly from Dropbox to any of the GenomeSpace tools. If you want to disconnect Dropbox from GenomeSpace, right-click on the Dropbox folder and select Disconnect. For information on how to connect to Amazon S3 buckets, refer to the Adding an Amazon S3 Bucket page of the User Guide. |

 icon opens up the new tool catalog (more on that below).