Public Data: Project Achilles
Posted by Ted Liefeld, Barbara Weir on Friday, September 21, 2012 at 07:36AM
Project Achilles is a systematic effort aimed at identifying genetic vulnerabilities across hundreds of well characterized cancer cell lines. Large-scale functional screening of cancer cell lines provides a complementary approach to those studies that aim to characterize the molecular alterations (mutations, copy number alterations, etc.) of primary tumors, such as The Cancer Genome Atlas. This project intends to identify genes essential for proliferation and survival using a genome-scale, systematic loss of function screen. Each screen uses a lentivirally delivered pool of ~54K shRNAs targeting ~11K genes and identifies gene dependencies by comparing the population of shRNAs at the endpoint of the screen relative to the initial reference pool.
Project Achilles data is available in /Public/SharedData/Datasets/Achilles Phase 2. (This requires a GenomeSpace login. If you don't have one, it's easy to register.)
For more information on Project Achilles, see its page on the Broad Institute Cancer Program Resource Gateway.
MSigDB has moved!
Posted by Ted Liefeld on Friday, September 21, 2012 at 07:01AM
For those of you who have been using the MSigDB gene lists in the /Public/SharedData folder, we would like to let you know that the paths to these data have been moved. In preparation for adding more shared public datasets, we have changed the categorization of data to use the project names instead of the type of data provided, since many studies include data of multiple types.
As a result, the MSigDB datasets have moved from /Public/SharedData/GeneLists/MSigDB to a new home at /Public/SharedData/Datasets/MSigDB.
The same data are there as before, it's just a new address. We hope that this new organization will allow you to find the public datasets you are looking for more easily in the future.
Stay tuned: more shared datasets are coming in the next few months!
Opening the GSUI at a particular directory
Posted by Ted Liefeld on Wednesday, September 12, 2012 at 09:16AM
Last updated on Monday, November 02, 2015 at 11:50AM
For developers who would like to integrate the GenomeSpace UI (GSUI) into their web sites, there is a little-known feature you can use to open the GenomeSpace UI on a particular directory.
To do this you simply need to provide a parameter (?pathOrUrl=) to the GSUI launch URL telling it the path or the file that you want to open. For example,
https://gsui.genomespace.org/jsui/?pathOrUrl=/Home/Public/SharedData/
This link will launch the GSUI, open at the directory path provided, in this case /Home/Public/SharedData/.
The limitation of this feature is that you need to provide a path that is visible to the GenomeSpace user opening the URL. For example, if I provide a path to one of my directories under /Home/Ted/somedirectory, then no one (other than me, user=Ted in this case) will be able to open the directory. To work around this, share the directory to the user or group you are giving the link to, and then use the path to the shared directory (as in the example above).
Also despite its name, pathOrUrl, it does not yet take URLs. As you may guess however, this is a feature that will be available in a future release...
Update 11/17/2012
As noted above, you have been able to specify a path to a file or directory in order to open GenomeSpace automatically at that file/directory as if you had navigated down through the directory structure, but now you can use the GenomeSpace URL to do the same. For example, to open the TCGA Squamous Cell Dataset you can use either of these links:
https://gsui.genomespace.org/jsui/gsui.html?pathOrUrl=/Public/SharedData/Datasets/TCGA/Squamous%20Cell%20Lung%20Cancer
https://gsui.genomespace.org/jsui/gsui.html?pathOrUrl=https://dm.genomespace.org/datamanager/v1.0/file/Home/Public/SharedData/Datasets/TCGA/Squamous%20Cell%20Lung%20Cancer
Please note that the link URLs are available for all files by right-clicking on the file, and selecting View file link from the pop-up menu.
Adding Private Tools
Posted by Ted Liefeld on Monday, August 27, 2012 at 11:51AM
Last updated on Thursday, August 30, 2012 at 10:07AM
Introduction
The GenomeSpace team is working on a new feature to allow you to add your own private tools to the GenomeSpace toolbar. This will allow you to add your own versions of existing tools (e.g., your lab's GenePattern or Galaxy instance) or other tools that are not part of the public GenomeSpace installation into your toolbar.
For the first version of this feature, the GenomeSpace team must add the tools for you. However, this will be followed shortly with an update to GenomeSpace that will let you add and remove tools yourself.
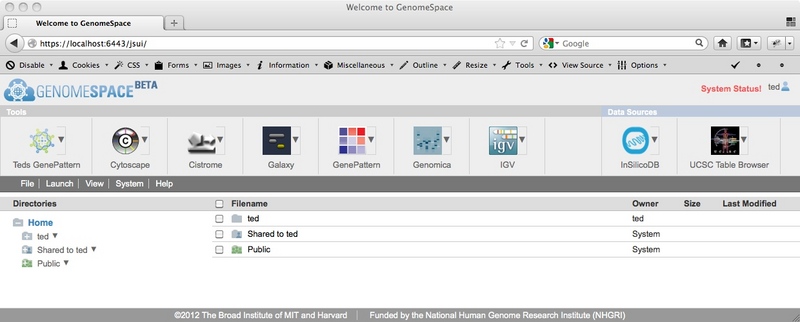
Image 1: Notice the 'Teds GenePattern' tool at the left edge of the toolbar
Getting Started
While it's no problem to add a tool as-is with no GenomeSpace features added, we recommend as a minimum that you add the ability to transfer data between your tool and GenomeSpace. You can find instructions on how to do this on our technical documentation page. That page also shows you how to implement login and authentication, launch a tool on a file, and add other GenomeSpace functionality.
To have a tool added send an email to gs-help(at)broadinstitute.org with a subject line "Add a private tool to GenomeSpace". The body of the message should include the following information:
-
Tool name, e.g., "GenePattern"
-
Author/organization - who provided the tool, e.g., "GenePattern team from the Broad Instittute"
-
Short description - what the tool can do, e.g., "Performs a variety of genomic analyses"
-
Base URL - The URL to launch the tool, meaning either its web address or the address of a JNLP launcher for desktop applications, e.g., http://tedsserver.broadinstitute.org:8080/gp/receiveFile.jsf
-
(optional) Input file parameter - if the tool can be launched on a file, this is the parameter that should precede input file URLs
-
(optional) Allowable file formats for the input files
-
include extension, name, and a brief description
-
(optional) JRAC launch port - the port that desktop applications implementing the Java Relaunch Avoidance Code (JRAC) specification listens to
-
(optional) Tool icon (~128x128 pixels).
-
(optional) The name of the GenomeSpace user groups with whom you want to share the tool. Members of these groups will also see the tool in their toolbar.
Shortly after your email is received, the GenomeSpace administrators will enter these details into the GenomeSpace database and the tool will become available for testing on your toolbar.
Limitations
-
All tools need to be web-launchable. Desktop applications like Excel cannot be handled at this time. If your tool is a Java-based application, it must be implemented as a Java Web start jnlp file.
-
Tool icons may take a while to show up. In the meantime, they will use the default GenomeSpace icon in the toolbar.
-
You may not share tools with the gs-public group via this mechanism.
-
You may only share tools to groups of which you are yourself a member.
-
If you are using a private tool and would like to see it use more GenomeSpace features, please let us know and we will try to work with the developers to have it added.
-
If GenomeSpace-enabled, the tool should point to the GenomeSpace production environment as detailed in the technical documentation.
Conclusion
That's it! Once your tool has been added, you should be able to launch it from GenomeSpace. In the months to come, we will be adding functionality to GenomeSpace so that you will be able to add tools easily yourself.
New Feature: Customizing Your Toolbar
Posted by Ted Liefeld on Friday, June 22, 2012 at 06:02AM
Last updated on Tuesday, August 28, 2012 at 09:30AM
Customizing Your Toolbar
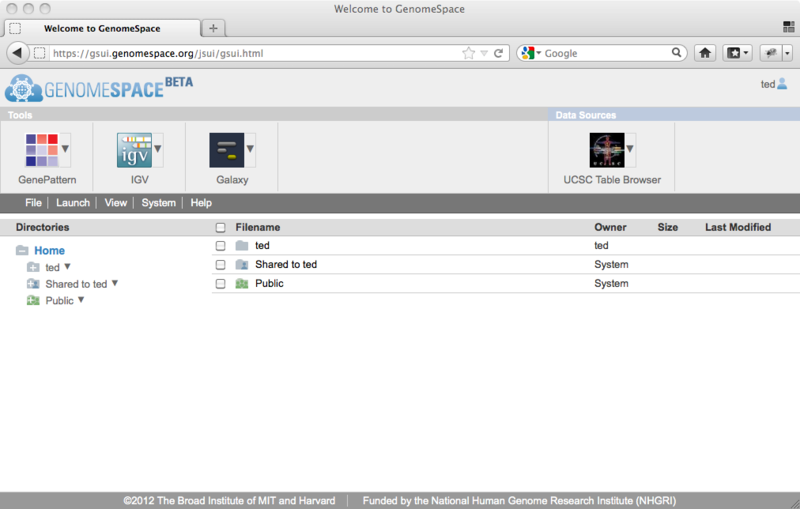
As the number of tools in GenomeSpace continues to grow, you may want to control which tools appear in your toolbar and in what order they appear to personalize your GenomeSpace. You can now do this through our new feature: the Customize toolbar dialog.
To use this new functionality, go to the menu bar and select View>Customize toolbar...

You will see the Customize toolbar dialog, which allows you to reorder and show/hide the items on the toolbar.
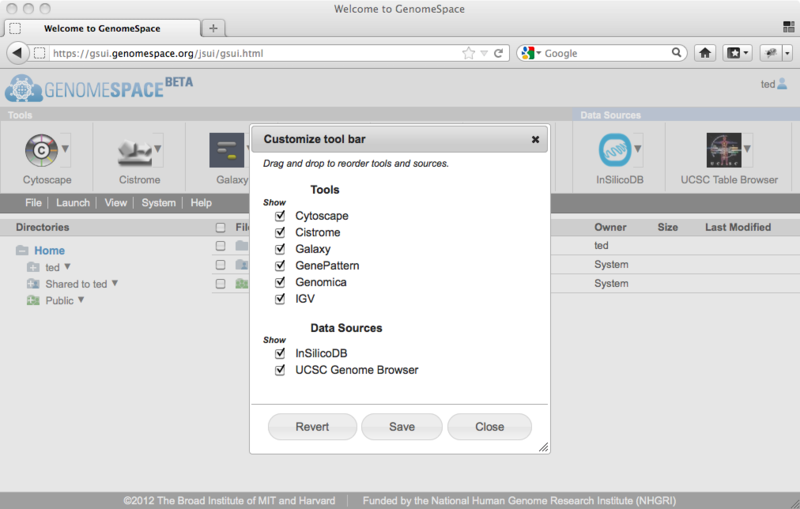
To take a tool off of the toolbar, simply clear its checkbox. To reorder the tools on your toolbar, drag and drop them into the order you prefer.
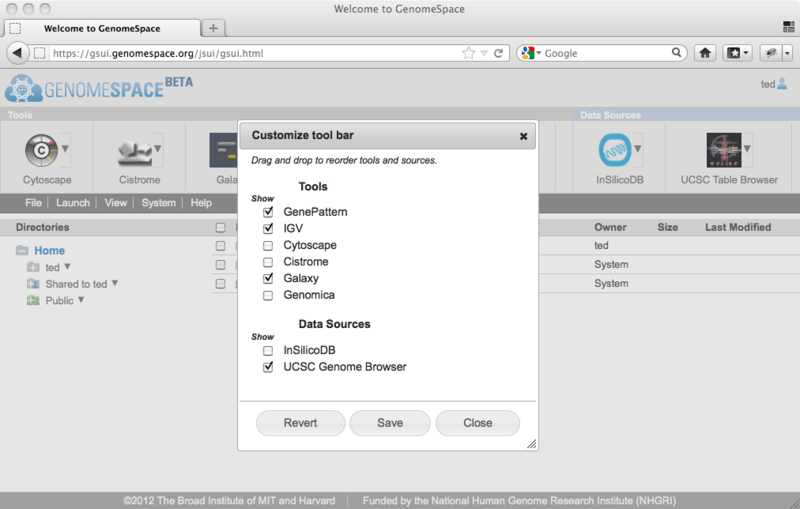
When you have the tools and arrangement you want set up in the dialog, click Save. This will reorganize your toolbar, and this arrangement will persist every time you log in (unless you change it again!)
To make all the tools visible again and order them alphabetically, click Revert. (But remember that if you want this view, you'll have to click Save.)
That's it!
Coming attraction: We are working on a GenomeSpace feature that will allow you to add private tools to your toolbar (such as your own GenePattern or Galaxy server). These tools will only be visible to you and optionally a group of users you want to share them with. This feature is still in development, but if you have a tool you would like added, please contact gs-help@broadinstitute.org and we'll work with you to add it.
Sharing Files in GenomeSpace
Posted by Ted Liefeld on Thursday, June 07, 2012 at 02:49PM
GenomeSpace makes it easy for you to share files or folders with your collaborators and co-workers, or even the public.
To share a file or folder, select it in GenomeSpace and select File>Sharing in the menu bar (or right-click the file/folder and select Sharing from the pop-up menu). This opens up the Sharing & Permissions dialog that lets you see the other users or user groups you have already shared the file with. You can then click the Edit Sharing button to change who you are sharing with.
Where Shared Files Show Up
Files that have been shared to you directly or to a group you are a member of will appear automatically in your Shared to [User Name] directory, in a folder with the GenomeSpace username of the person who shared them to you. If you don't see a file that you think should have access to, refresh that directory by selecting View>Refresh Current Directory in the menu bar or by clicking on another directory and then back.
Files shared to the public will show up in the Public folder, also named according to the name of the user who shared them. Publicly shared files are also available for download by any non-GenomeSpace user. You can right-click on the file and select View file link in the pop-up menu to get a link that can be copied and sent to anyone (even non-GenomeSpace users).
Granting Permissions
To share a file or folder with another user:
-
Select the file/folder and select File>Sharing in the menu bar.
-
Click Edit Sharing.
-
Enter the user's GenomeSpace username in the Share with User section of the Edit Sharing & Permissions dialog. You'll need to ask them for their username as GenomeSpace does not share username information between users at this time.
-
Choose between sharing the file read only (Read), or with full permissions (Read, Write & Delete). If you give full permissions those people can also change or replace your file.
To share the file with a group of users, you can select a group from the drop-down menu in the Share with Group section of the Edit Sharing & Permissions dialog. Then select the level of permissions you would like to grant. To create or manage groups, click on the blue tool icon next to the drop-down menu.
To share with the public at large, select the Allow public access checkbox on the right and select the permissions you want to grant.
Once you have added a user, a group, the public, or any combination of the three, click the Grant Permissions button and the files will become available as you have specified.
Removing Permissions
From within the edit sharing dialog box, click on the red  next to the permission you wish to remove. The permission will be removed immediately. If you remove the read permission from a file, it will also remove the write and delete permission (since it makes no sense to let them write to a file they cannot see). next to the permission you wish to remove. The permission will be removed immediately. If you remove the read permission from a file, it will also remove the write and delete permission (since it makes no sense to let them write to a file they cannot see).
Folders and Inherited Permissions
If you grant permissions to a folder, all the files in that folder and its subfolders will inherit those permissions. So if you were to make your home directory writable by a colleague, then that person would be able to fully access any of your files (for better or worse).
For inherited permissions, they will show up in the dialog without the red to remove the permission. If you want to eliminate this permission, you'll need to do it from the folder you originally applied it to.
GenomeSpace and Single Sign-On
Posted by GenomeSpace Development Team on Monday, May 14, 2012 at 03:04PM
Last updated on Tuesday, May 15, 2012 at 01:27PM
GenomeSpace attempts to minimize sign-ons but does not have true single sign on (yet). Currently it's more of a dual-sign on system. Web applications can sign on using the GenomeSpace OpenID provider. Desktop applications can sign on using the Java CDK. These two systems do not yet communicate with each other due to technical limitations. Specifically, the OpenID protocol requires the ability for an OpenID provider to be able to establish a secure HTTP connection to a client. For desktop applications this is frequently not possible due to organizational firewalls. The CDK shares login via storage of a token (like a browser cookie) on the client machine. Web applications are prevented (rightly) by the browsers from accessing files on the client machine and therefore they can't use this mechanism either. As a result the GenomeSpace tools use one of these two systems:
-
OpenID: Galaxy, GenePattern, InSilico DB, GenomeSpace user interface
-
CDK: Cytoscape, Genomica, the Integrative Genomics Viewer (IGV)
The UCSC Table Browser is different in that it is not using OpenID, instead relying on the same protocol as the CDK, but without the ability to share the token with other applications. Therefore for the time being, users must log into UCSC separately.
Future posts will include updates on our efforts to establish a single sign-on across GenomeSpace tools.
Safari - Uploads are disabled
Posted by Ted Liefeld on Thursday, May 10, 2012 at 02:53PM
Last updated on Tuesday, May 15, 2012 at 01:27PM
The GenomeSpace File Uploader Applet is not working on the Safari browser on some Macs due to changes made by Apple to prevent the Flashback trojan. If this affects you, please update your Safari to the lates version or use Firefox or Chrome instead.
If you are still at version 5.0.5 or earlier, you can download 5.0.6 from here: http://support.apple.com/kb/DL1422
For Snow Leopard, Safari 5.1.7 is available here: http://support.apple.com/kb/DL1531
Displaying results 51 - 58 of 58 in total
|
