|

|
User Interface
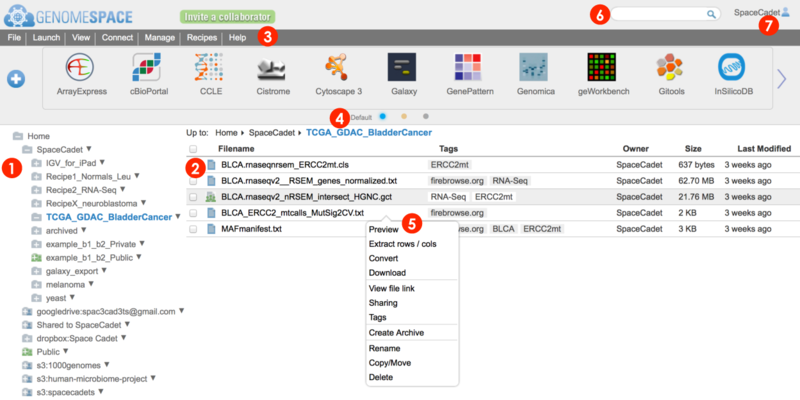
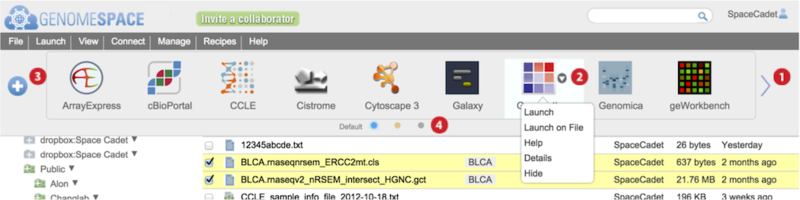
This section provides details on the user interface elements numbered in the screenshot below (2015.02.06). For a brief overview of the user interface, see Highlights & Quickstart.
The following links jump to the sections on this page and reference numbered elements in the screenshot.
-
Left directories panel gives overview of folders
-
Lists your GenomeSpace user folder at the top, and includes a Shared to folder containing items shared to you, and the Public folder containing items shared to all users.
-
Also displays any connected storage such as Dropbox and Google Drives and mounted Amazon S3 buckets, e.g. s3:1000genomes.
-
Main files panel lists files and folders within a selected folder
-
Sort items by clicking on headers, e.g. Last Modified.
-
Breadcrumb list at top, e.g. Home>SpaceCadet>TCGA_GDAC_BladderCancer, tells you which folder contents are displayed in blue and is clickable for backward navigation.
-
Menu bar organizes functions for managing files and groups, launching tools, connecting additional storage, accessing Recipes, and help items, e.g. viewing the status of the server system.
-
Toolbar displays tool and data sources as interactive icons that launch the tool.
-
Click wide arrows at edge of toolbar
 , here displayed on the right, to scroll to next set of tools. , here displayed on the right, to scroll to next set of tools.
-
Click on a tool icon to launch the tool. See FAQ2.2 for help launching desktop tools.
-
Hover mouse over an icon for tool description and click on the small arrow
 that appears to access the tool-specific menu. that appears to access the tool-specific menu.
-
Customize your toolbar from the tool catalog by clicking on the blue plus button
 at the left. at the left.
-
Display alternate toolbar views by clicking on the dots
 centered at the bottom of the toolbar. centered at the bottom of the toolbar.
-
Pop-up menu gives you access to a number of menu bar functions.
-
The search bar matches to the names, descriptions, tags, and tag-associated descriptors of tools, files, and folders.
-
The user profile name is displayed in the upper right corner. Click for profile information, history, and to log out.
Access directories panel (1) and file panel (2) options via File menu (3) and right-click pop-up menu (5)
Use the directories panel (1) to navigate your directories structure and click on a folder to display contents in the main files panel (2).
The main files panel provides a better access point to perform actions on both subfolders and files. A subset of these actions are available to perform on subfolders from the directories panel which only lists folders.
Within the main files panel, sort how items are listed by clicking on column headers, e.g. Last Modified, and also navigate backwards up the displayed directory structure by clicking on folder names in the breadcrumb list at top. E.g. clicking on SpaceCadet in the breadcrumb Up to: Home>SpaceCadet>TCGA_GDAC_BladderCancer will switch to display the subfolder SpaceCadet from contents of folder shown in blue.
For each file or folder, whether in the directories panel or in the main files panel, three alternate management actions are available:
-
Right-click and select option from pop-up menu (5)
-
for the directories panel, also click on downward right triangle
-
Select folder or file(s), see items highlighted, and go to the menu bar (3)> File for options.
-
for the main files panel, check the box left of the file/folder
-
Drag-drop
-
Drag-drop desktop file(s) to a folder either in the directories panel (1) or in the files panel (2).
-
Select folder or file(s) and drag-drop to different areas to move to a new directory (1) or to launch specific tools on the files (4).
Options may or may not be available depending on the read and write permissions granted at the initial mounting of the directories. For example, the Shared to folder containing items shared to you by other users and the Public folder containing items shared to all users may limit your access to contained files as read only or read and write permission. Increased sharing changes the folder icon to show one to three green people.
The difference between the File menu and the pop-up menu option is that File menu options remain static, with inaccessible options dimmed in gray, while the pop-up menu displays only available actions for the folder or file type. Additionally, actions for multiple files should be accessed from the File menu. Pop-up menu actions are usually only on the moused over item.
The options available from the various menus are summarized in the table below and are divided roughly by private versus shared or public directory types.
Certain menu options, such as Import from URL, are only available from one menu, in this example the File menu.
|
Private storage: User folder & subfolders, Dropbox folder, and Read/Write S3 Bucket |
|
Upload |
-
This menu item gives a reminder message to upload files by dragging and dropping them onto the destination folder in the directories or files and subdirectories panels.
-
For step-by-step instructions see the Upload Data to GenomeSpace recipe.
|
|
Import from URL
(File menu only)
|
-
Enter or drag-drop the file URL in the provided textbox.
-
Select the destination folder from the provided directory structure.
-
Edit the name of the imported file.
|
|
Create subdirectory |
-
Creates a subfolder within the selected directory. Enter a name for the subfolder.
|
|
View file/directory link |
-
Displays the highlighted URL address of the file/folder that you can copy by keyboard shortcut or right-click menu.
|
|
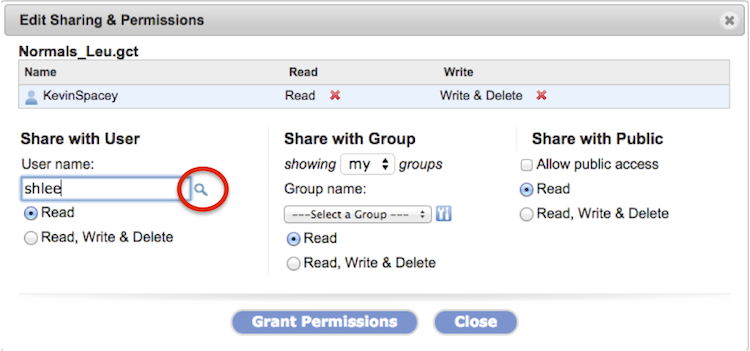
Sharing |
-
View and edit the share setting for the file/folder with individual users, groups, or the public.
-
To create groups, see instructions for Manage>Groups below.
-
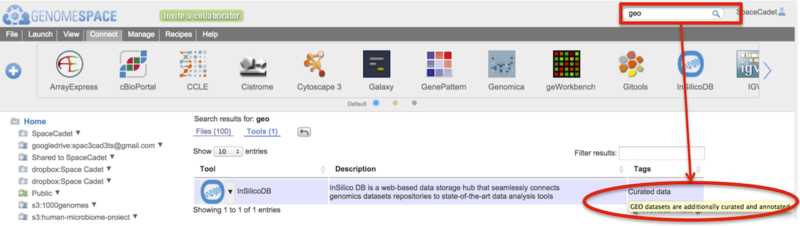
To confirm a username exists, click on the magnifying glass (Screenshot, circled in red).
-
Revoke permissions by clicking on the red X next to the shared user/group name.
-
Checking Allow public access for a file/folder places an alias of the file/folder in the Public directory within a folder with your username. Within your user directory, the file/folder icon displays green people (
  ) to indicate public sharing. ) to indicate public sharing.
-
Read more in the Share Data section.
|
|
Tags |
-
Add or remove tags to file(s)/folders.
-
Folder tags apply only to the folder and not to contents.
-
The search bar matches search terms within the file name and tags, tool name, tool description, tool tags and tag descriptions.
-
To tag tools, see Customizing the interface.
|
|
Create/Expand Archive |
-
Compress or expand file/folder in ZIP, TAR.GZ, or TAR format with option to edit name. At the directory level, ZIP and TAR.GZ compression are recommended.
-
Archiving creates a secondary compressed file and leaves the original file/folder intact.
-
Similarly, expanding an archive creates a secondary expanded folder and leaves the archived files intact.
|
|
Rename |
-
The original file/folder name is displayed for editing.
|
|
Copy/Move |
-
Select the destination folder for the copied or moved file/folder.
-
Edit the file/folder name. An error occurs if a file/folder of the same name already exists in the destination folder so be sure to edit the name if copying to the same folder.
-
Progress is shown at the bottom of the browser and a dialog box informs you of completion.
|
|
Delete |
-
Delete file(s) or a folder with contents from the main files & subdirectories area.
-
To delete from the directories panel, the folder must be empty.
-
Refresh your browser window to reflect the change.
|
|
Disconnect (Dropbox & S3) |
-
Disconnects linked account. Browser refreshes automatically to reflect change.
|
|
Public storage: GoogleDrive folder, Shared to folder, Public folder, and Public Amazon S3 buckets |
|
View file/directory link |
-
Displays the highlighted URL address of the file/folder that you can copy by keyboard shortcut or right-click menu.
|
|
Sharing |
-
View the share setting for the file/folder. These folders do not allow editing of share settings.
|
|
Create/Expand Archive |
-
Archive a file or folder and its contents or expand an archive to the User directory. Move the archived file or expanded folder to the desired linked account afterwards.
-
Supported compression formats are ZIP, TAR.GZ, and TAR and you can edit the name of the resulting file/folder.
-
Archiving creates a secondary compressed file and leaves the original file/folder intact.
-
Similarly, expanding an archive creates a secondary expanded folder and leaves the archived files intact.
|
|
Copy/Move |
-
Select the destination folder for the copied or moved file/folder.
-
Edit the file/folder name. An error occurs if a file/folder of the same name already exists in the destination folder so be sure to edit the name if copying to the same folder.
-
Progress is shown at the bottom of the browser and a dialog box informs you of completion.
|
|
Disconnect (S3 and GoogleDrive) |
-
Disconnects linked account. Browser refreshes automatically to reflect change.
|
Additional options for files (2) from the File menu (3) and right-click pop-up menu (5)
In addition to the options listed in the previous section, the File menu (3) and right-click pop-up menu (5) allow for specific functions on data files in the main files panel (2) and are listed in the table below. These options work on specific data file formats.
|
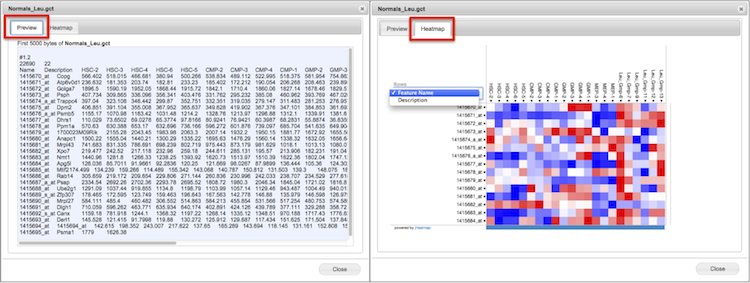
Preview |
-
View the selected text-based file up to the first 5 kilobytes in a new window.
-
Depending on file type, you may see an additional tab labeled Heatmap. Click to switch to Heatmap view created by jHeatmap. If the file is large, the heatmap may take a while to load.
-
Scroll within the heatmap to zoom view.
-
Click on a datapoint in the heatmap for column, row, and value.
-
Read more in the Preview & Heatmap section.
|
|
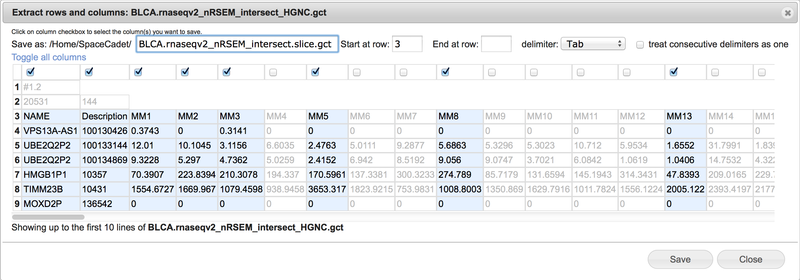
Extract rows & columns |
-
Create a new file containing selected columns and selected consecutive rows.
-
View the selected text-based file up to the first ten rows in spreadsheet format.
-
Use the Save as field to change the file name. GenomeSpace automatically appends the term .slice between the original file name and extension.
-
Select consecutive rows by entering start row and end row numbers. Leave end row field blank to include all remaining rows.
-
Select tab, comma, space, or semicolon delimiter with option to treat consecutive delimiters as one.
-
Select columns by checking boxes at top of columns. Scroll bar at bottom to display additional columns.
-
Click on Toggle all columns to invert selections.
-
See the Extract file rows & columns section for additional details.
|
|
Convert |
-
Convert files into data formats used by popular bioinformatic tools. Within your account, go to Help>Fomat Converters to see the most current list of supported conversions. For more instruction see Convert file formats.
-
Select a single file and Convert.
-
Select the conversion format from the drop-down menu.
-
Download to your desktop or save to your GenomeSpace account by selecting Convert on Server.
-
The original file remains intact and the converted file saves as a new file.
-
Some tools will automatically convert compatible formats for you when launched on files.
|
|
Download |
-
Download files to your local machine.
-
For multiple files, check the files and use File menu>Download.
-
Alternatively for a single file, you can right-click on the item and select Download.
|
|
Open Parent Folder (search results only) |
-
Opens the folder the search result item is found in.
|
Other Menu bar functions (3)
The options provided by the menu bar (3) are listed in the table below.
|
File |
See the two previous sections above for details.
|
|
Launch |
-
Launch a selected tool or data source. If you have selected a file, you can launch a tool on that file.
-
The drop-down menu lists all available tools and data sources alphabetically described in Tools.
-
Alternatively, drag-drop selected files on the tool displayed in the Toolbar.
-
For step-by-step instructions see the Send Data from GenomeSpace to a Tool recipe.
|
|
View |
-
Refresh current directory refreshes the directory currently in your view.
-
The alternative browser refresh resets the directory view
-
Recent uploads displays files most recently queued for upload to your GenomeSpace User account.
-
This differs from the User>History list
-
Customize toolbar displays the same toolbar manager as clicking the blue + button on the left of the toolbar. Using the displayed toolbar catalog, add or remove tools, tag tools, and search tools. You can rearrange the display order of tools either in the catalog or directly on the toolbar. For more details, see Customizing the interface.
|
|
Connect |
Connection to these three commercial cloud storage systems are supported for access from GenomeSpace and enabled tools. Select the storage to connect from the menu and the permissions granted, read only or read and write, and follow directions from the service provider. Once connected, drives appear as folders in the left directories panel (1). You can connect multiple drives at a time.
-
For Amazon public S3 data buckets, enter the bucket name in lowercase, e.g. 1000genomes or human-microbiome-project.
-
Connecting a private Amazon S3 bucket is a multistep process to verify you have access to the Amazon Web Services (AWS) account.
-
Read only or read & write permissions are granted by the bucket owner. To enable writing to a bucket from a browser, from your AWS console, select the S3 bucket Properties>Permissions>Add CORS Configuration. Copy-paste the following custom script over the sample CORS configuration and save.
<?xml version="1.0" encoding="UTF-8"?>
<CORSConfiguration xmlns="http://s3.amazonaws.com/doc/2006-03-01/">
    <CORSRule>
        <AllowedOrigin>*</AllowedOrigin>
        <AllowedMethod>PUT</AllowedMethod>
        <AllowedMethod>POST</AllowedMethod>
        <AllowedHeader>*</AllowedHeader>
    </CORSRule>
    <CORSRule>
        <AllowedOrigin>*</AllowedOrigin>
        <AllowedMethod>GET</AllowedMethod>
    </CORSRule>
</CORSConfiguration>
-
Follow the connection instructions provided by GenomeSpace using the provided links to specific AWS console pages to perform steps.
-
Note that leading or trailing spaces in textboxes, leftover from copy-pasting, will give errors in connecting the bucket. Go back to each field and remove the spaces and submit again.
One advantage of accessing data in these drives from your GenomeSpace account is that GenomeSpace links preserve 3-letter file format extensions required by many bioinformatic tools to recognize file types, e.g. the IGV tool, which may not be the case when the files are accessed directly from the connected storage system.
|
|
Manage |
-
Select Groups to create groups of GenomeSpace users.
-
Select a group under Group Names to view, edit members, or delete the group.
-
Members with administrator priviliges are shown with a red icon and other members in blue.
-
Private Tools opens a window that allows you to add private tools to your toolbar or to share with your groups.
-
Press Add new and fill in the form.
-
To display more instruction, click the ? icon on the right.
|
|
Recipes |
-
View GenomeSpace Recipes of which there are three groups in a new browser tab:
-
Loading data into GenomeSpace
-
Moving data between tools via GenomeSpace
-
Analyzing data with GenomeSpace tools
-
Recipes are step-by-step instructions of two types: (1) they outline how to perform tasks in GenomeSpace such as loading or moving data, and (2) show how to perform specific integrative bioinformatic data analyses using GenomeSpace tools.
|
|
Help |
Menu items link to the following:
-
User Guide (GenomeSpace Help)
-
Tools listing (Tool Help) where you can find support information by clicking on a specific tool
-
a popup box listing supported Format Conversions
-
System Status page to check for changes in the system that impact using GenomeSpace
-
GenomeSpace Support page for our help email, links to forums, and to sign up for email lists.
-
What's new popup box featuring news highlights and excerpts and links to the blog
-
email the GenomeSpace team (Contact us) opens your desktops default email app
-
About GenomeSpace gives information about the origin, funders, and participating labs of GenomeSpace.
|
Launch tools from the Toolbar (4) or left-click pop-up menu (5)
Each GenomeSpace tool and data source is represented on the Toolbar with an icon and in the Launch menu as part of a list. Additionally, normal or left-clicking on a file displays a pop-up menu of tools that when selected will launch on the file. The Tools page describes each of the tools and data sources.
-
Scroll to view next set of tools by clicking the wide arrows at either edge of the toolbar.
-
These buttons also work on touchscreens such as from a tablet or smartphone.
-
Hover mouse over a tool and click on the small downward triangle that appears to access specific functions from a menu listed in the table below. Additional menu options are available for private tools you administer. See Managing Private Tools for details on these.
-
|
Launch |
-
Launches the tool.
-
Alternatively, click directly on a tool icon to launch the tool or data source.
|
|
Launch on file |
-
Launch the tool on preselected files.
-
The dialog box allows removal and addition of selections before launching the tool via drag-drop.
|
|
Help |
-
Opens the Tools page. Select the specific tool you need help on to view tool-specific support information.
|
|
Details |
-
Describes the tool and displays editable tags. Tool description is the same that appears when you hover mouse over tool icon.
-
View, add, and edit tool tags shared by users as detailed in Customizing the interface. The search bar matches to terms within tool names, descriptions, tags, and tag descriptors.
|
|
Hide |
|
-
Click the blue plus icon or go to View menu > Customize toolbar to display the tool catalog. For details on the tool catalog, see Customizing the interface.
-
Click on small selector buttons at the bottom of the toolbar to display alternative views of the toolbar. These alternate views are user-defined by customizing the toolbar.
-
When you start, the Default toolbar shows all available tools.
-
New tools added to GenomeSpace after your account is activated can be viewed and added to the toolbar via the tool catalog.
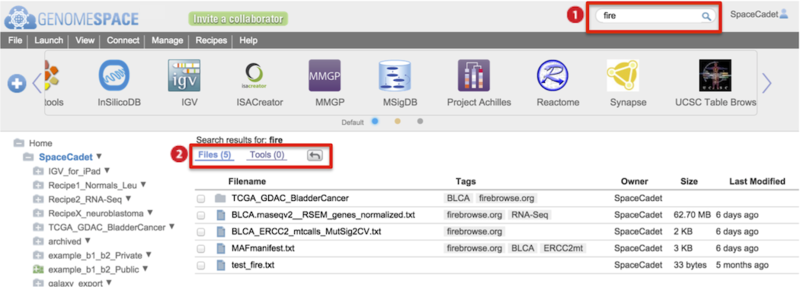
Find files, folders, or tools using the Search bar (6)
-
Type into the search field to match terms to file/folder names, tool names, tool descriptions, all tags, and tag-associated descriptors.
-
Searching is case-insensitive and matches strings within words.
-
Items separated by comma or space search for matches containing any of the search terms.
-
For space separated terms, hits are listed in order of matches to search terms. In other words, hits with matches to the most search terms are listed first then hits with matches to fewer search terms are listed next.
-
The order of the comma-separated search hits reflect directory structure.
-
Results for Files and Tools are listed separately with files hits displayed first.
-
Click on the Tools (#) link to switch display results.
-
Click the return arrow to go back to the directory displayed before searching.
-
For Files results, hover mouse over a result to see the location of the hit in your directories.
-
For Files results, right-click on a result for pop-up menu options, which include Open Parent Folder.
-
For Tools results, hover mouse over a tag to display the tag-associated descriptor
-
In the screenshot example below, the search term geo (boxed) is found in the tag-associated descriptor (circled).
-
For Tools, click on the downward triangle next to the tool icon for the tool-specific pop-up menu.
Log out with your User Profile (7)

Clicking your username or the  icon gives you the following menu of options. icon gives you the following menu of options.
|
Profile |
-
Change the associated email address
-
Change account password
-
Make your user name unsearchable by others or searchable (default)
-
Check the amount of storage you are using against the quota
|
|
History |
-
Search and view your account activity log by date range
-
Toggle and sort column headers of time, action, and files
|
|
Logout |
-
Logs you out of your GenomeSpace account.
-
To open multiple different accounts at the same time from the same machine, use a private instance of the browser or different browsers, i.e. Firefox and Chrome.
|
|

