Extract file rows & columns
Create a new file containing selected columns and consecutive rows on the GenomeSpace server from a delimited data file. This obviates the need for you to download a file and perform the operation in a spreadsheet program and upload the new file.
To access this feature you can either:
-
Right-click on a file and select Extract rows/cols from the pop-up menu
-
Check to select a single file then select File menu>Extract rows and columns.
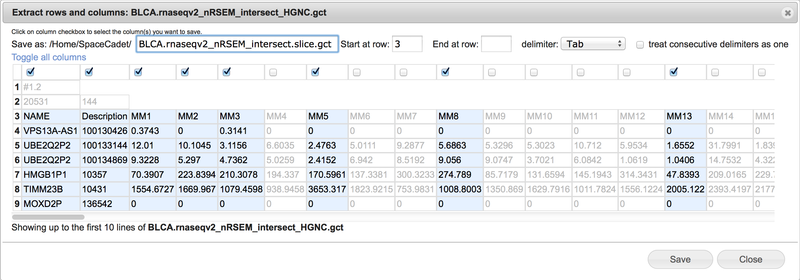
This opens the Extract rows and columns dialog (Screenshot 2015.1.21). Make selections within the dialog and click Save for a new file.

-
Select tab, comma, space, or semicolon delimiter from the drop-down menu.
-
Display updates automatically.
-
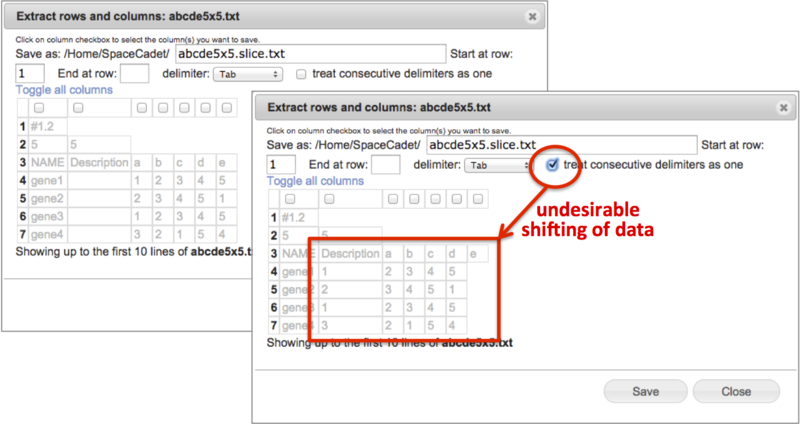
Check treat consecutive delimiters as one to skip empty fields between delimiters and to place filled fields adjacently. This can shift data cells in undesired ways. For example, for a GCT file with empty Description fields, checking this box will shift data fields into the Description column (Screenshot below 2015.2.3).
-
View the selected text-based file up to the first ten rows in spreadsheet format.
-
When less rows are shown, up to the first 50 kb of the selected file is displayed.
-
Select consecutive rows by entering start row and end row numbers. Leave end row field blank to include all remaining rows.
-
Use the bolded row numbers on the left as reference.
-
Select columns by checking boxes at the top of columns. Scroll horizontal bar at bottom to display additional columns.
-
When selected, column text changes from gray to black and is highlighted.
-
Unselected column text remains gray with white backgrounds.
-
Click on Toggle all columns to invert selections.
-
This is useful when selecting the majority of columns as it allows you to uncheck the fewer undesired columns.
-
Use the Save as field to change the file name. GenomeSpace automatically appends the term .slice between the original file name and extension.
-
If you are removing header lines, consider editing the file extension to match the new format.
-
Press Save to create the new file in the same folder as the original file.

|


