Connect S3 Bucket
You can connect public and private Amazon S3 Buckets, and instructions for mounting both categories of buckets are outlined on this page.
You can connect multiple S3 Buckets simultaneously to your GenomeSpace account.
-
Public buckets require only the name of the bucket to mount it.
-
Connecting private buckets, or those with limited non-public accessibility, involves several steps and requires an Amazon AWS account with an S3 Bucket and bucket permissions edited to share with GenomeSpace. Bucket permissions are either read-only or read-and-write. Once a bucket has been mounted in GenomeSpace, you can share it with other GenomeSpace users using the standard GenomeSpace sharing dialogs.
Mount a Public Amazon S3 Bucket
A publicly accessible Amazon S3 Bucket has its permissions set to allow public access to anyone without authentication. Public buckets may be mounted only with read permissions in GenomeSpace and means you cannot write files back to them. This is to prevent users from accidentally saving files to Amazon S3 Buckets that they do not control.
-
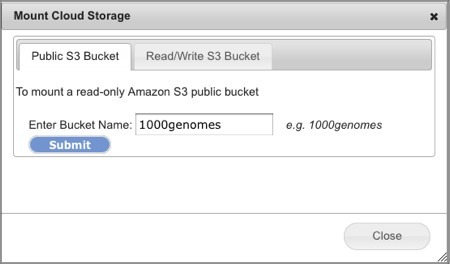
Select Connect>Amazon S3 Bucket. This will open the Mount Cloud Storage dialog box (Screenshot 2013).
-
Select the Public S3 Bucket tab.
-
Enter the name of the publicly accessible bucket in the field.
-
In the screenshot example, we used the 1000genomes bucket.
-
Bucket names are always all lowercase.
-
Click Submit. In less than a minute, the directory view refreshes with the new bucket mounted under your Home directory, e.g. s3:1000genomes. You can now read files from this bucket as you would any other files in GenomeSpace and share it read-only to other GenomeSpace users.

See aws.amazon.com for the comprehensive list of public S3 datasets. Of note are two projects, the 1000 Genomes Project and the Human Microbiome Project. To find a specific S3 Bucket input name, click on the specific dataset and look for a URL address such as <https://s3-us-west-2.amazonaws.com/human-microbiome-project>. For this example, input human-microbiome-project as the S3 Bucket name to mount the data. Some datasets do not provide their bucket name on the website as they require human subjects protection approval, copying the data to your own drive prior to access, or access from specific geographic regions, i.e. from northeastern USA. Contact the provider for more information.
Mount a Private Read/Write Amazon S3 Bucket
Connecting a private Amazon S3 bucket is a multistep process to verify you have access to the Amazon Web Services (AWS) account. GenomeSpace opens a wizard to guide you through the connection procedure. Buckets with default AWS settings will be read-only. Special instructions to edit your bucket permissions to read-and-write are at the end of this section.
-
Sign in to your Amazon AWS management console.
-
Within your GenomeSpace account, Select Connect>Amazon S3 Bucket. This will open the Connect to Amazon S3 Buckets dialog box.
-
Select the Read/Write S3 Bucket tab.
-
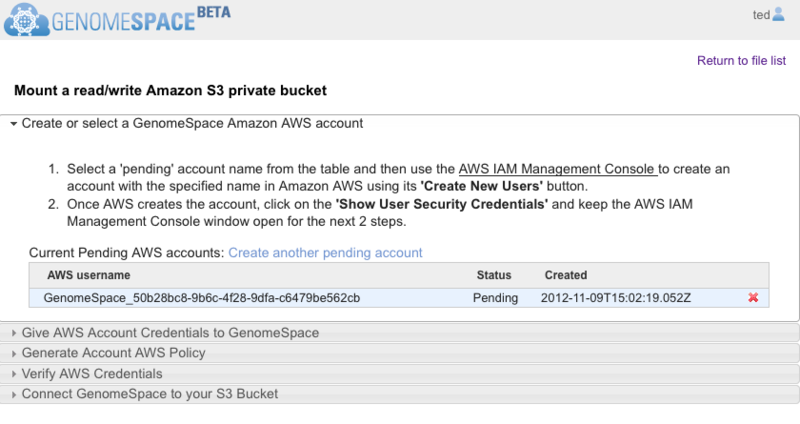
Click the Begin button and follow the guided instructions in the wizard that opens (Screenshot 2013).
-
Wizard section headings are in gray. Click on the section heading to expand the section.
-
Click on a previous section heading to go back and edit inputs.
-
For your convenience, we have provided clickable URL links to the relevant AWS Console pages and these are underlined.

Supplemental clarification to the wizard instructions
-
When the wizard opens, it should look like the Screenshot above. GenomeSpace automatically generates an AWS username under a Pending status. You will copy the AWS username to paste when you create the AWS sub-user account. If the creation date and time do not correspond to the current date and time, then it is from a previous session. Delete the account by clicking the red x and click Create another pending account to generate a fresh AWS username.
-
If you encounter errors, go back to sections by clicking on section headers and remove any leading or trailing spaces in the input textboxes and submit again.
-
When creating the custom policy, copy-paste the GenomeSpace provided policy document that is in JSON, a computer language with a lot of whitespace, brackets {, and quotes ". JSON is sensitive to misplaced extra spaces.
-
You will see an AWS credentials verified successfully notification when the connection is successful.
-
Read-only is the default AWS setting for S3 Buckets connected to GenomeSpace even if you select Read and Write permissions from the GenomeSpace wizard. The bucket owner can grant read-and-write permissions under S3 bucket Properties>Permissions>Add CORS Configuration. Copy-paste the following custom script over the sample CORS configuration and save.
<?xml version="1.0" encoding="UTF-8"?>
<CORSConfiguration xmlns="http://s3.amazonaws.com/doc/2006-03-01/">
    <CORSRule>
        <AllowedOrigin>*</AllowedOrigin>
        <AllowedMethod>PUT</AllowedMethod>
        <AllowedMethod>POST</AllowedMethod>
        <AllowedHeader>*</AllowedHeader>
    </CORSRule>
    <CORSRule>
        <AllowedOrigin>*</AllowedOrigin>
        <AllowedMethod>GET</AllowedMethod>
    </CORSRule>
</CORSConfiguration>
Amazon AWS is constantly updating their services. If you find our instructions no longer work, please let us know as soon as possible at gs-help@broadinstitute.org.
|


